Why Recently, I studied a lot of knowledge about the Ethereum ecosystem.scaffold-eth can help most fresh developers begin Ethereum development. However, scaffold-eth has too much magic for me. It hides some basic things. And I want to know the full details.
Learning DApp architecture First thing, we need to study about DApp architecture.
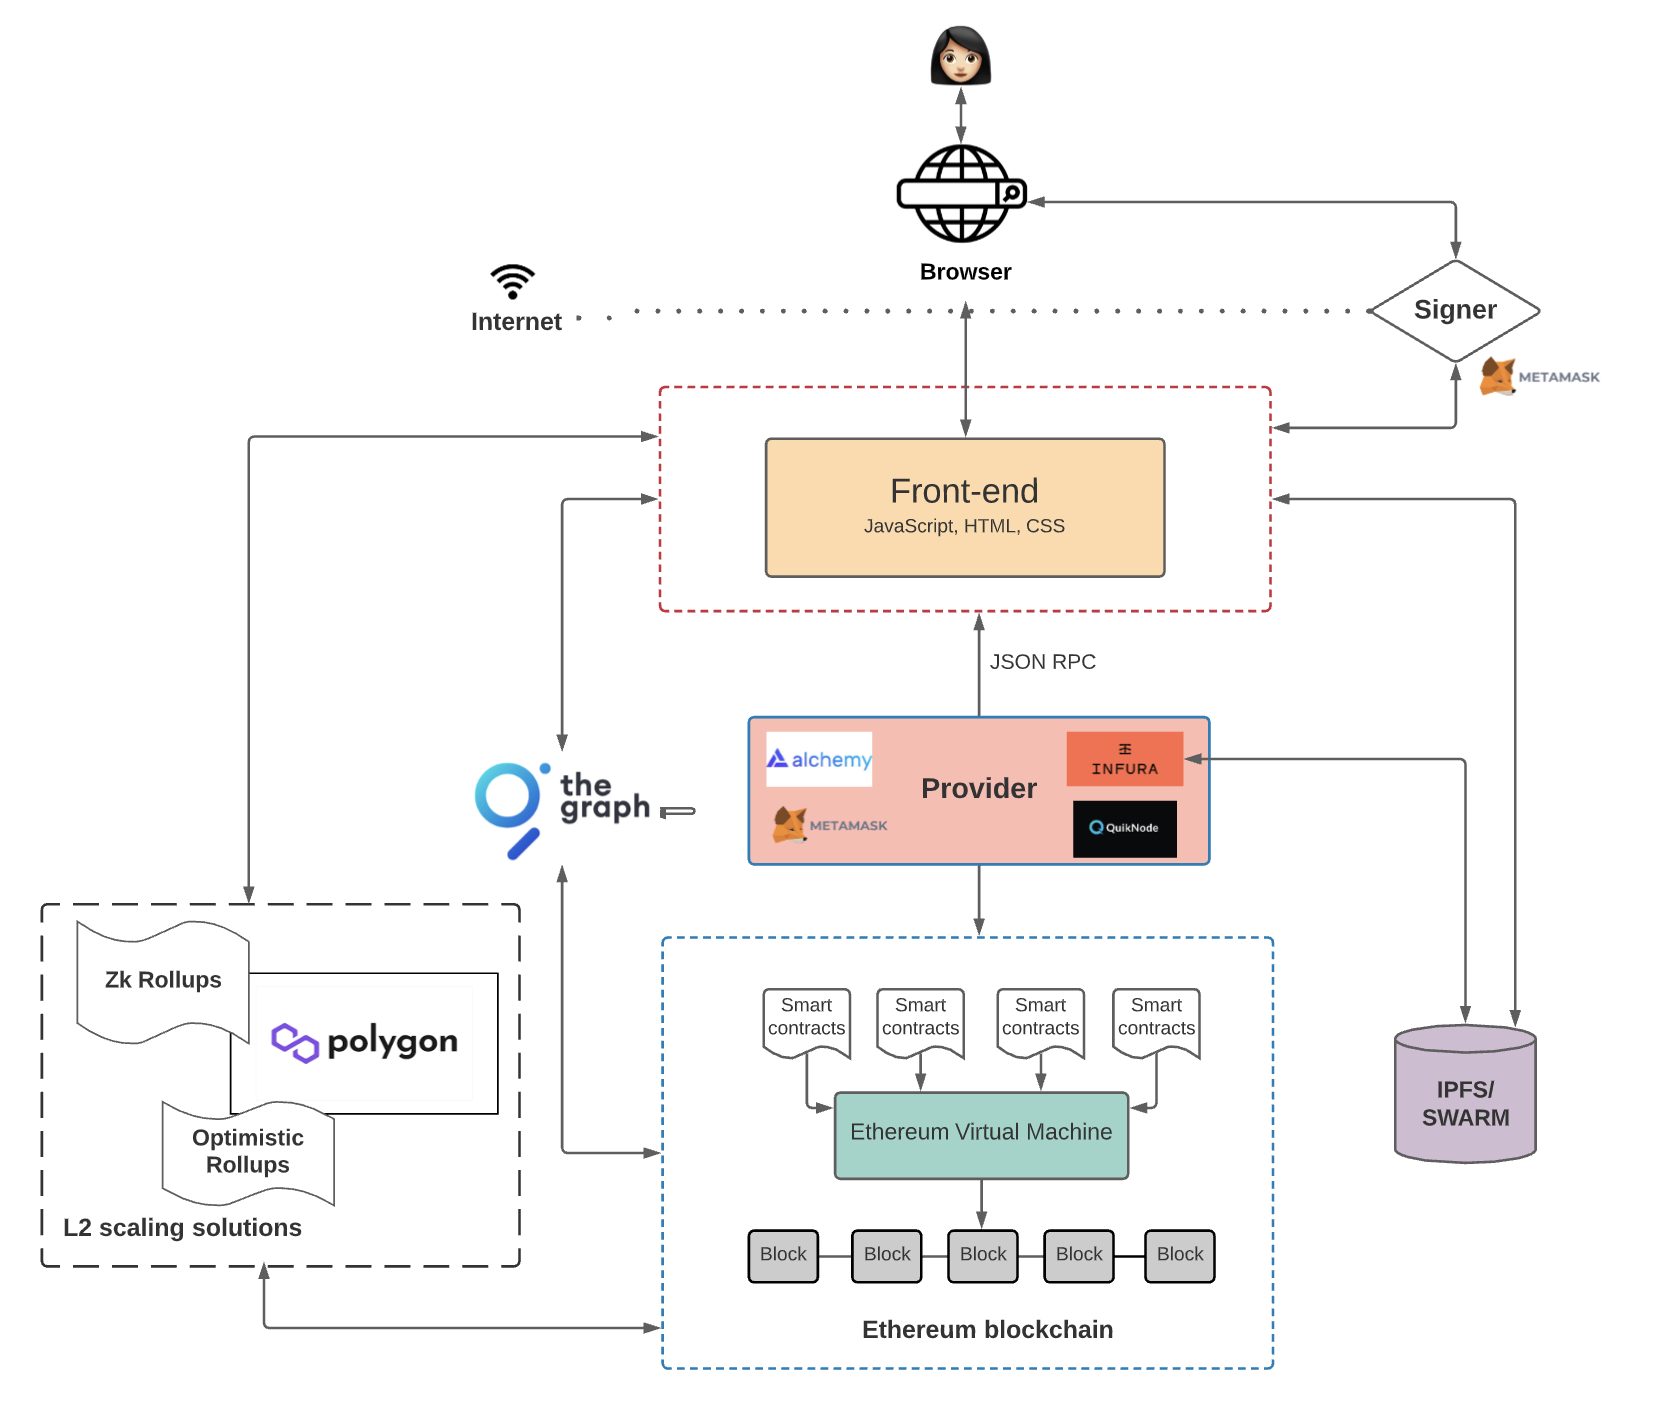
When we have read through this The Architecture of a Web 3.0 application and the knowledge we have so far.
A fully DApp architecture looks like this:
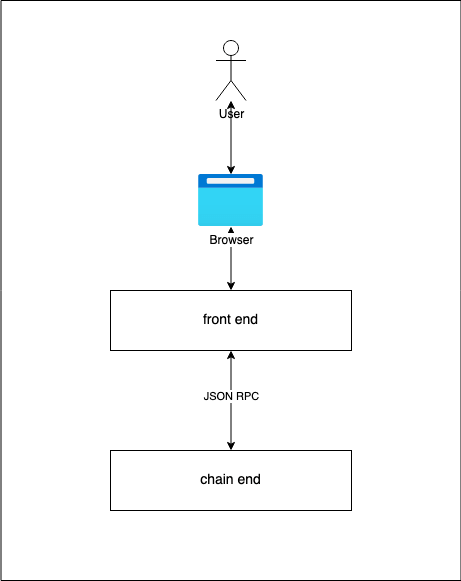
For beginner, I draw the simply DApp architecture
Look at the simply architecture, there are two important questions:
How do browsers and websites interact with each other?
How do websites and blockchains interact with each other?
Simple Answers:
Browser’s wallet extension or Wallet App
JSON RPC
Then, we will explore these two questions carefully when building a minimal DApp.
What are you best to know
Metamask
React
Node
Solidity
Frameworks and technologies In this article, we will use below frameworks and technologies.
Front-end
NextJS Typescript for type safety and cleaner codeTailwind CSS Flowbite
Chain-end
Foundry ganache
Why I chose Foundry instead of Hardhat?
Simple, foundry doesn’t care about any javascript things.
Pure Solidity, we can write unit tests in Solidity.
Why I used ganache and not Anvil?
When I was using anvil as a local chain I encountered the transfer jamming bug.
I like simple things, so ganache has a GUI. It’s even easier for a beginner.
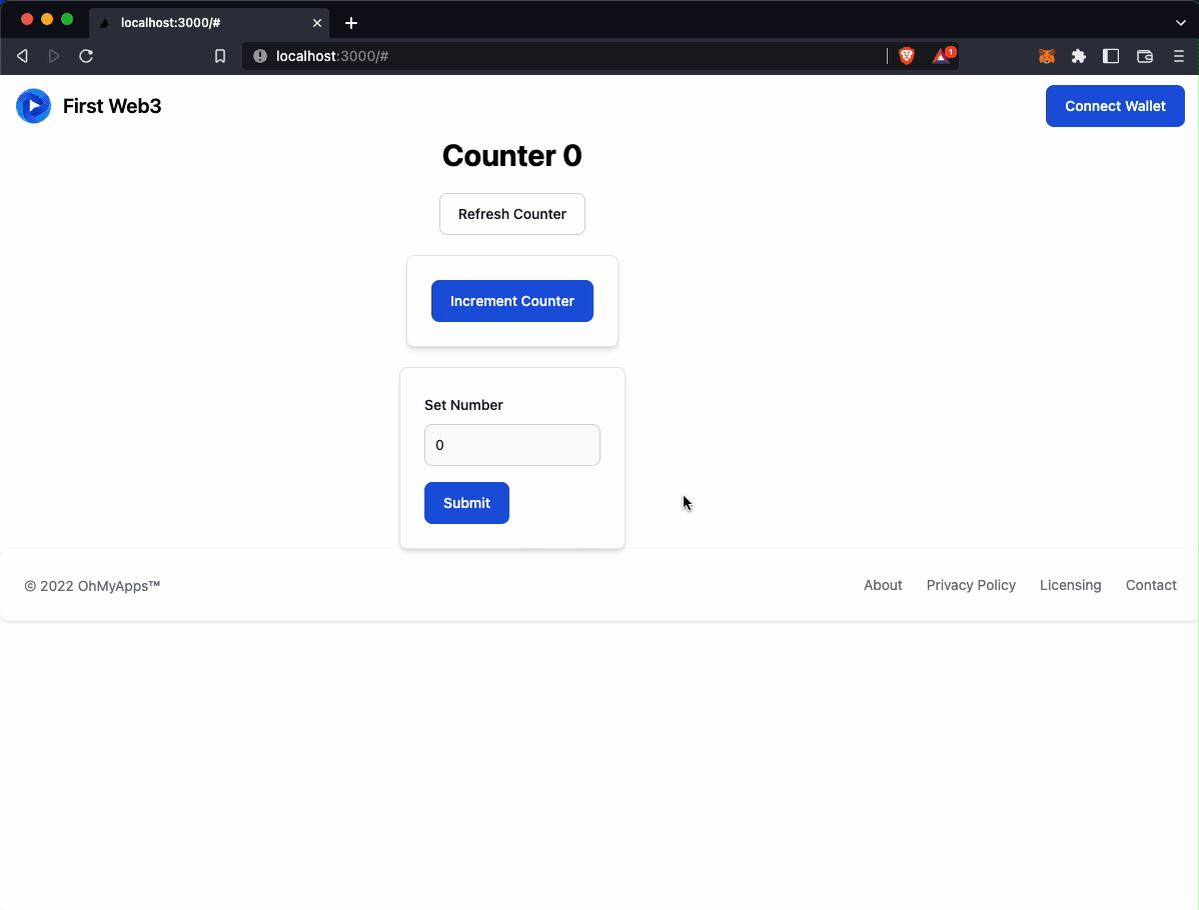
What is a minimal DApp?
We will use the default smart contract when we initiate the chain end project.
We will build simple front end and blockchain interaction logic.
Like this:
Let’s do it.
Create Our Project From Scratch Setting up the workspace I wish I could separate the front-end app and the chain-end app.
Create the project folder, which we call the DApp-Demo
1
2
mkdir DApp-Democd DApp-Demo
Add ./DApp-Demo/.editorconfig file
1
2
3
4
5
6
7
8
9
root = true [*] indent_style = space indent_size = 2 end_of_line = lf charset = utf-8 trim_trailing_whitespace = true insert_final_newline = true
Create chain end application with Foundry Install Foundry
1 curl -L https://foundry.paradigm.xyz | bash
We will use forge to start a new chain-end project.
For now, let’s check what the project layout looks like:
1 2 3 4 5 6 7 8 9 10 tree -L 2 . └── chain_end ├── foundry.toml ├── lib ├── script ├── src └── test 5 directories, 1 file
We will get a sample counter smart contract application.
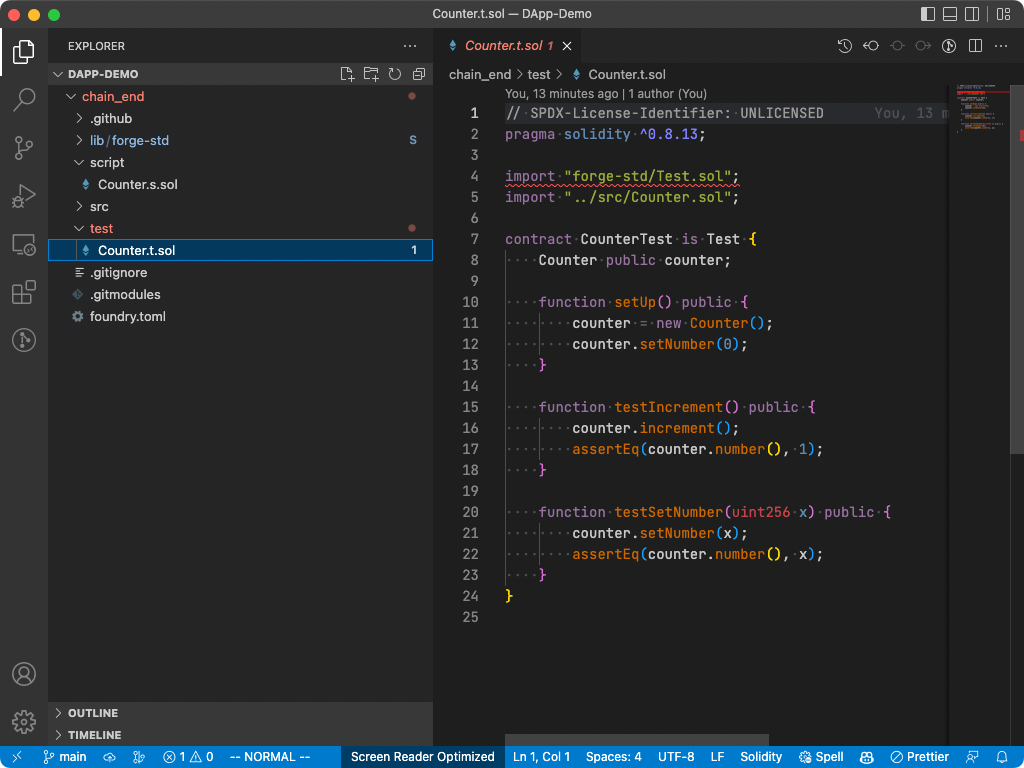
Open ./DApp-Demo/chain_end/src/Counter.sol file.
1 2 3 4 5 6 7 8 9 10 11 12 13 14 // SPDX-License-Identifier: UNLICENSED pragma solidity ^0.8.13; contract Counter { uint256 public number; function setNumber(uint256 newNumber) public { number = newNumber; } function increment() public { number++; } }
Our final task is that our front-end application could call these two functions on a chain.
Tips
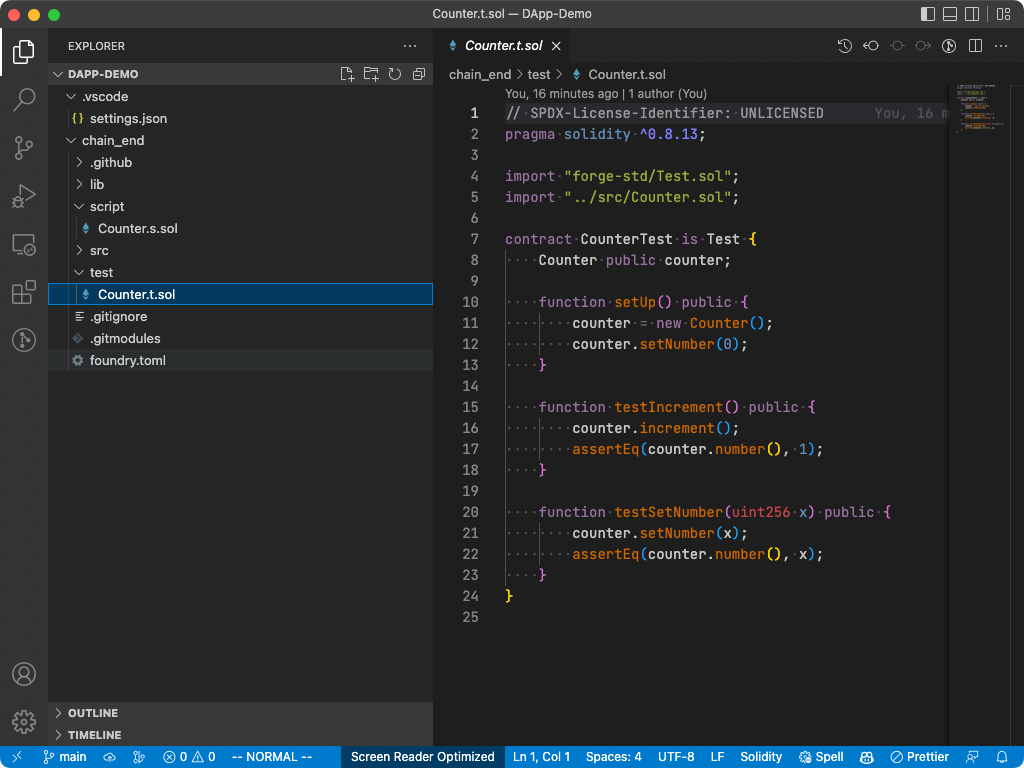
If we use VSCode to open this workspace, we will see solidity code has some warnings. Looks like:
We could add VSCode setting to solve this issue../DApp-Demo/.vscode/settings.json
1 2 3 { "solidity.packageDefaultDependenciesDirectory" : "chain_end/lib" }
Now the VSCode looks good.
Also, we could try forge test command
1 2 3 4 5 6 7 8 9 10 11 forge test [⠢] Compiling... [⠢] Compiling 10 files with 0.8.17 [⠰] Solc 0.8.17 finished in 992.00ms Compiler run successful Running 2 tests for test /Counter.t.sol:CounterTest [PASS] testIncrement() (gas: 28312) [PASS] testSetNumber(uint256) (runs: 256, μ: 27531, ~: 28387) Test result: ok. 2 passed; 0 failed; finished in 6.19ms
For now so far so good.
Create front end application
Initial our front end project with nextjs, typescript and tailwindcss.
1 2 yarn create next-app -e with-tailwindcss front_end
For now, let’s check what the project layout looks like:
1 2 3 4 5 6 7 8 9 10 11 12 13 14 15 16 17 18 19 20 21 22 23 24 25 tree -L 2 . ├── chain_end │ ├── cache │ ├── foundry.toml │ ├── lib │ ├── out │ ├── script │ ├── src │ └── test └── front_end ├── README.md ├── next-env.d.ts ├── next.config.js ├── node_modules ├── package.json ├── pages ├── postcss.config.js ├── public ├── styles ├── tailwind.config.js ├── tsconfig.json └── yarn.lock 12 directories, 9 files
Add front_end/.prettierrc file
1 2 3 4 5 6 { "semi": false, "trailingComma": "all", "singleQuote": true }
Install Flowbite React UI component library
Official Document
Install the flowbite package
1 2 3 cd front_endyarn add flowbite flowbite-react
Update tailwind.config.js
1 2 3 4 5 6 7 8 9 10 11 12 /** @type {import('tailwindcss' ).Config} */ module.exports = { content: [ './node_modules/flowbite-react/**/*.js' , './pages/**/*.{js,ts,jsx,tsx}' , './components/**/*.{js,ts,jsx,tsx}' , ], theme: { extend: {}, }, plugins: [require('flowbite/plugin' )], }
Here, we completed the front-end application set up.
Initial Git We want to use git to manage our code.forge and yarn to create projects. These two projects chain_end and front_end already have .git folders..git folders, Second, we initial the new git history.
1 2 3 4 5 6 rm -rf chain_end/.gitrm -rf front_end/.gitgit init git add . git commit -m "init project"
Setting up the local chain for development Usually, We have three choose to run a chain on localhost.
HardHat - HardHat Network
Truffle - ganahce
Foundry - anvil
Generally, we should have chosen anvil. It’s a part of Foundry.npm install).ganahce to run chain on localhost.
The ganahce is very easy to install and setting up. It’s a GUI application.
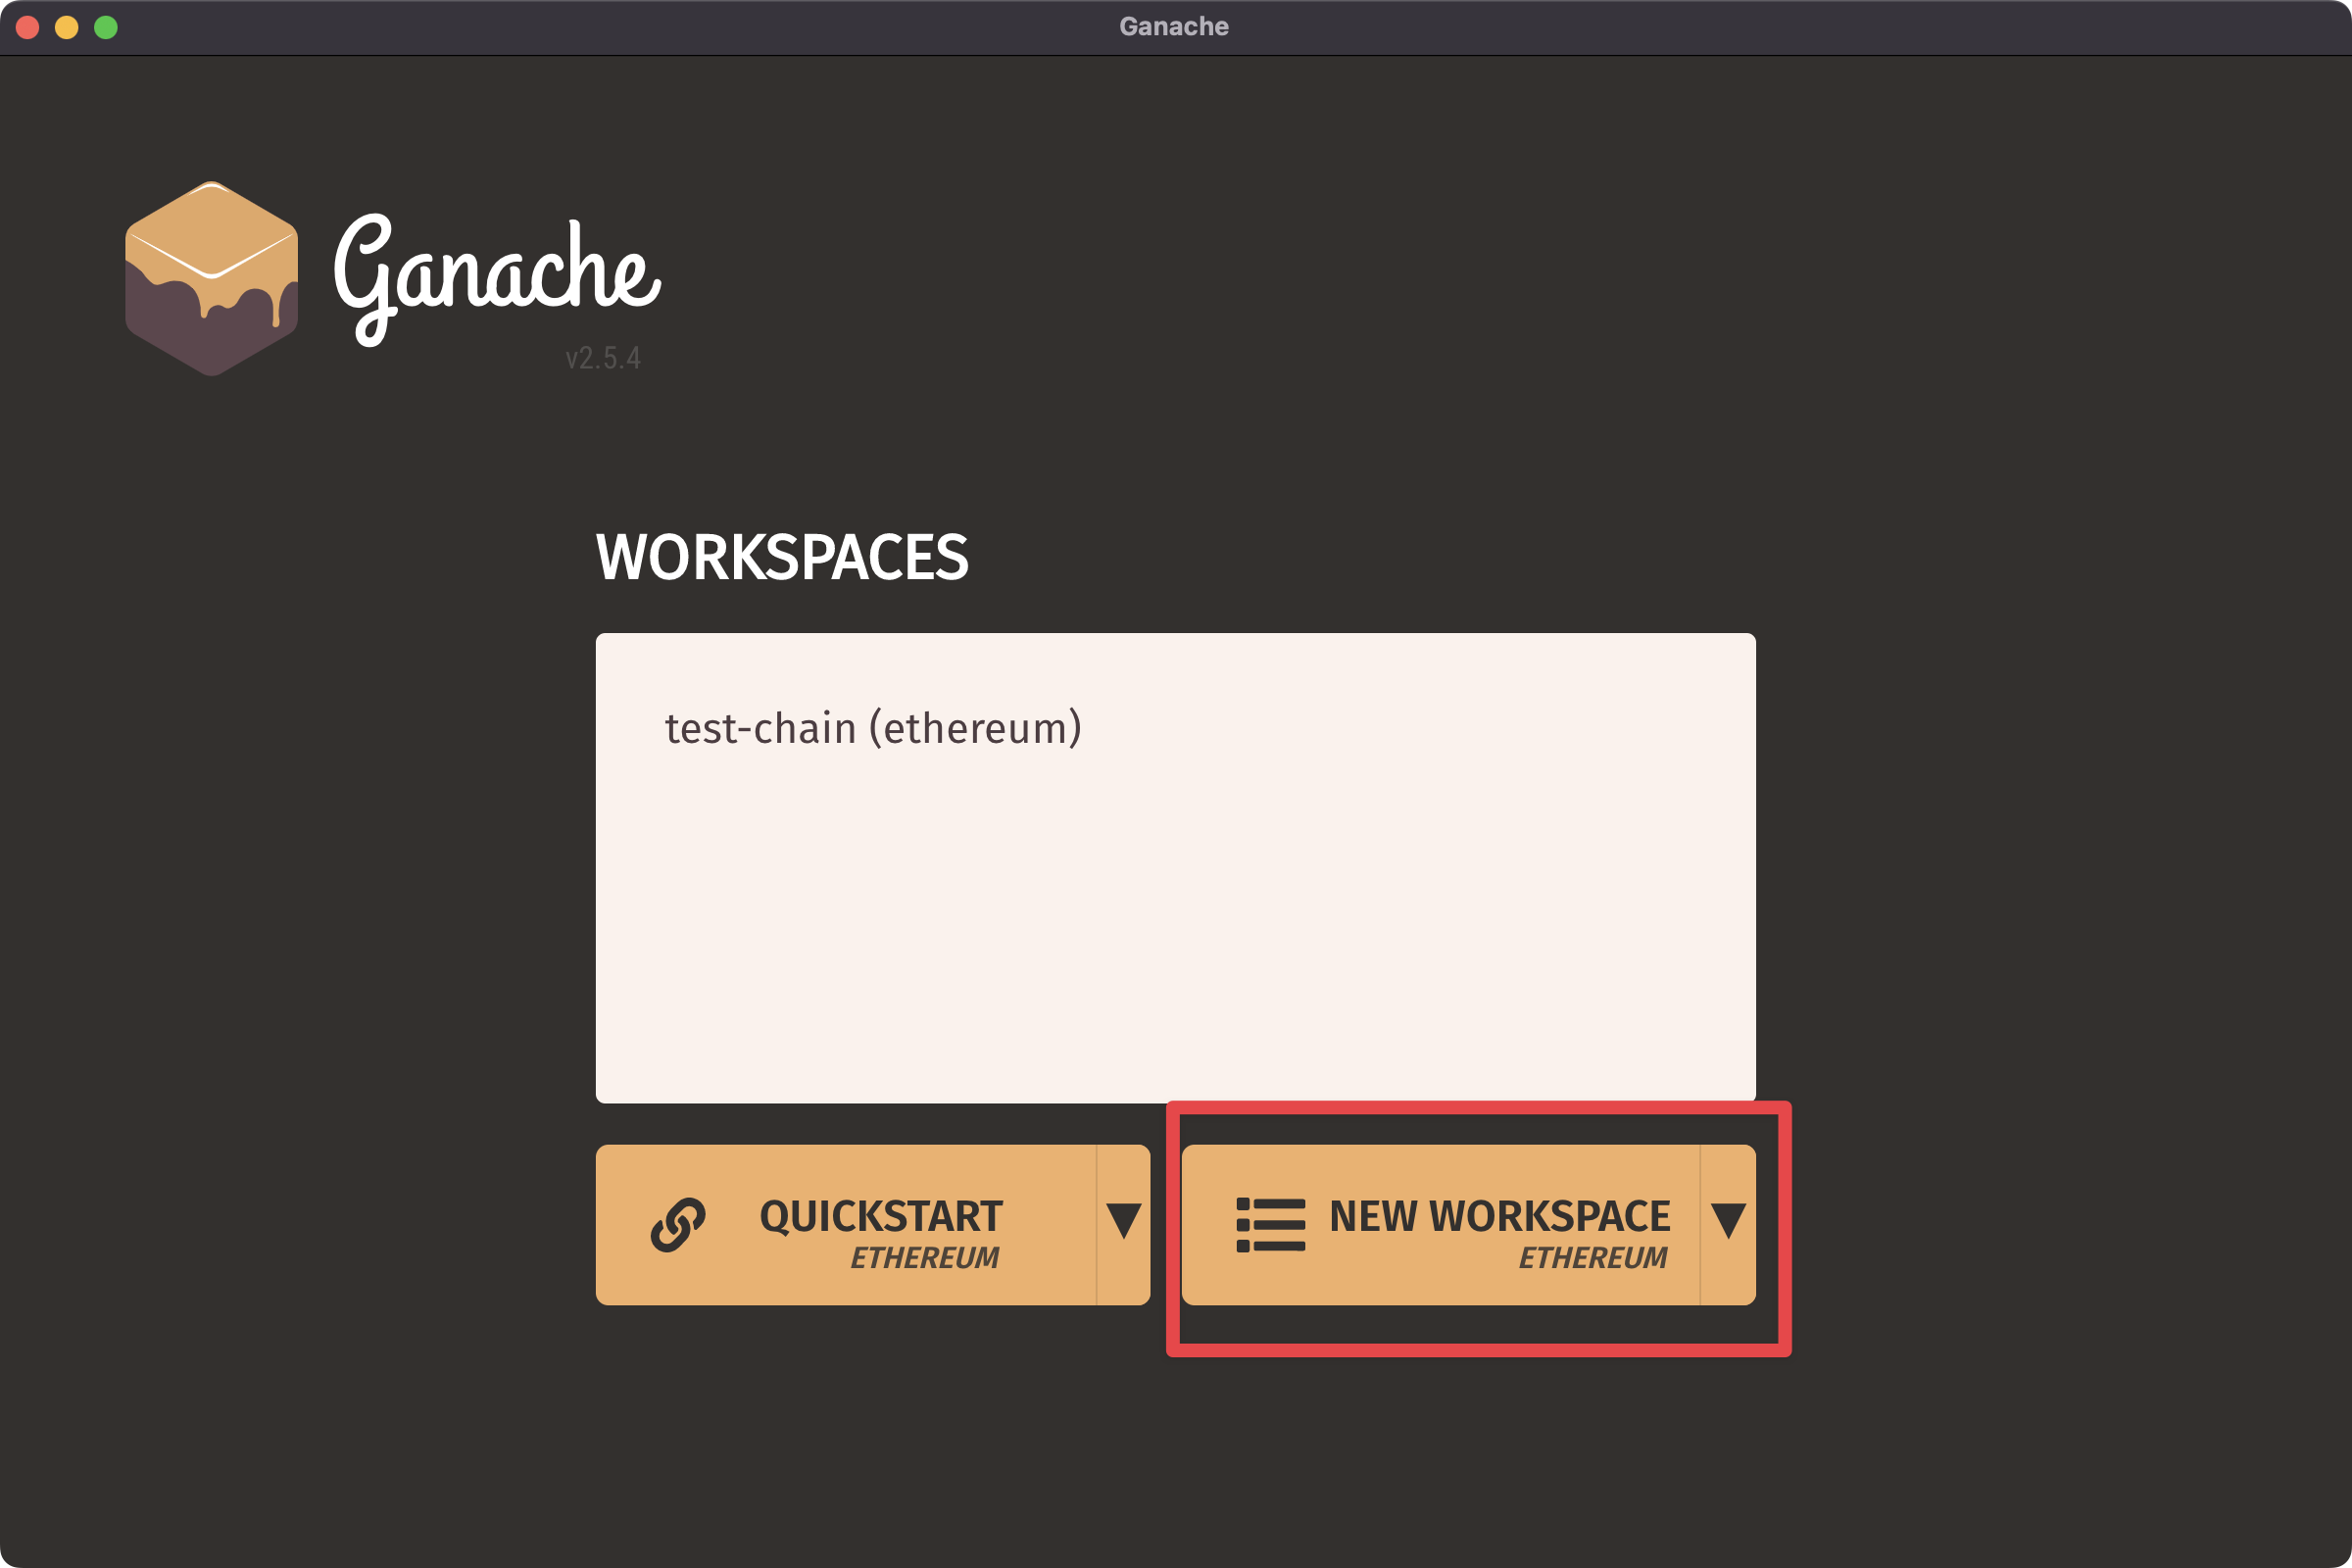
How to use the ganchce First, Install ganahce .
Open ganahce official website Download it and install it.
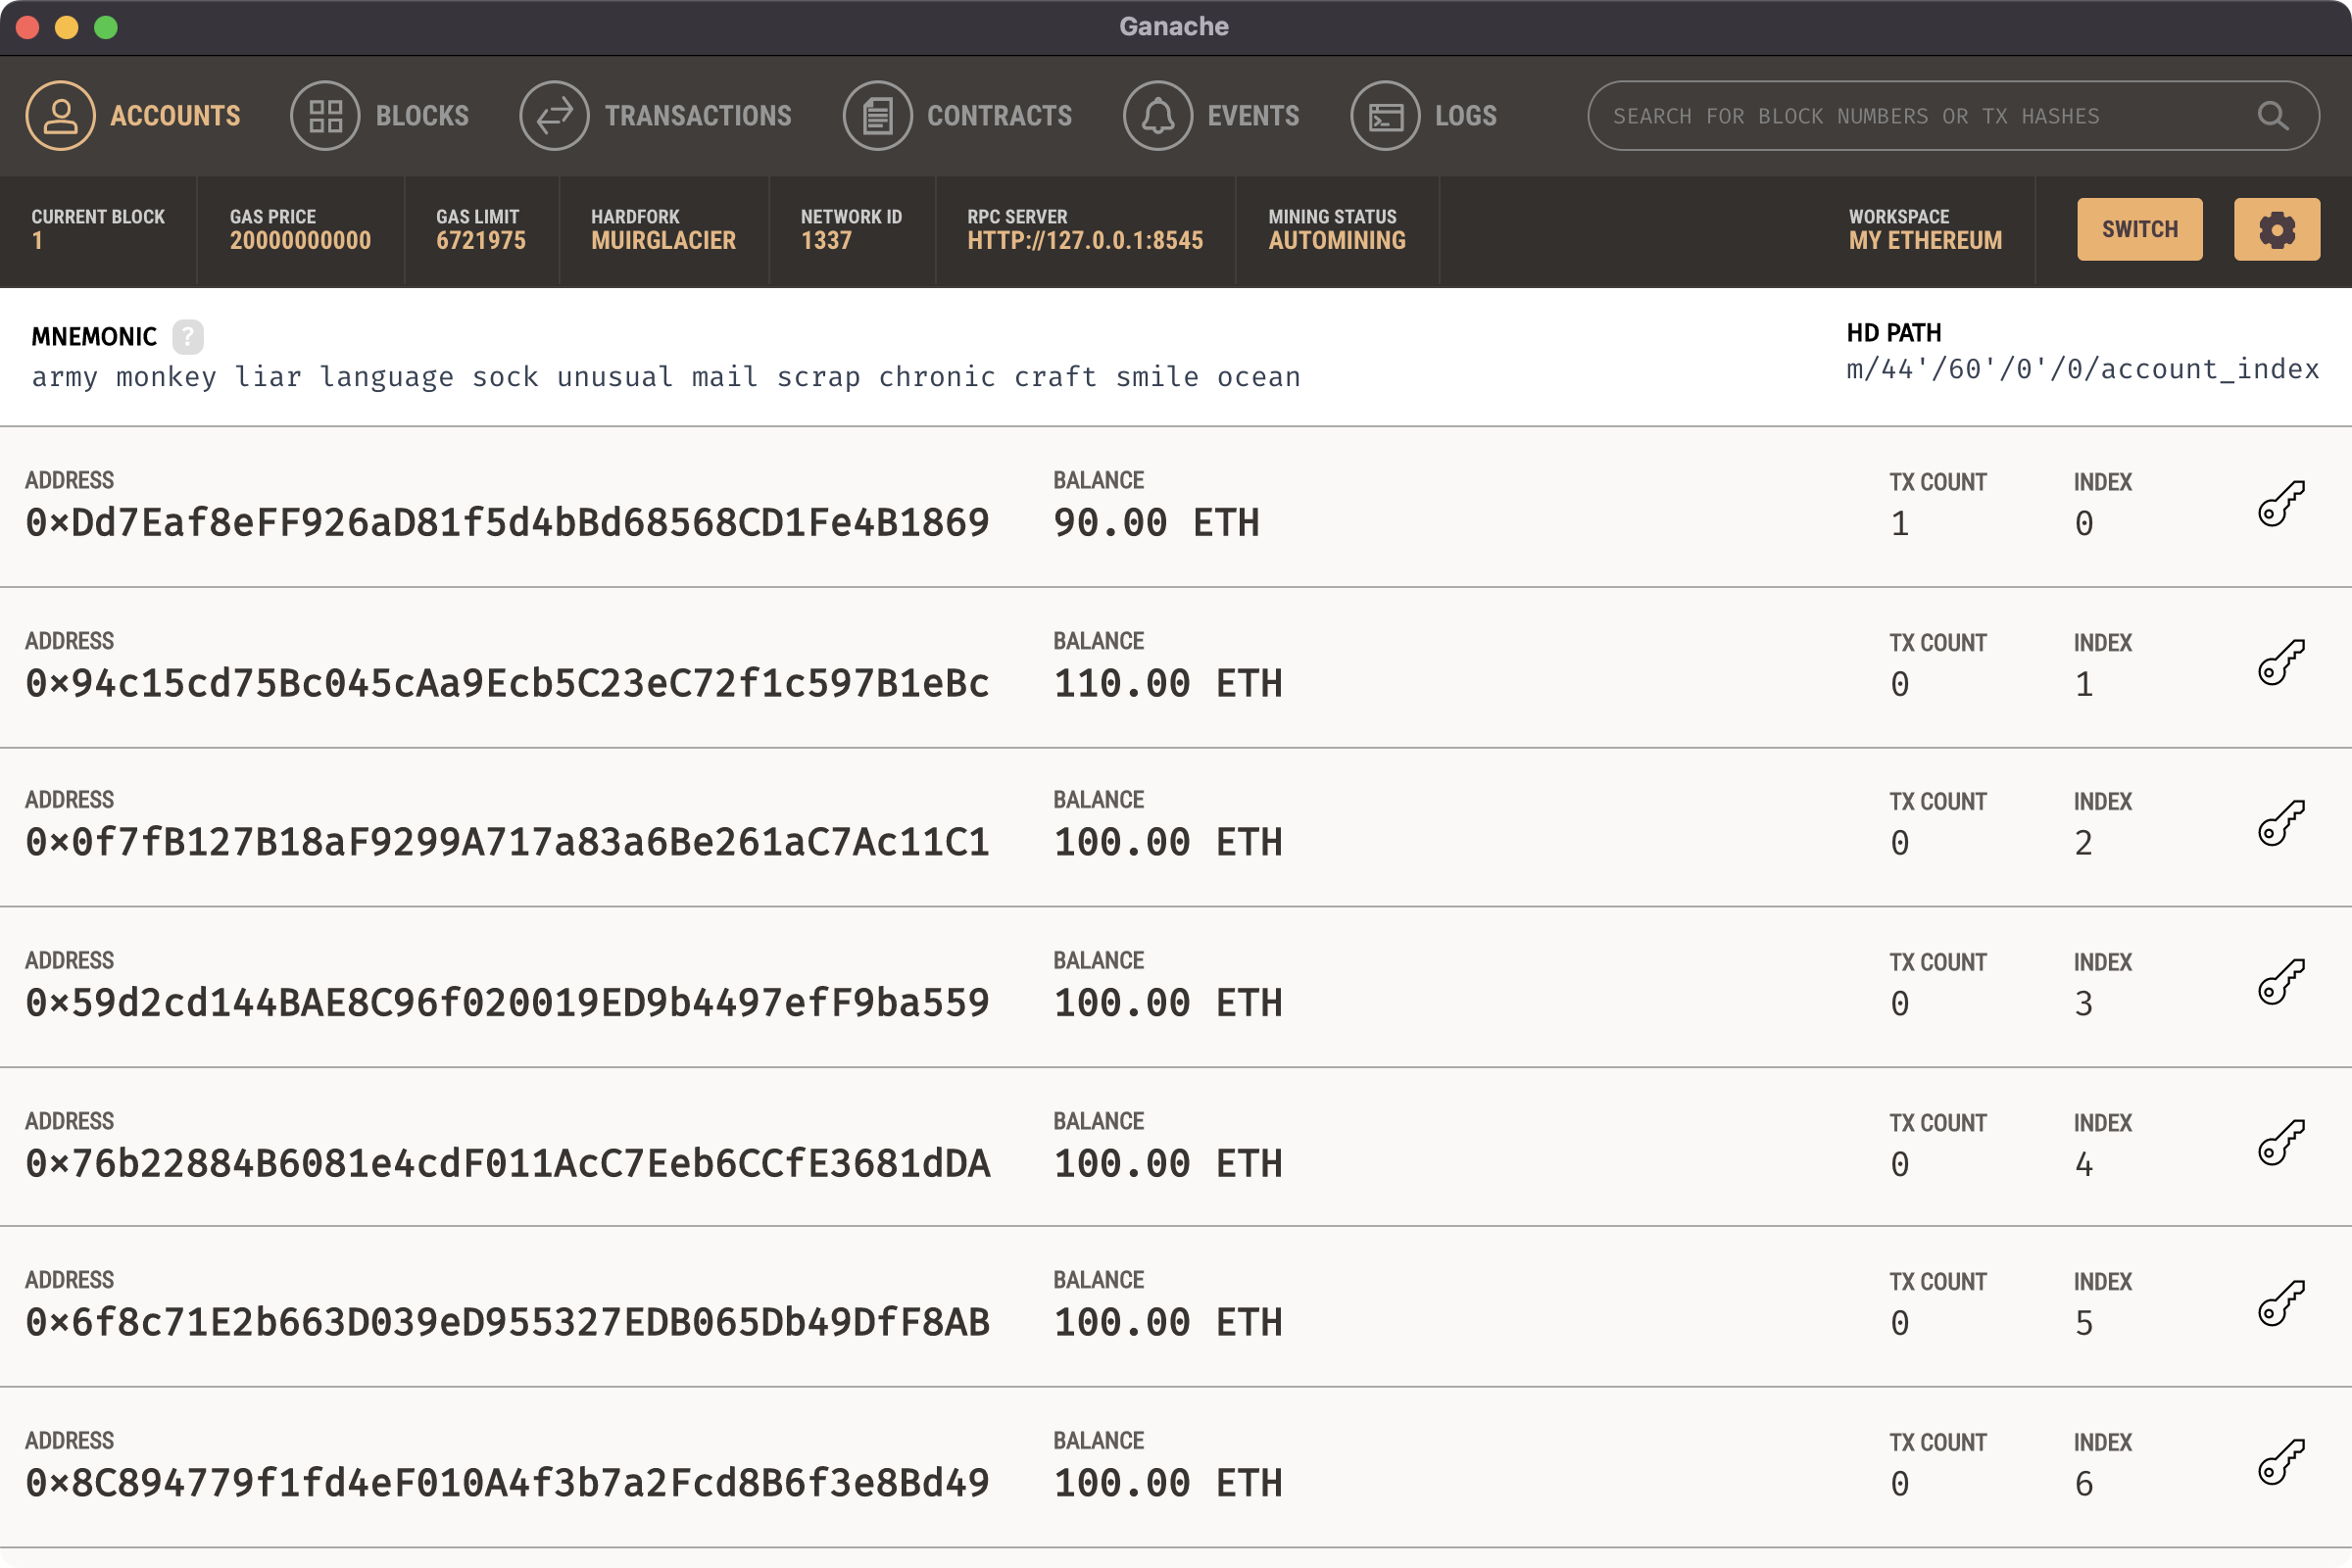
Create an new workspace
Choose ‘ETHEREUM’ and click the button.
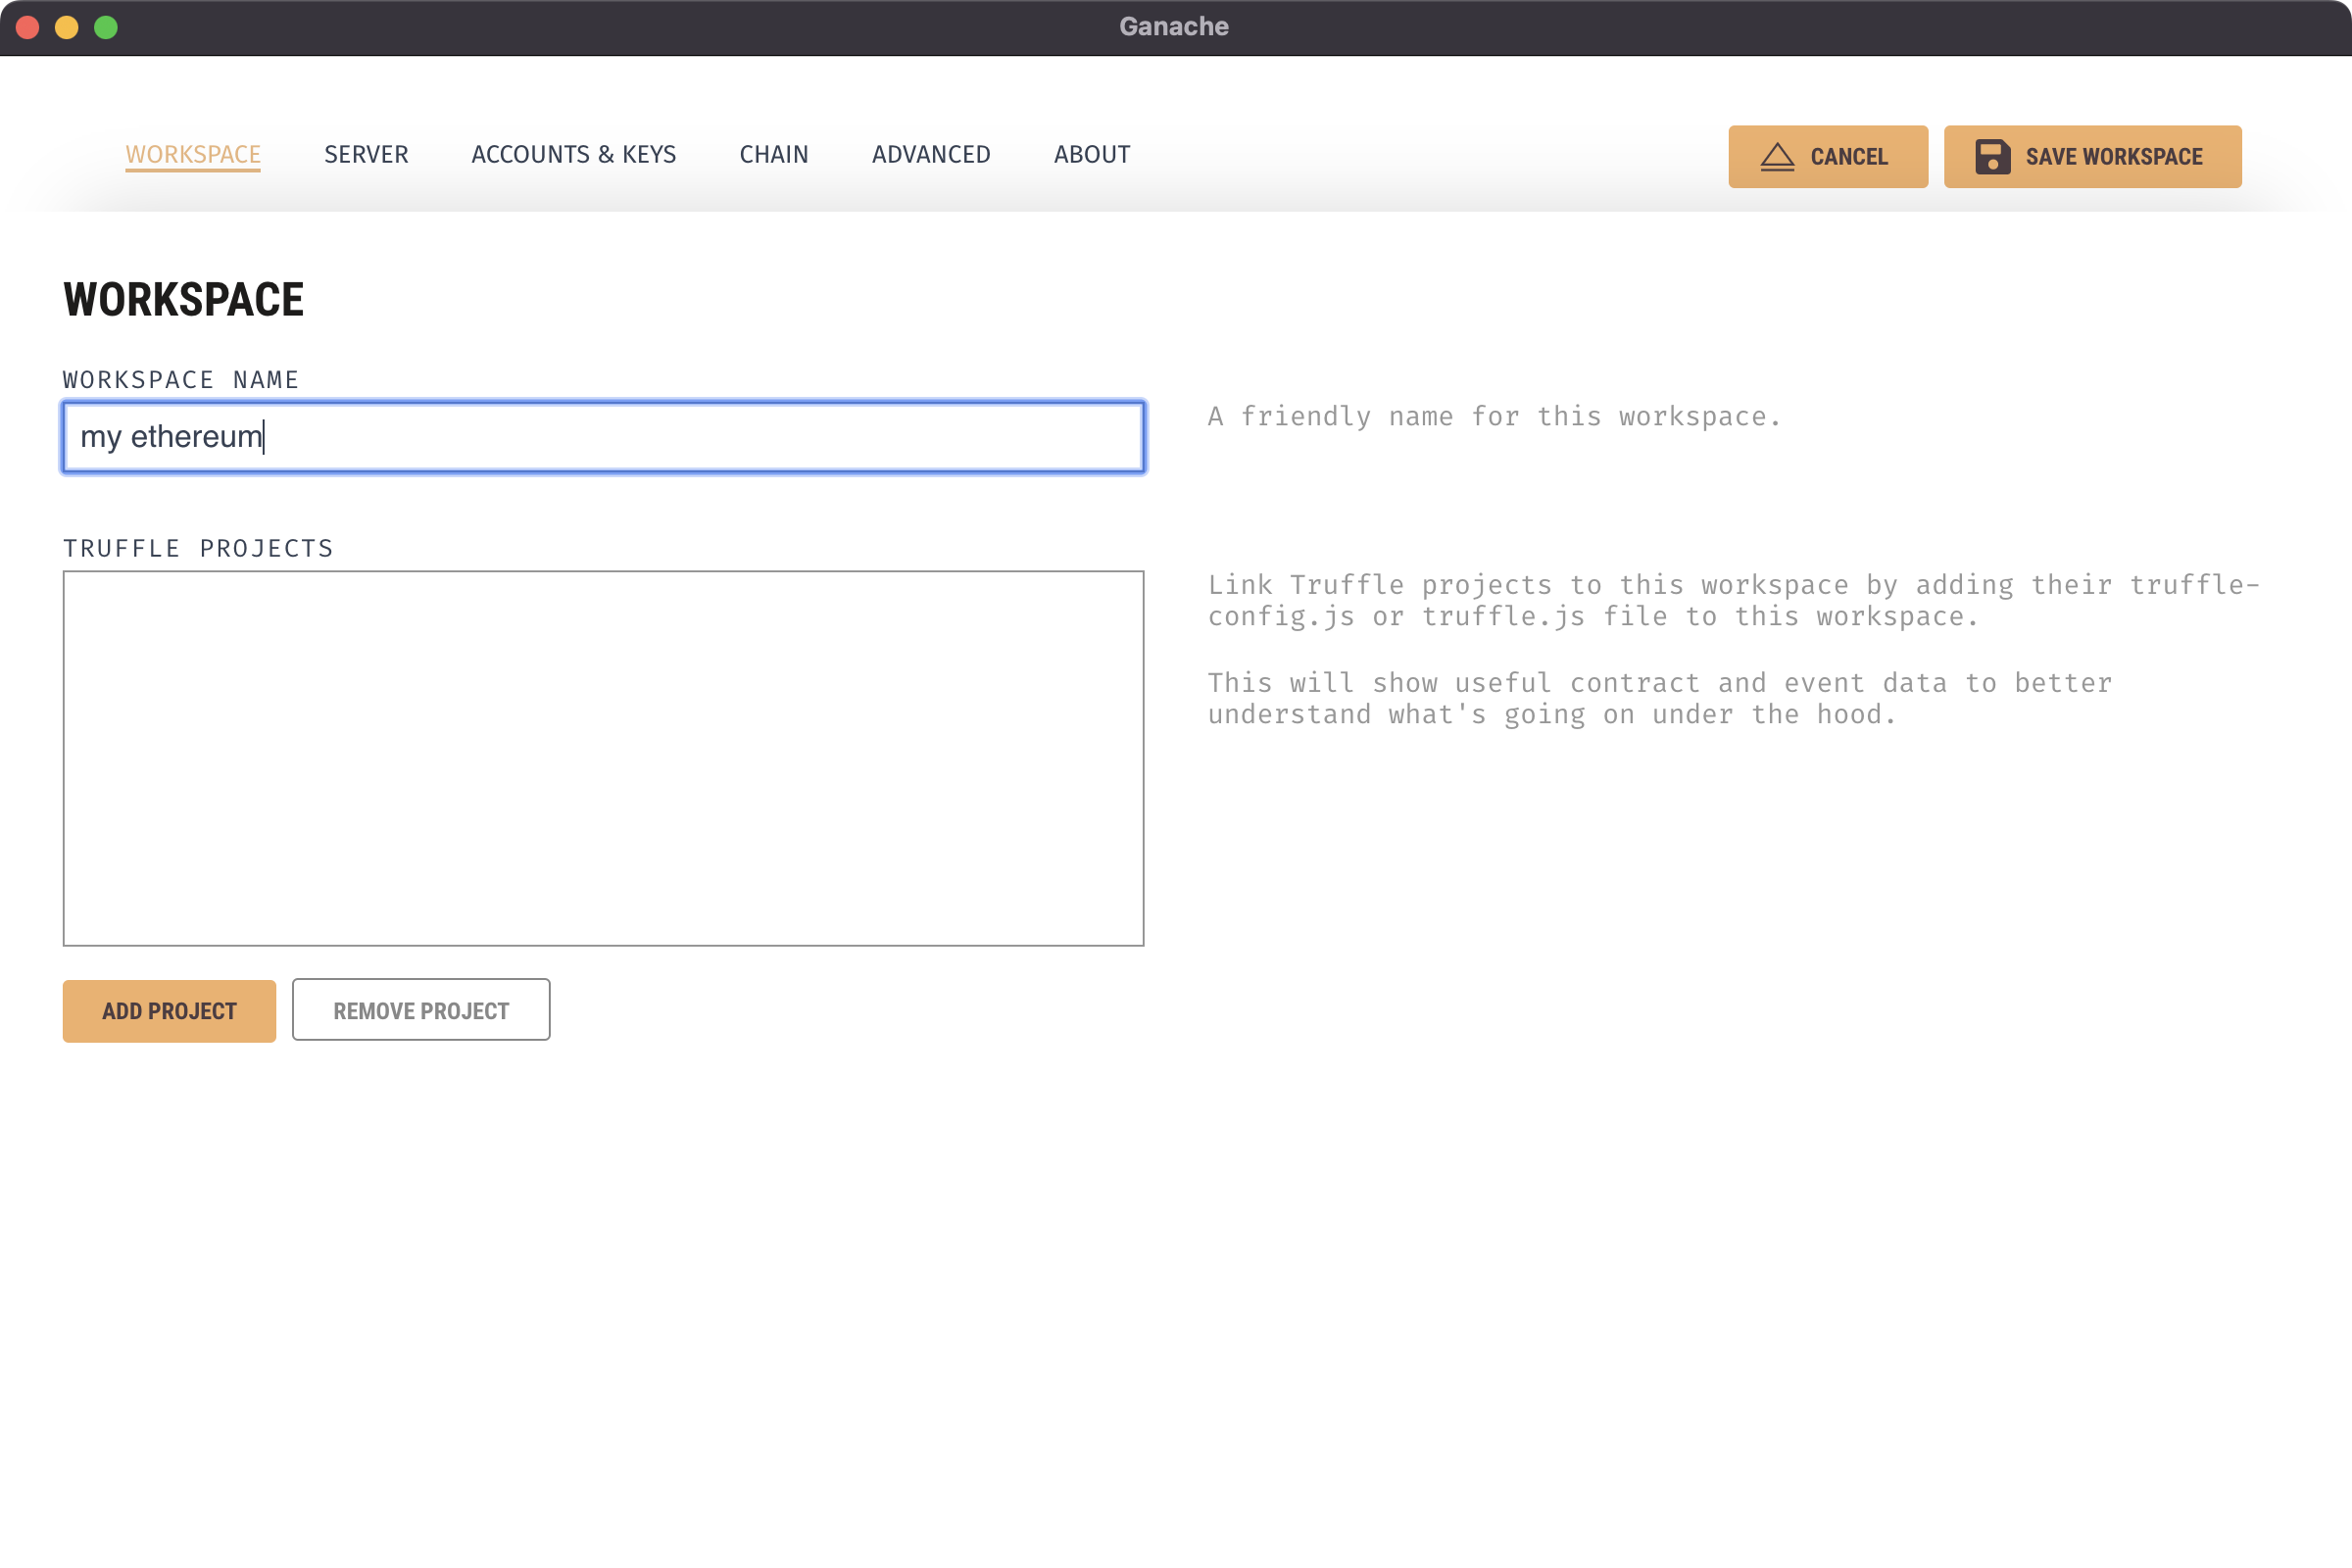
Rename the workspace name
We can modify it to any name we like.my ethereum
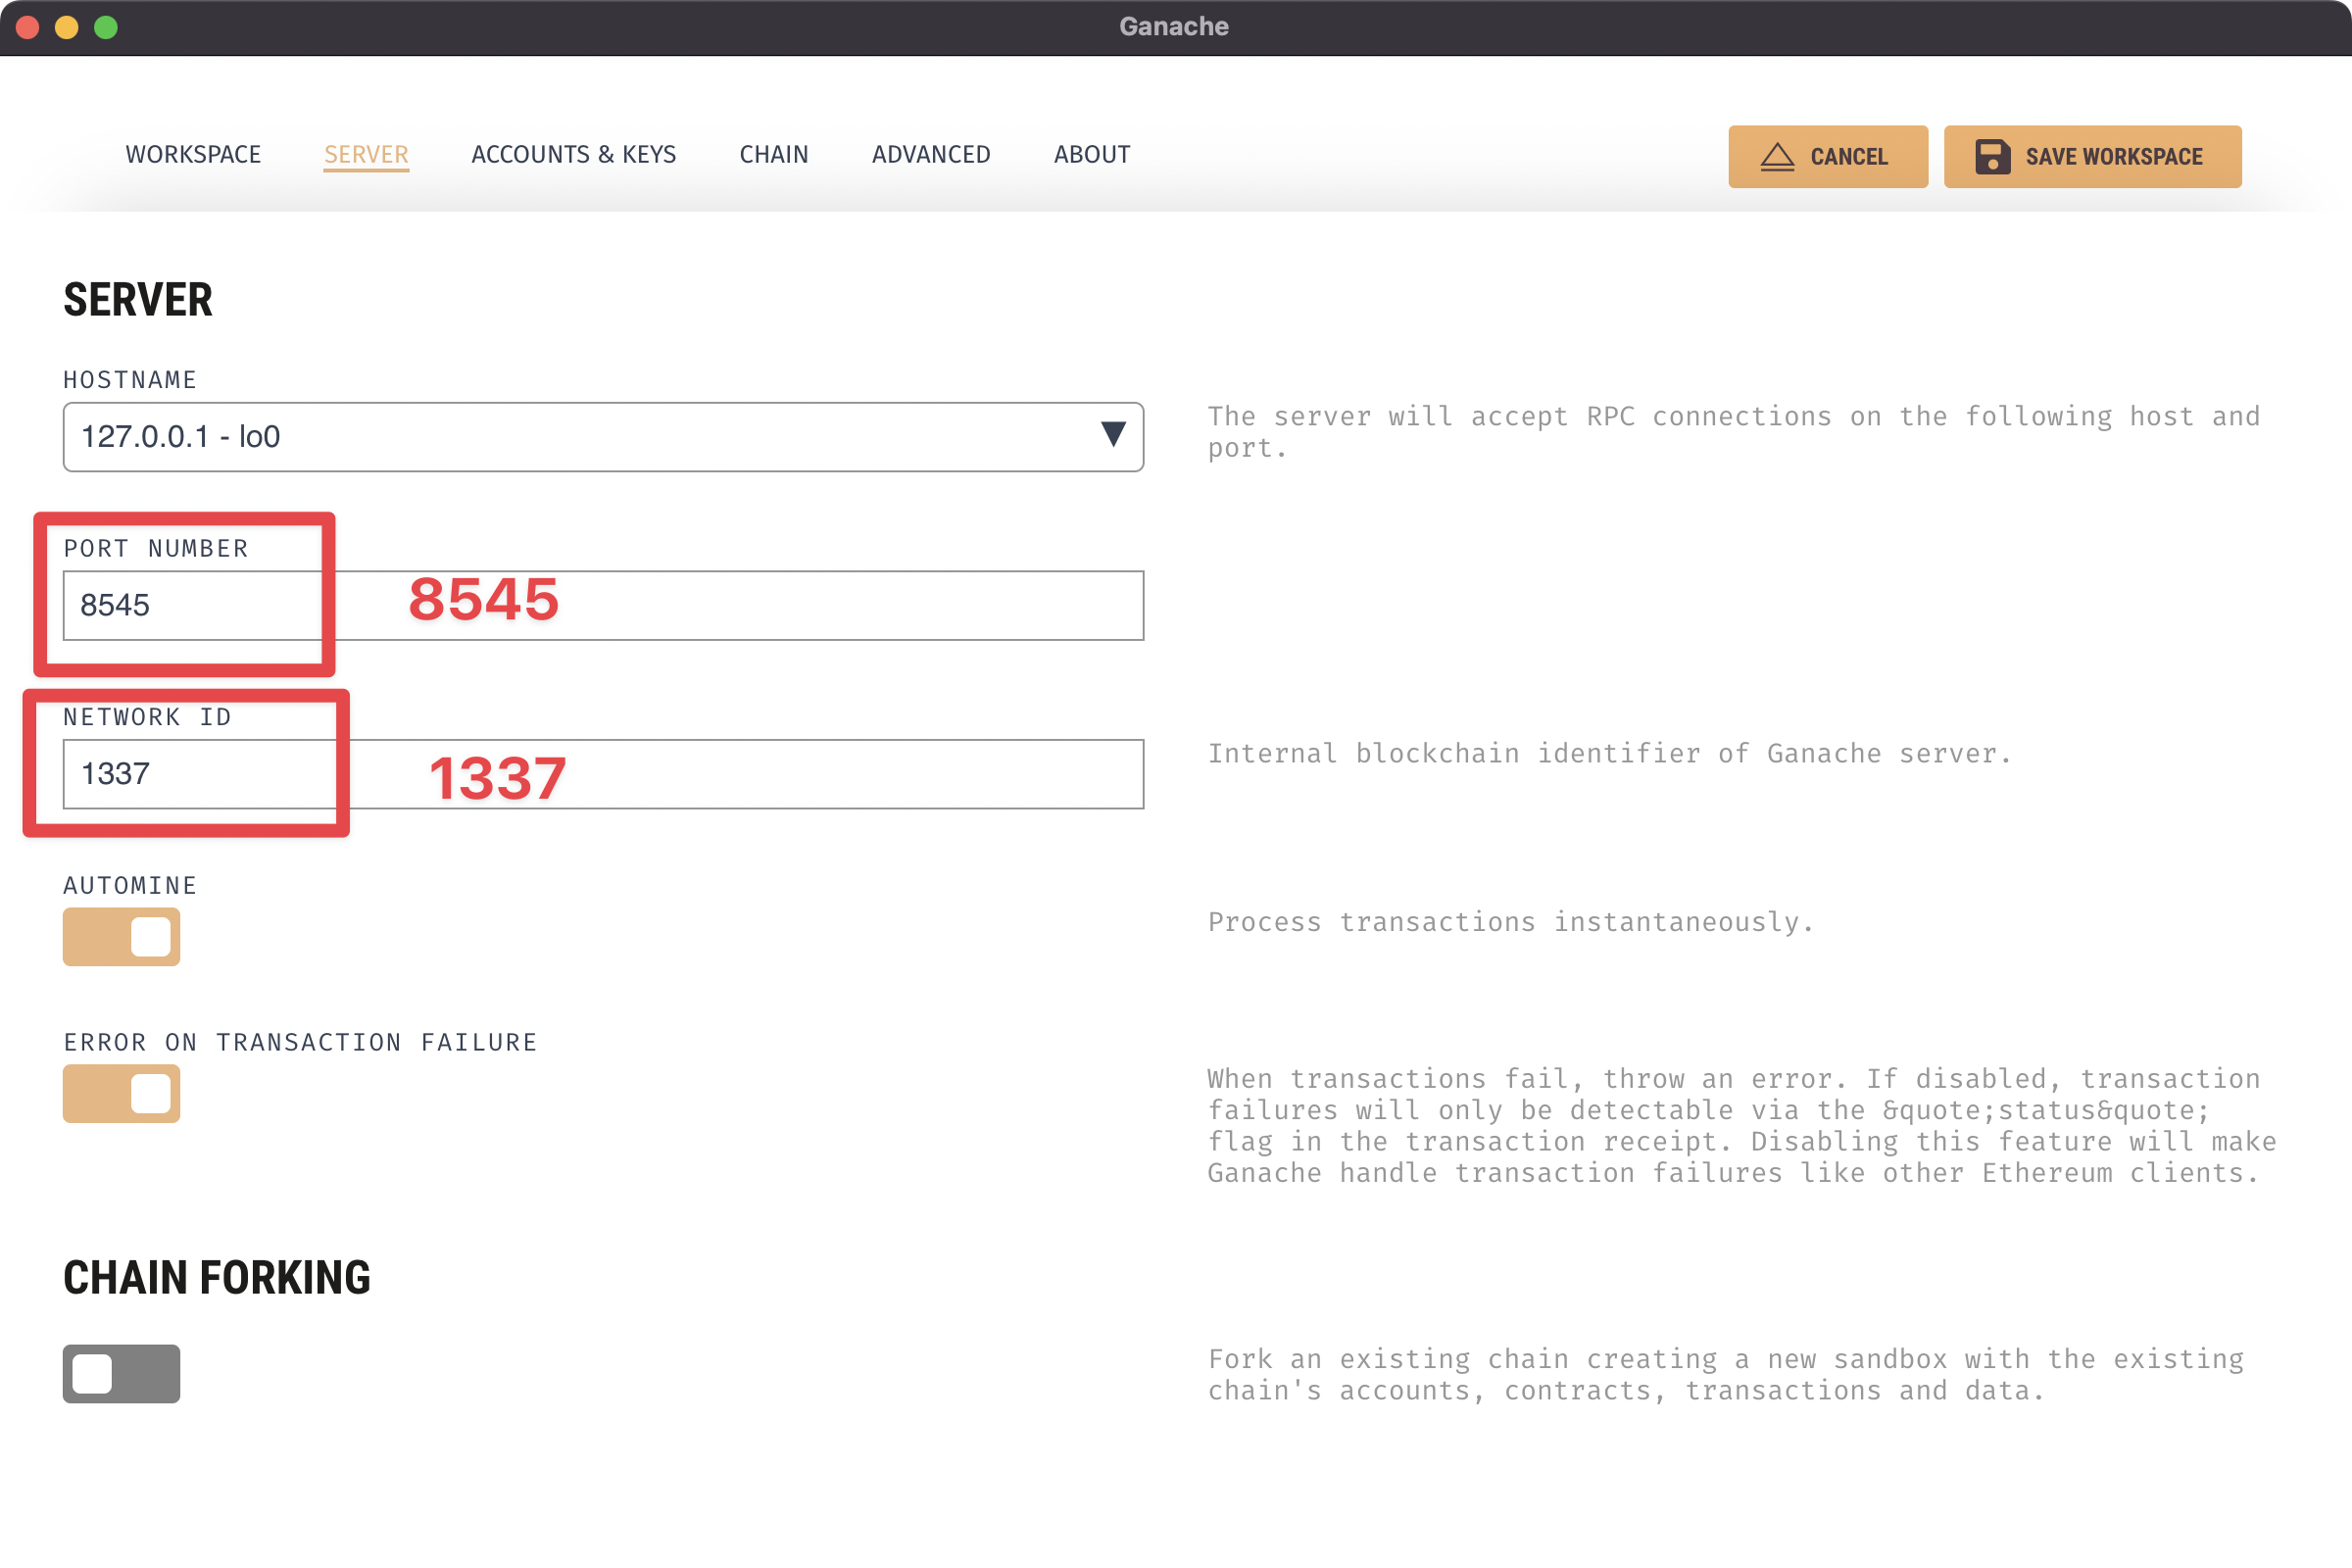
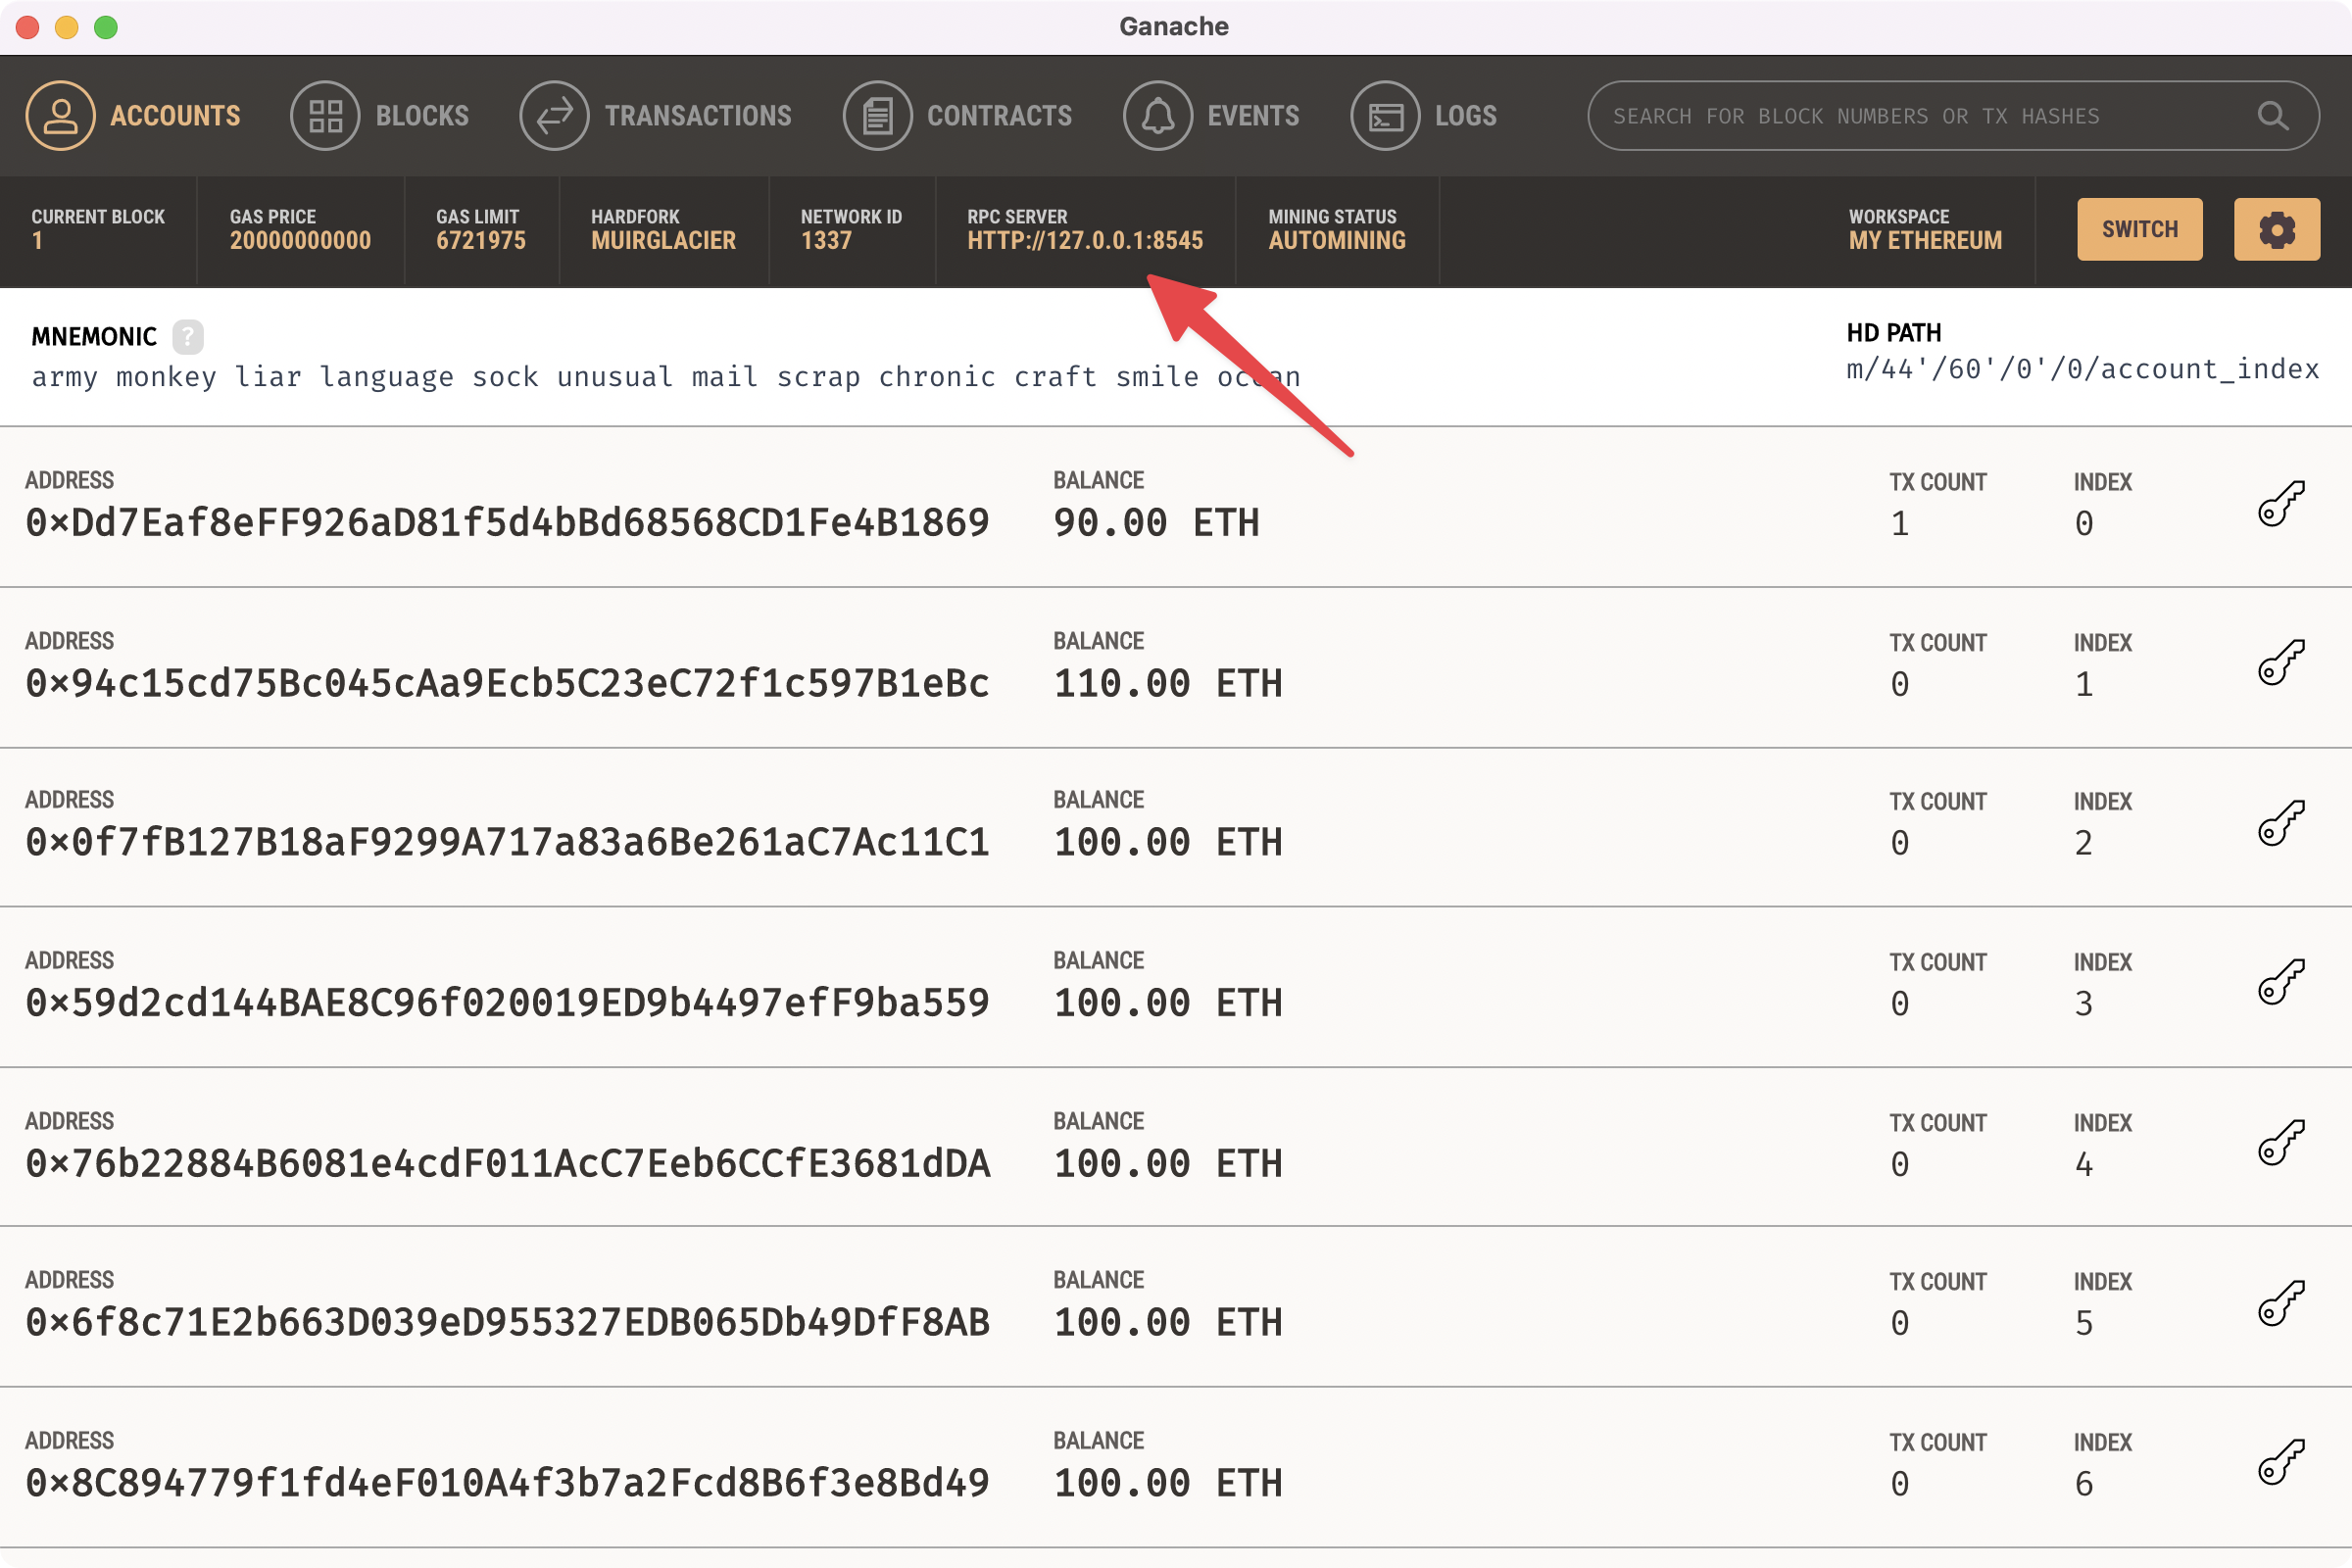
Update the server’s port and network id
The PORT NUMBER is 8545.1337.
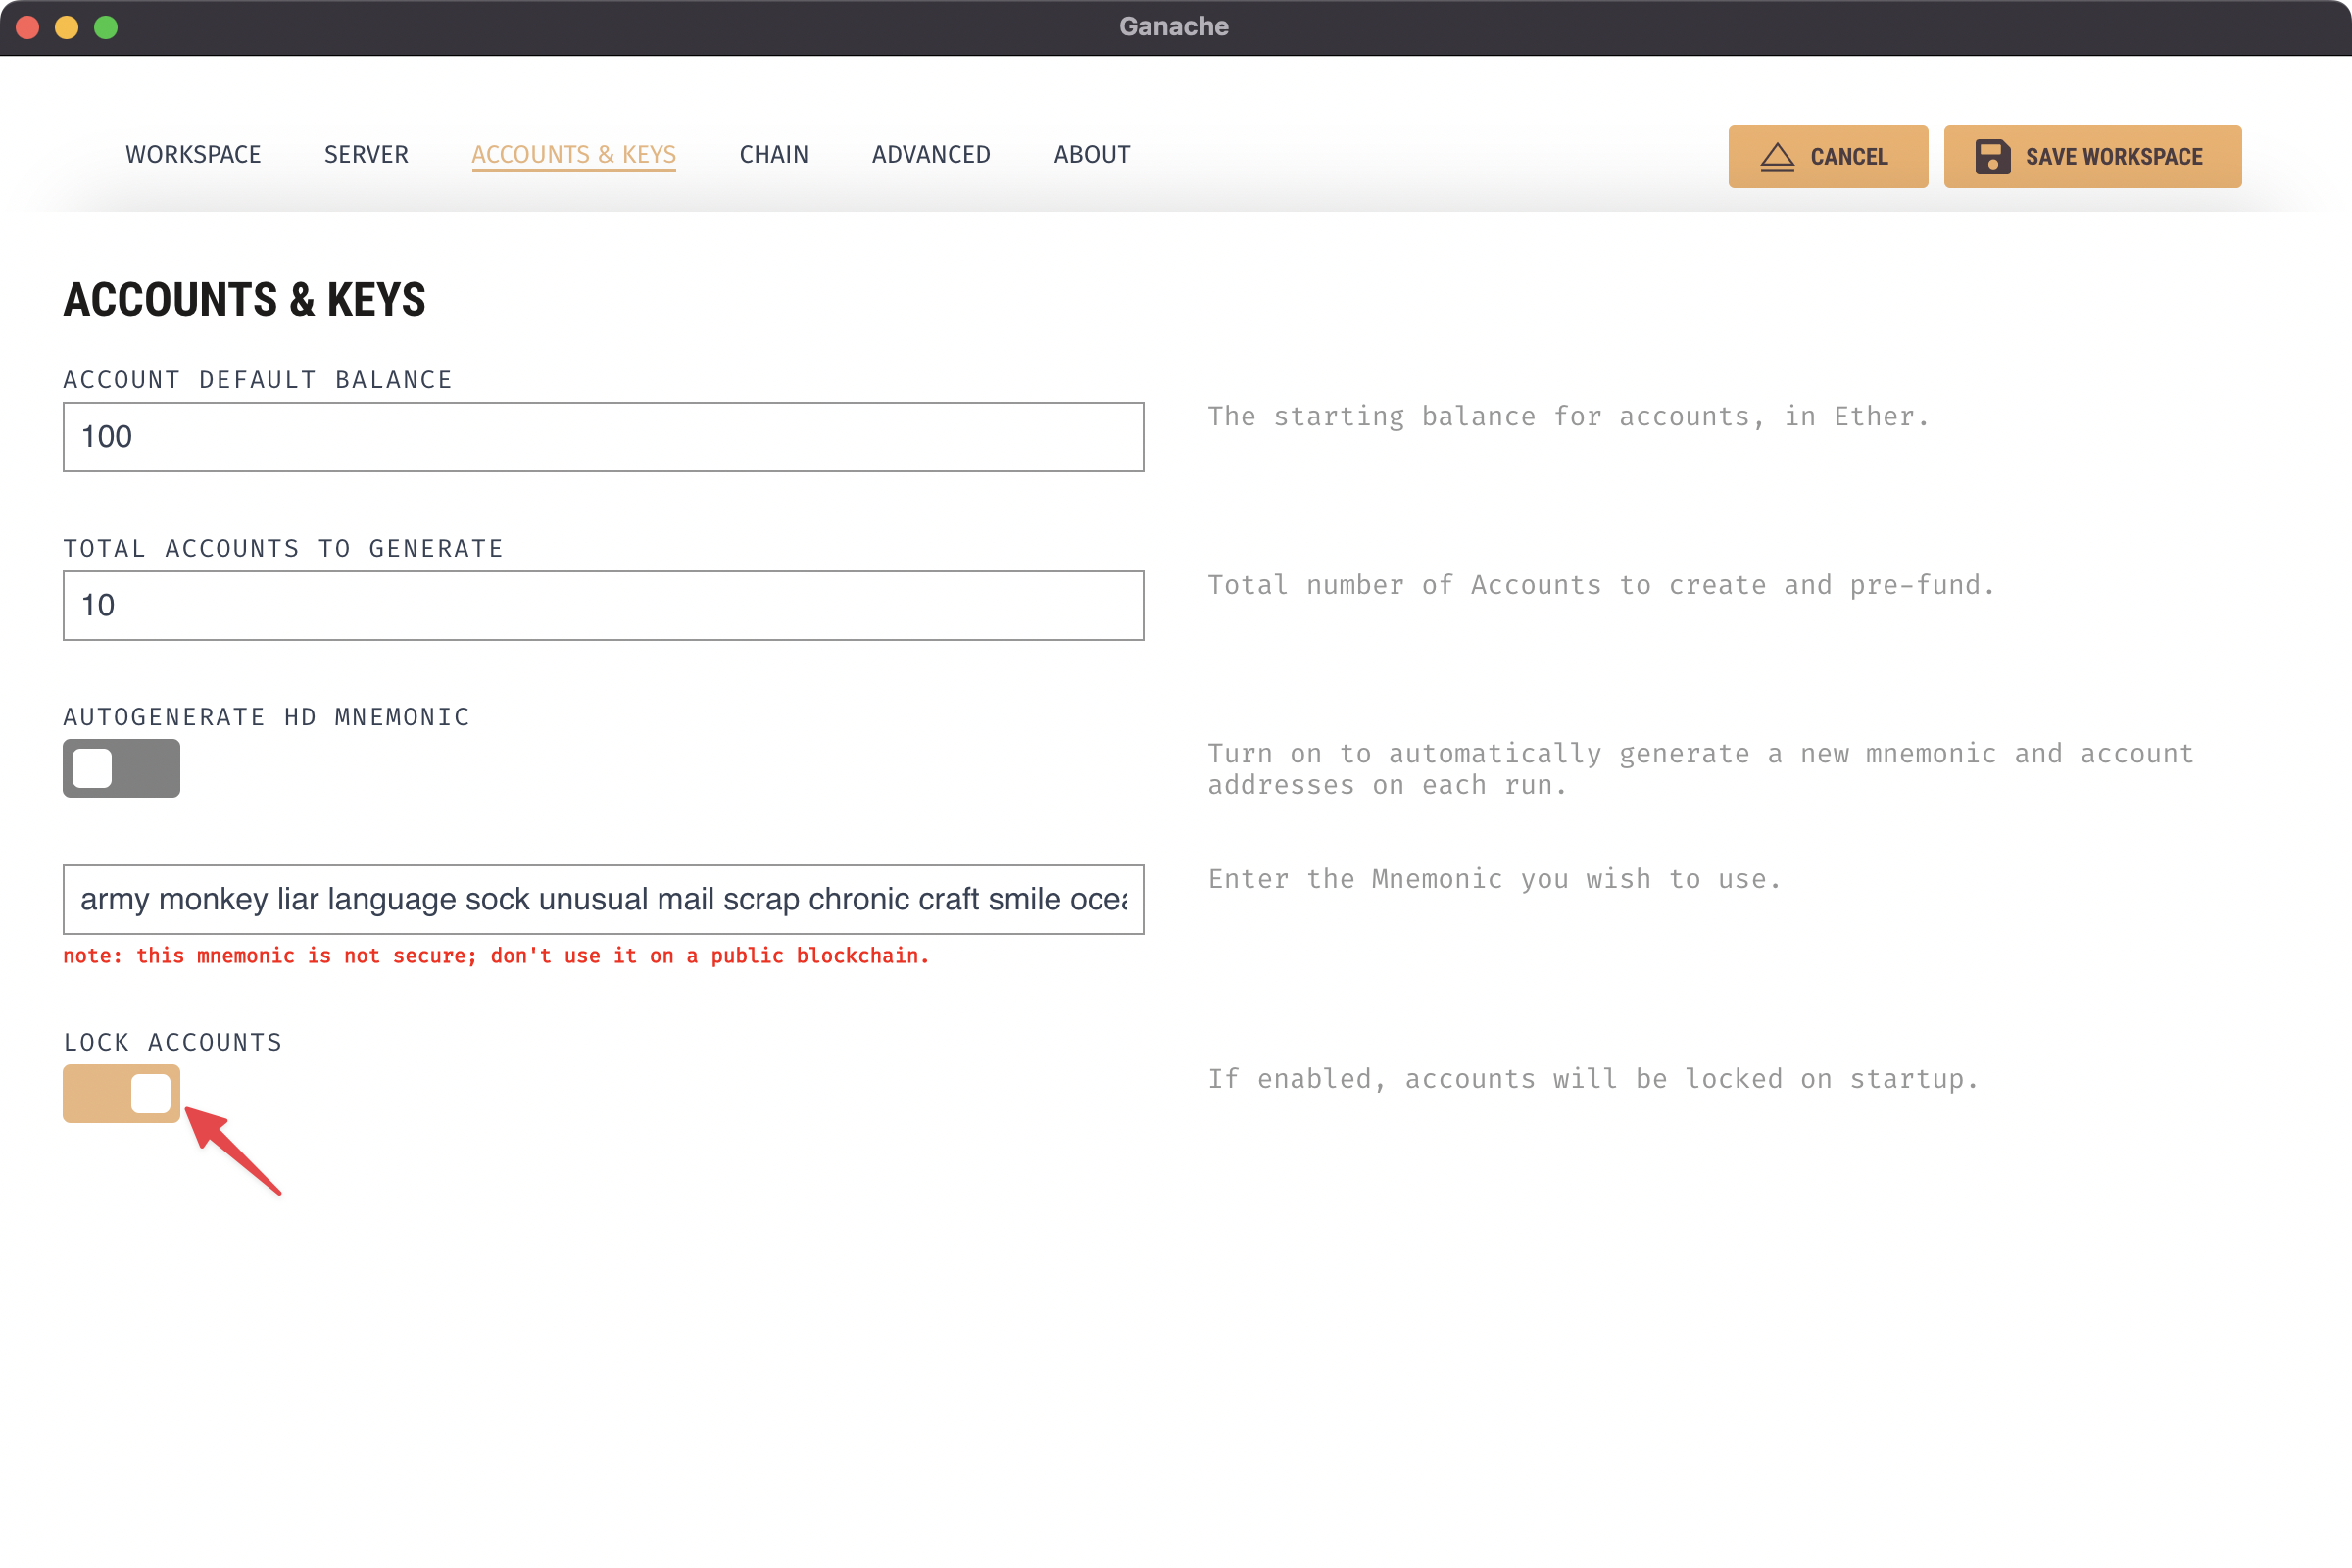
Open Lock Accounts
We don’t like the account always to change.
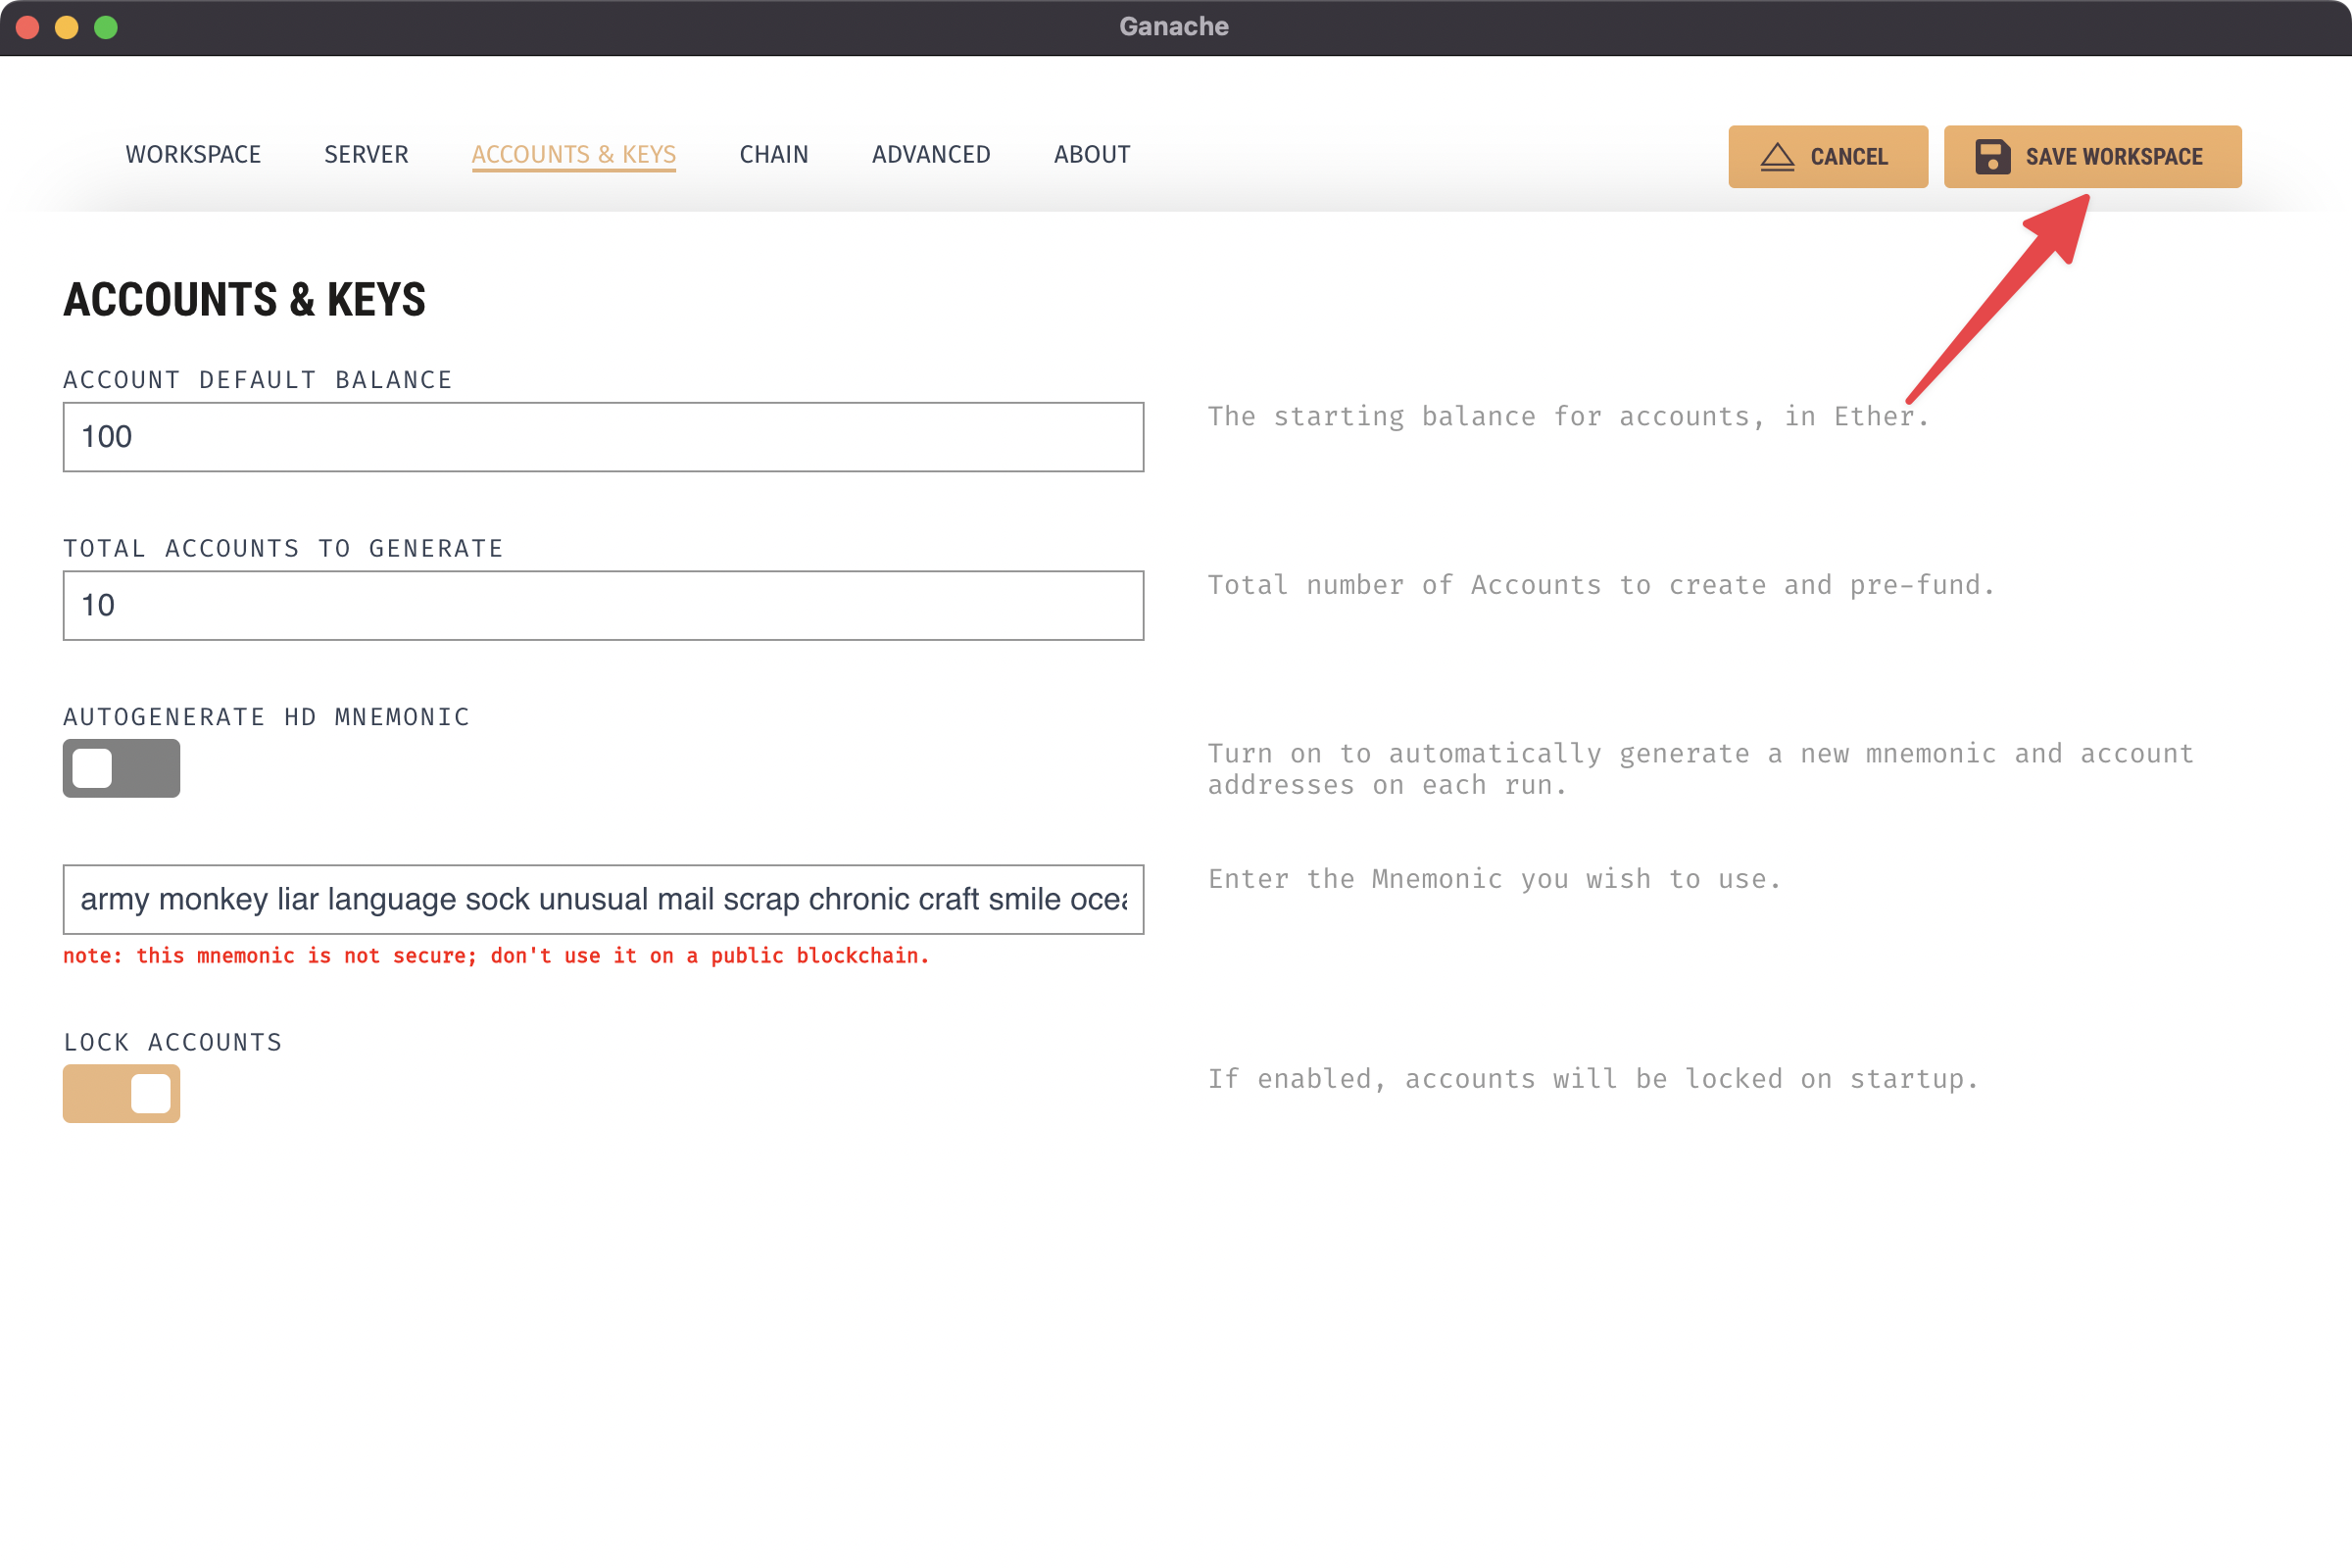
Click SAVE WORKSPACE button
Done
Install MetaMask and create one wallet.
https://metamask.io/
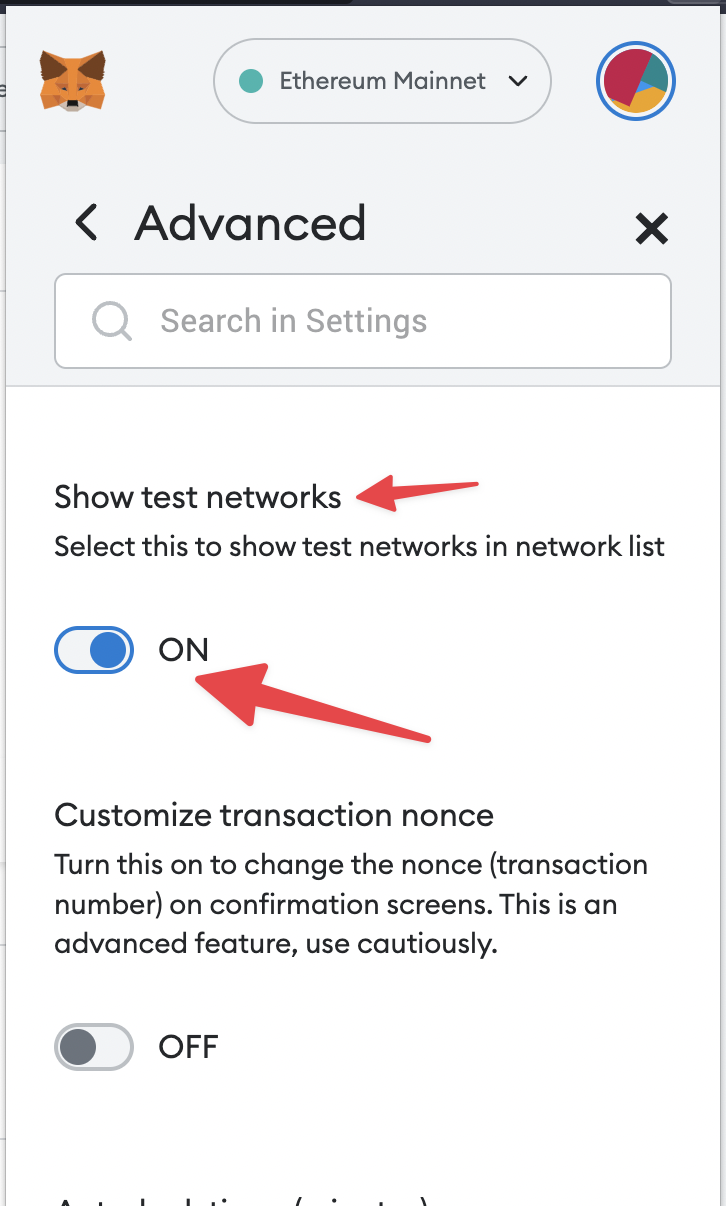
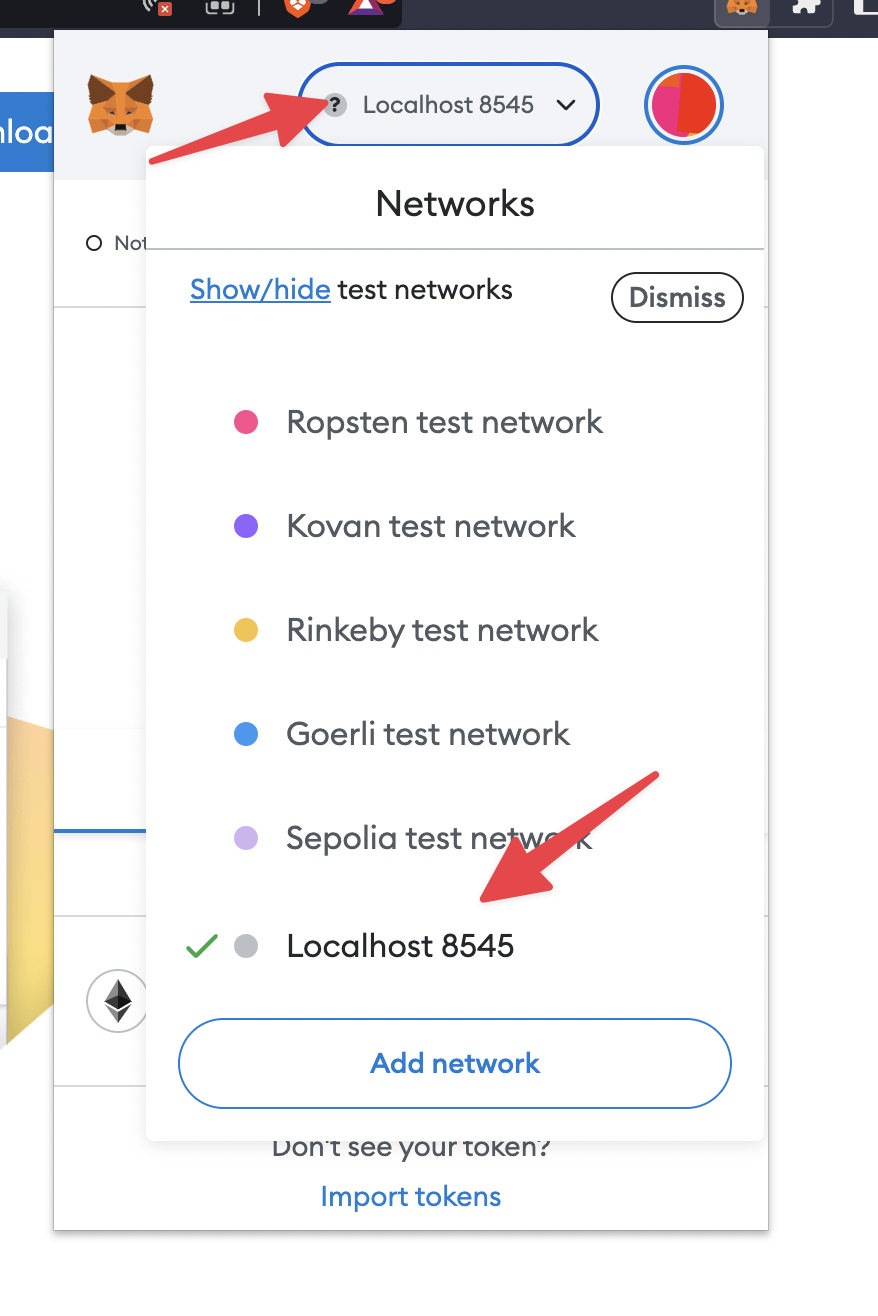
Open show test networks
Settings > Advanced
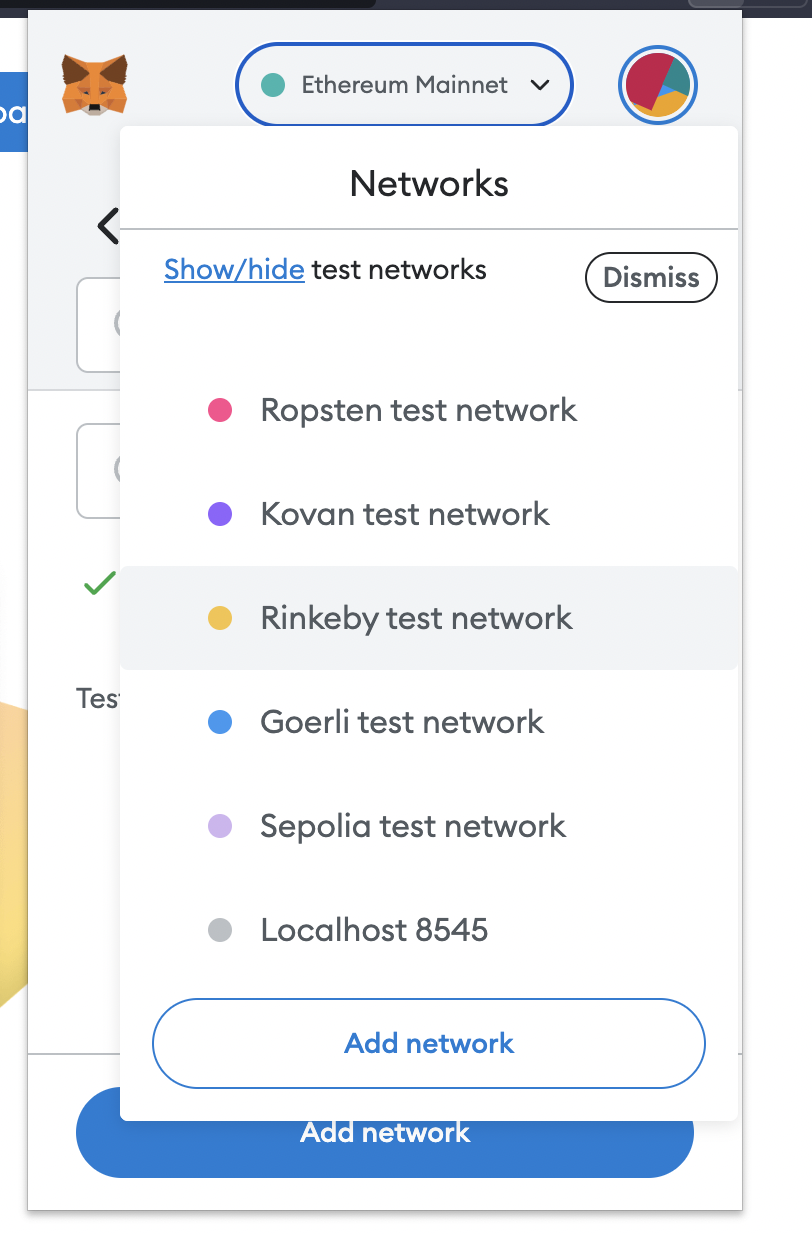
Now we can see all test networks
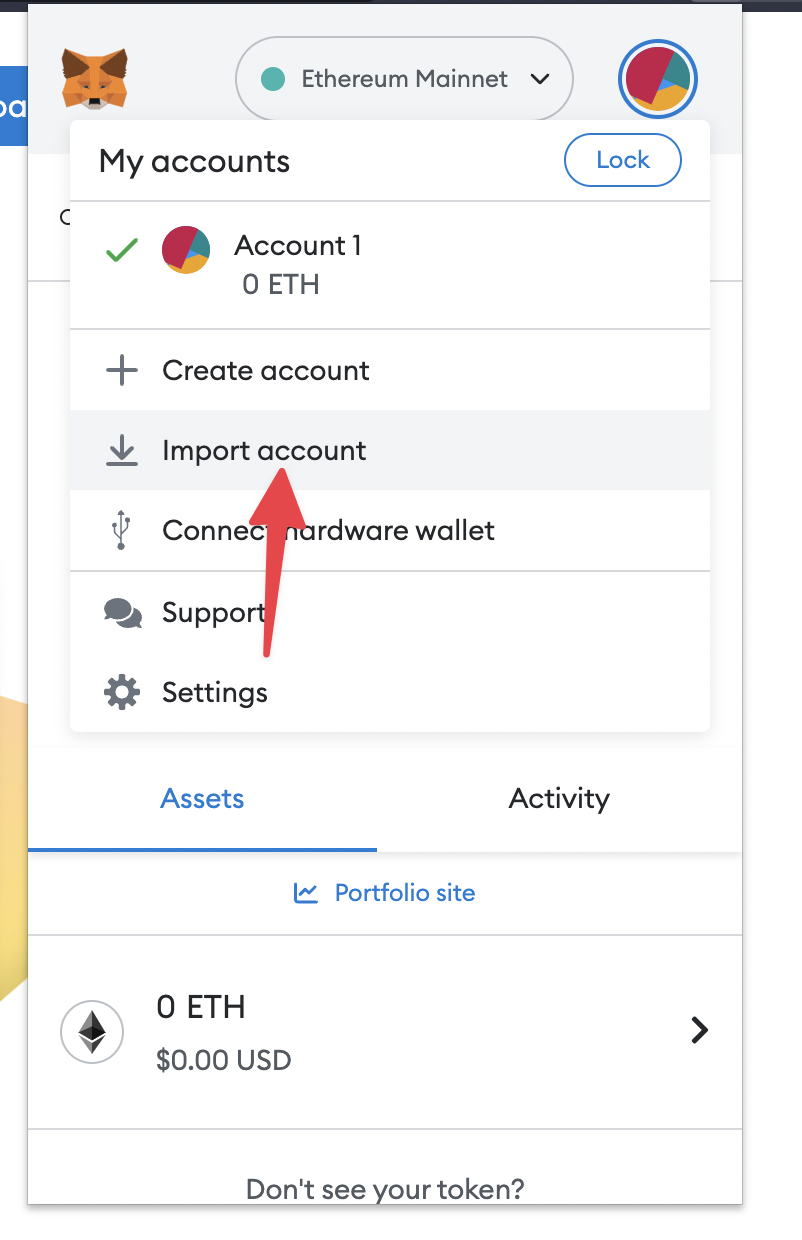
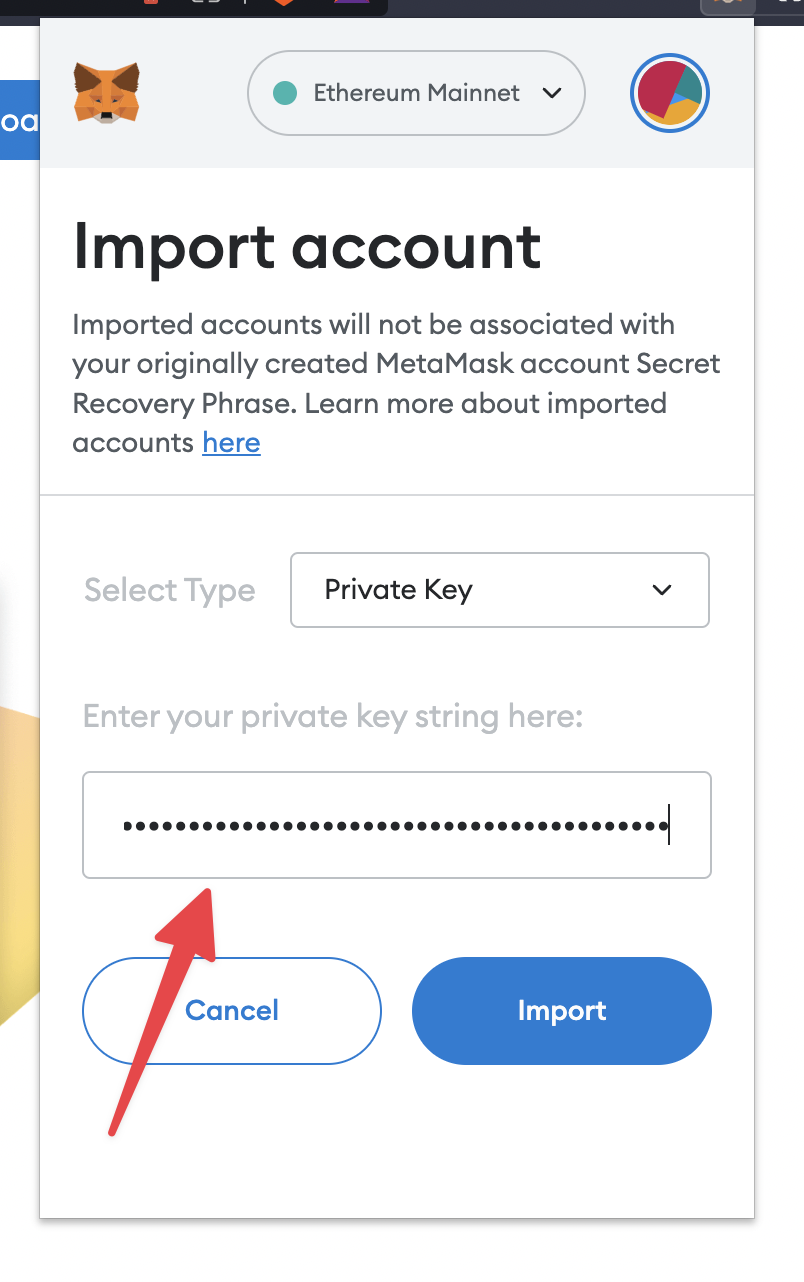
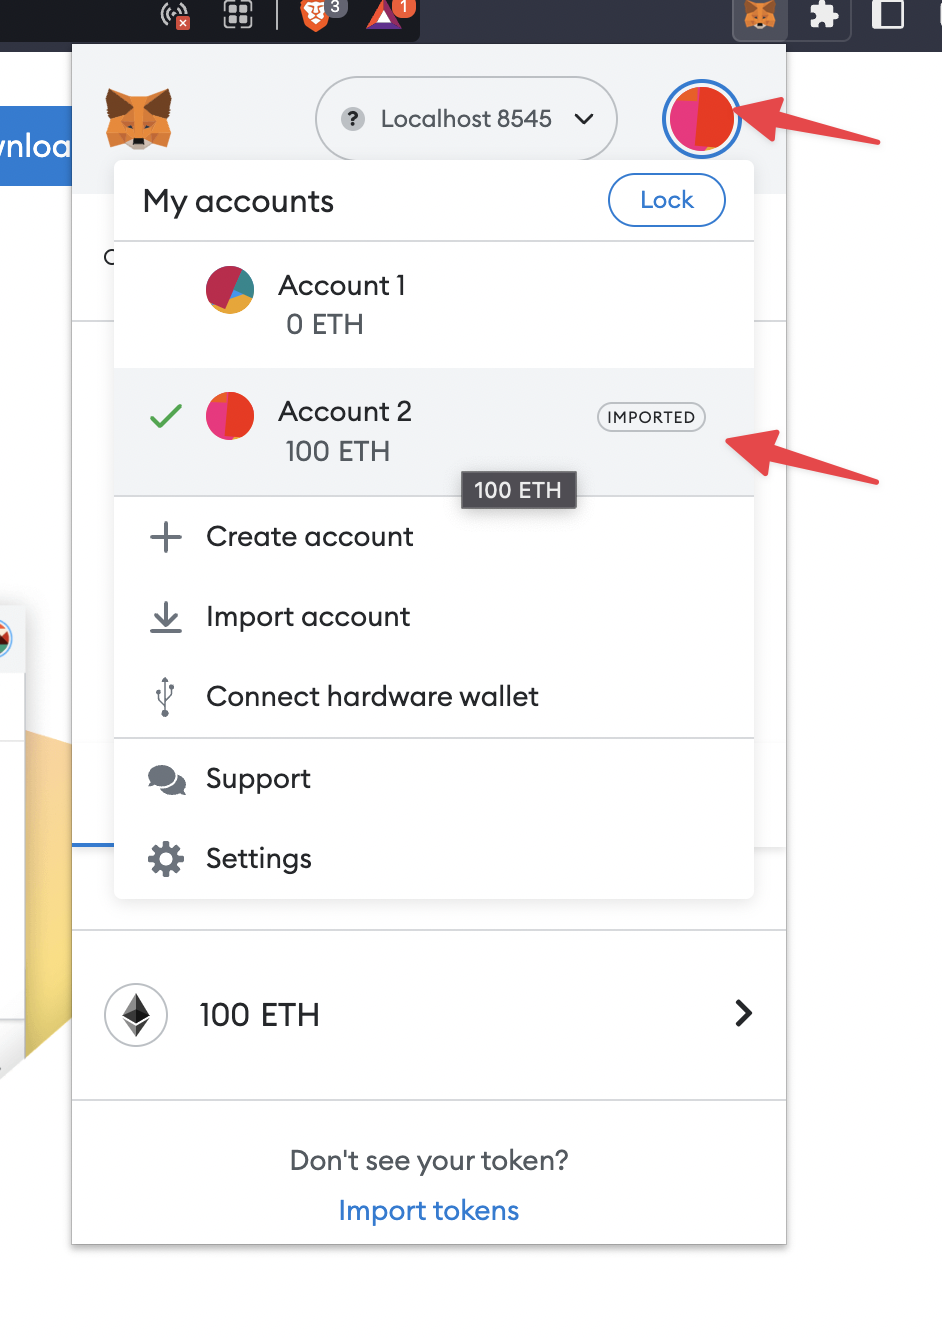
Add our localhost chain wallet to MetaMask
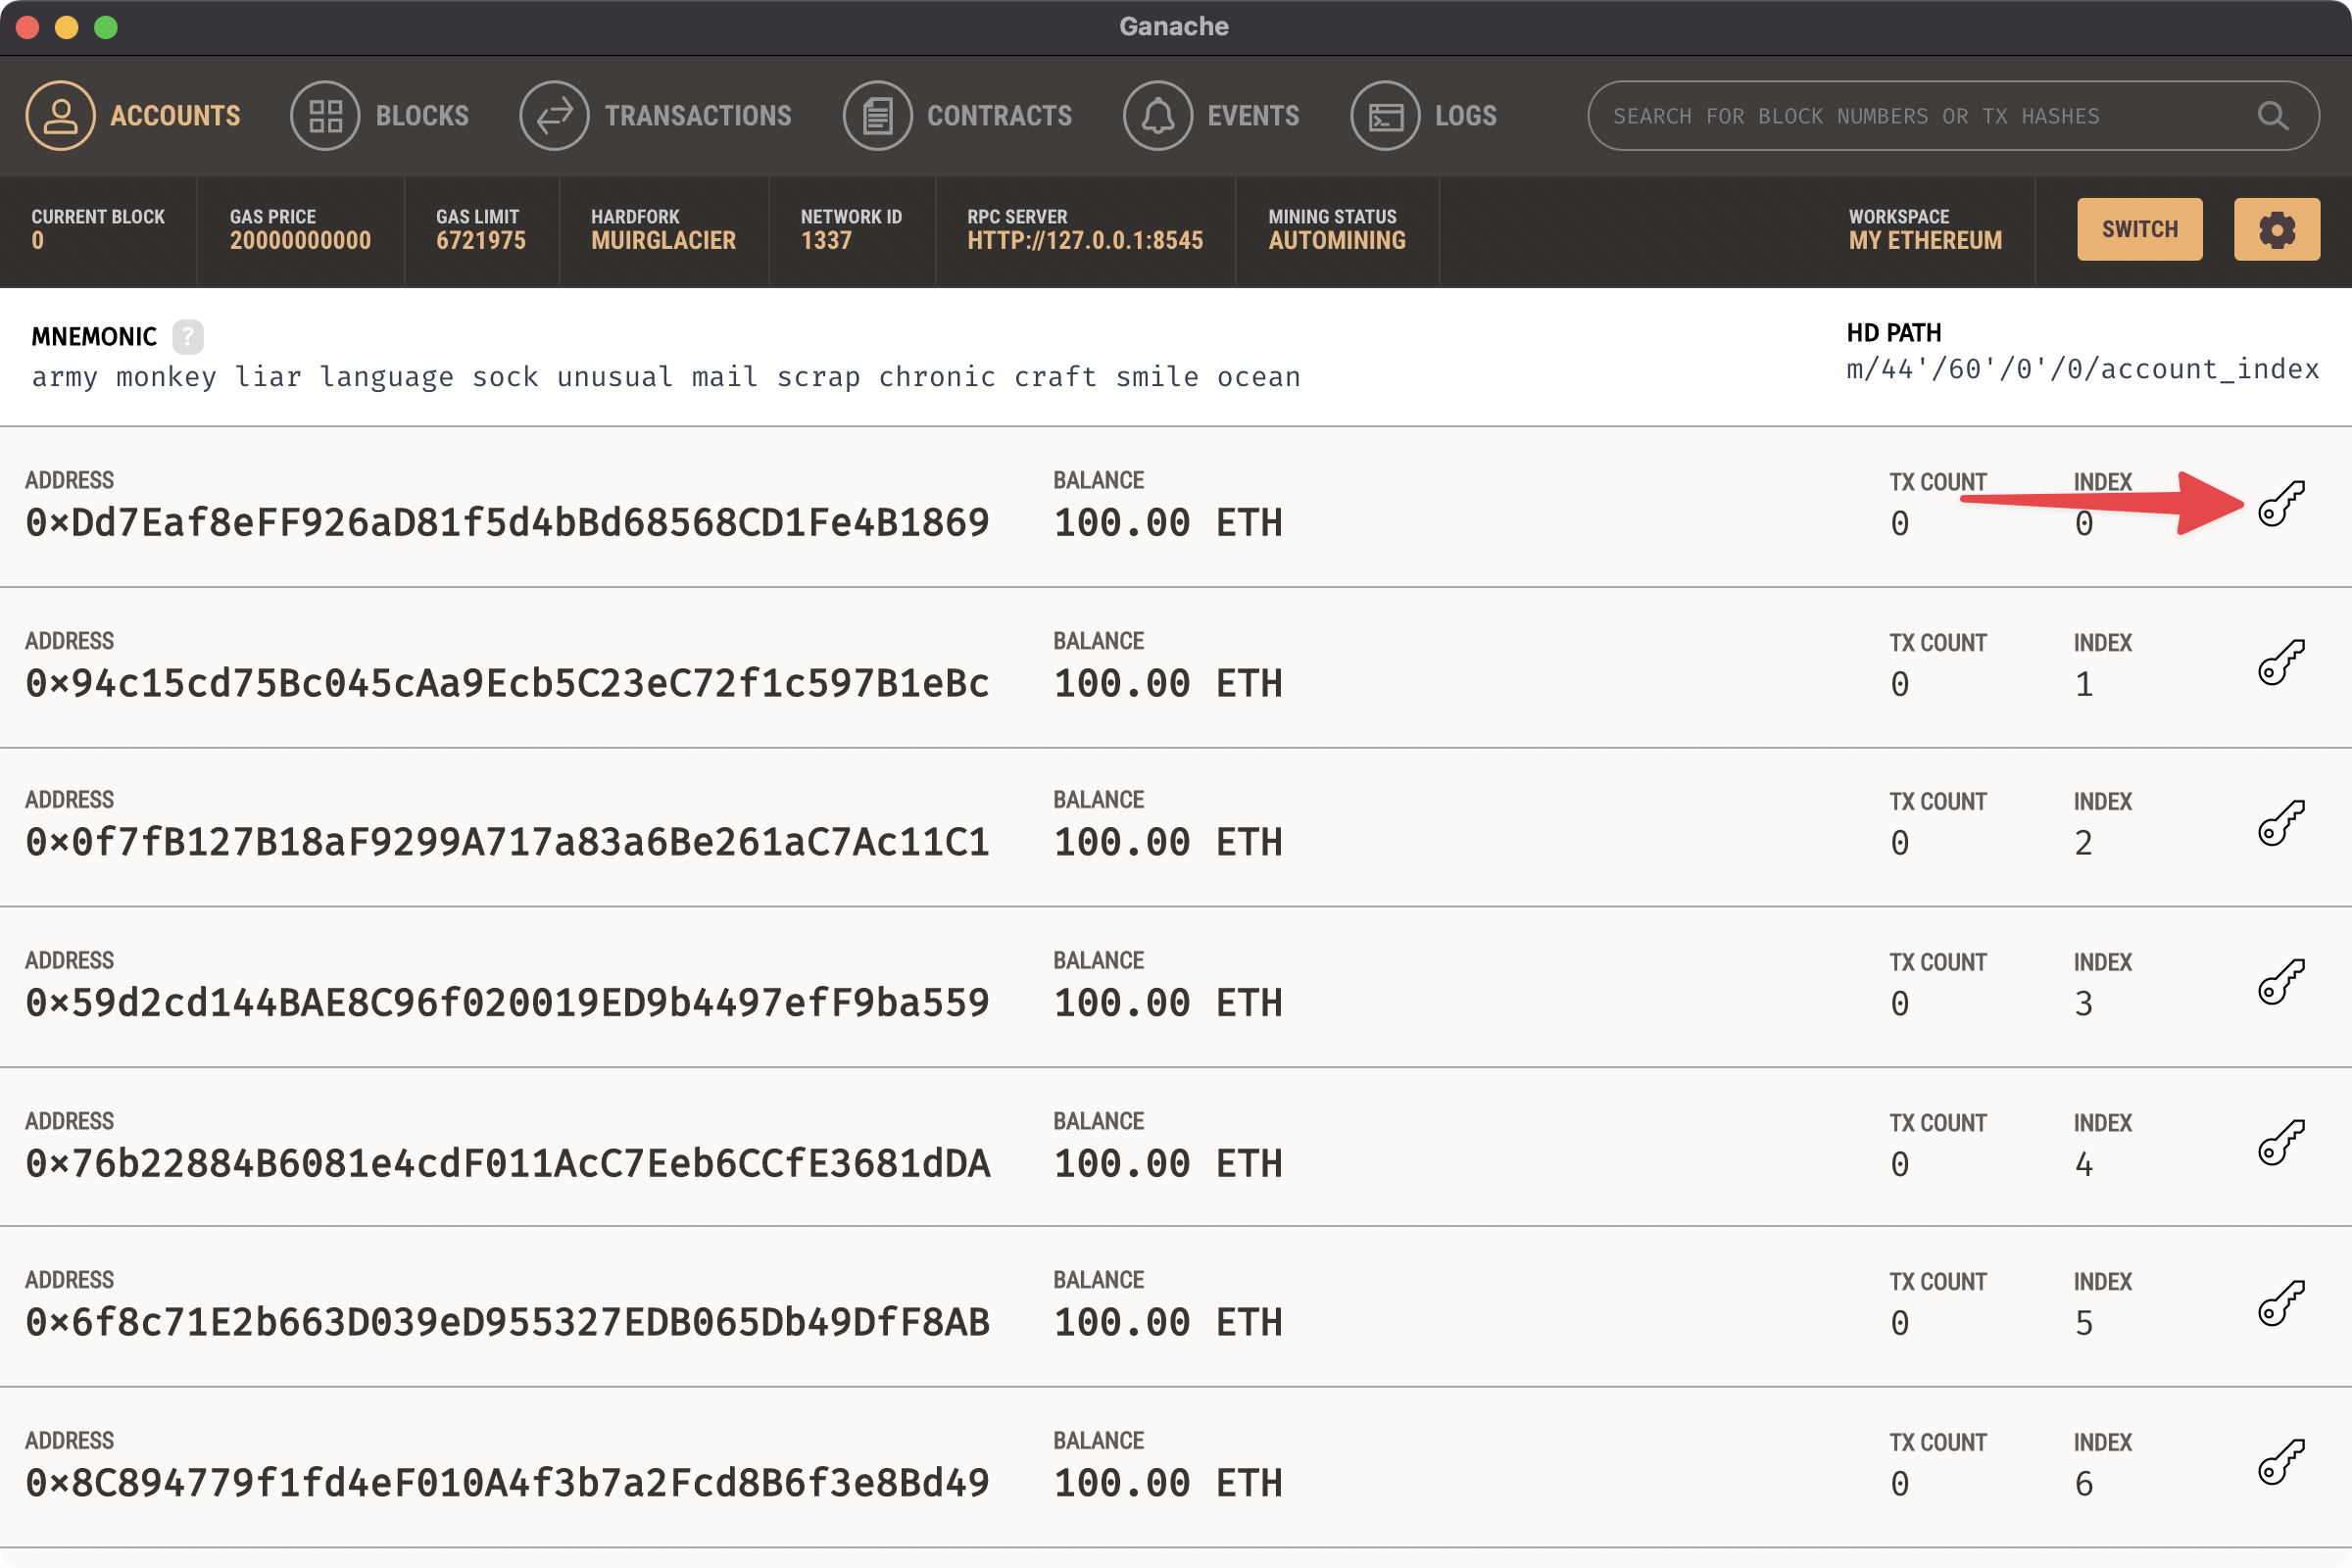
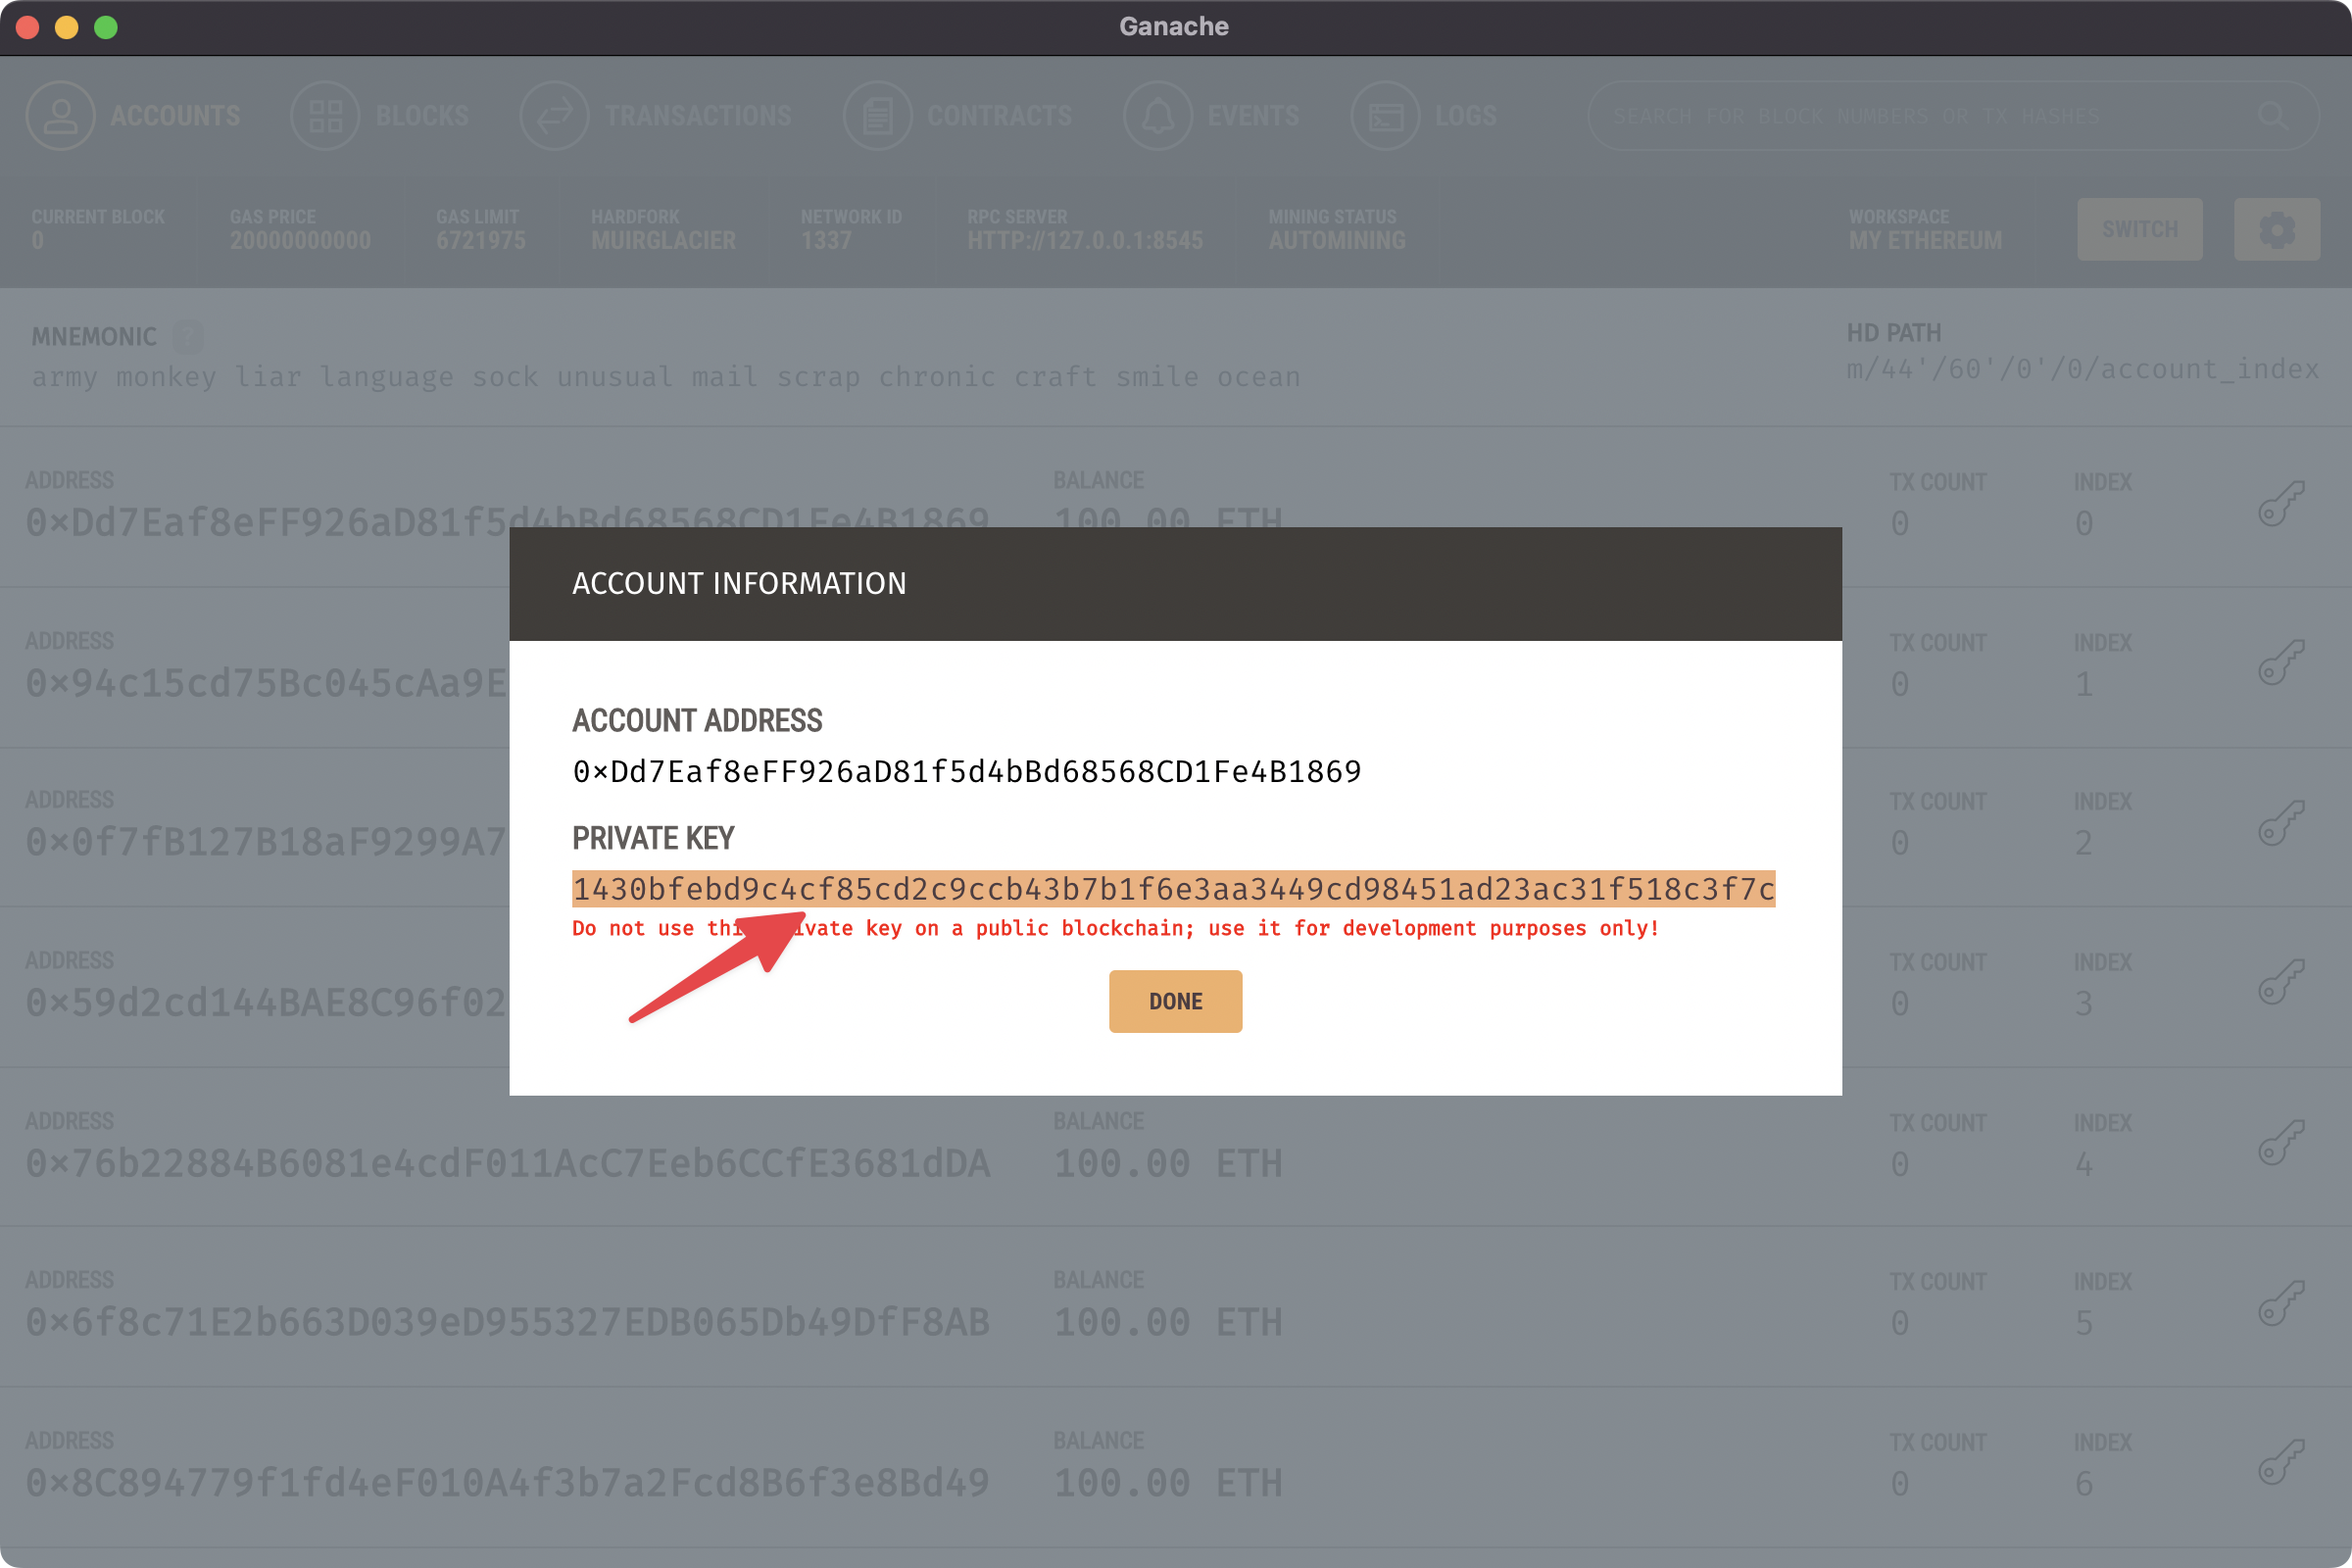
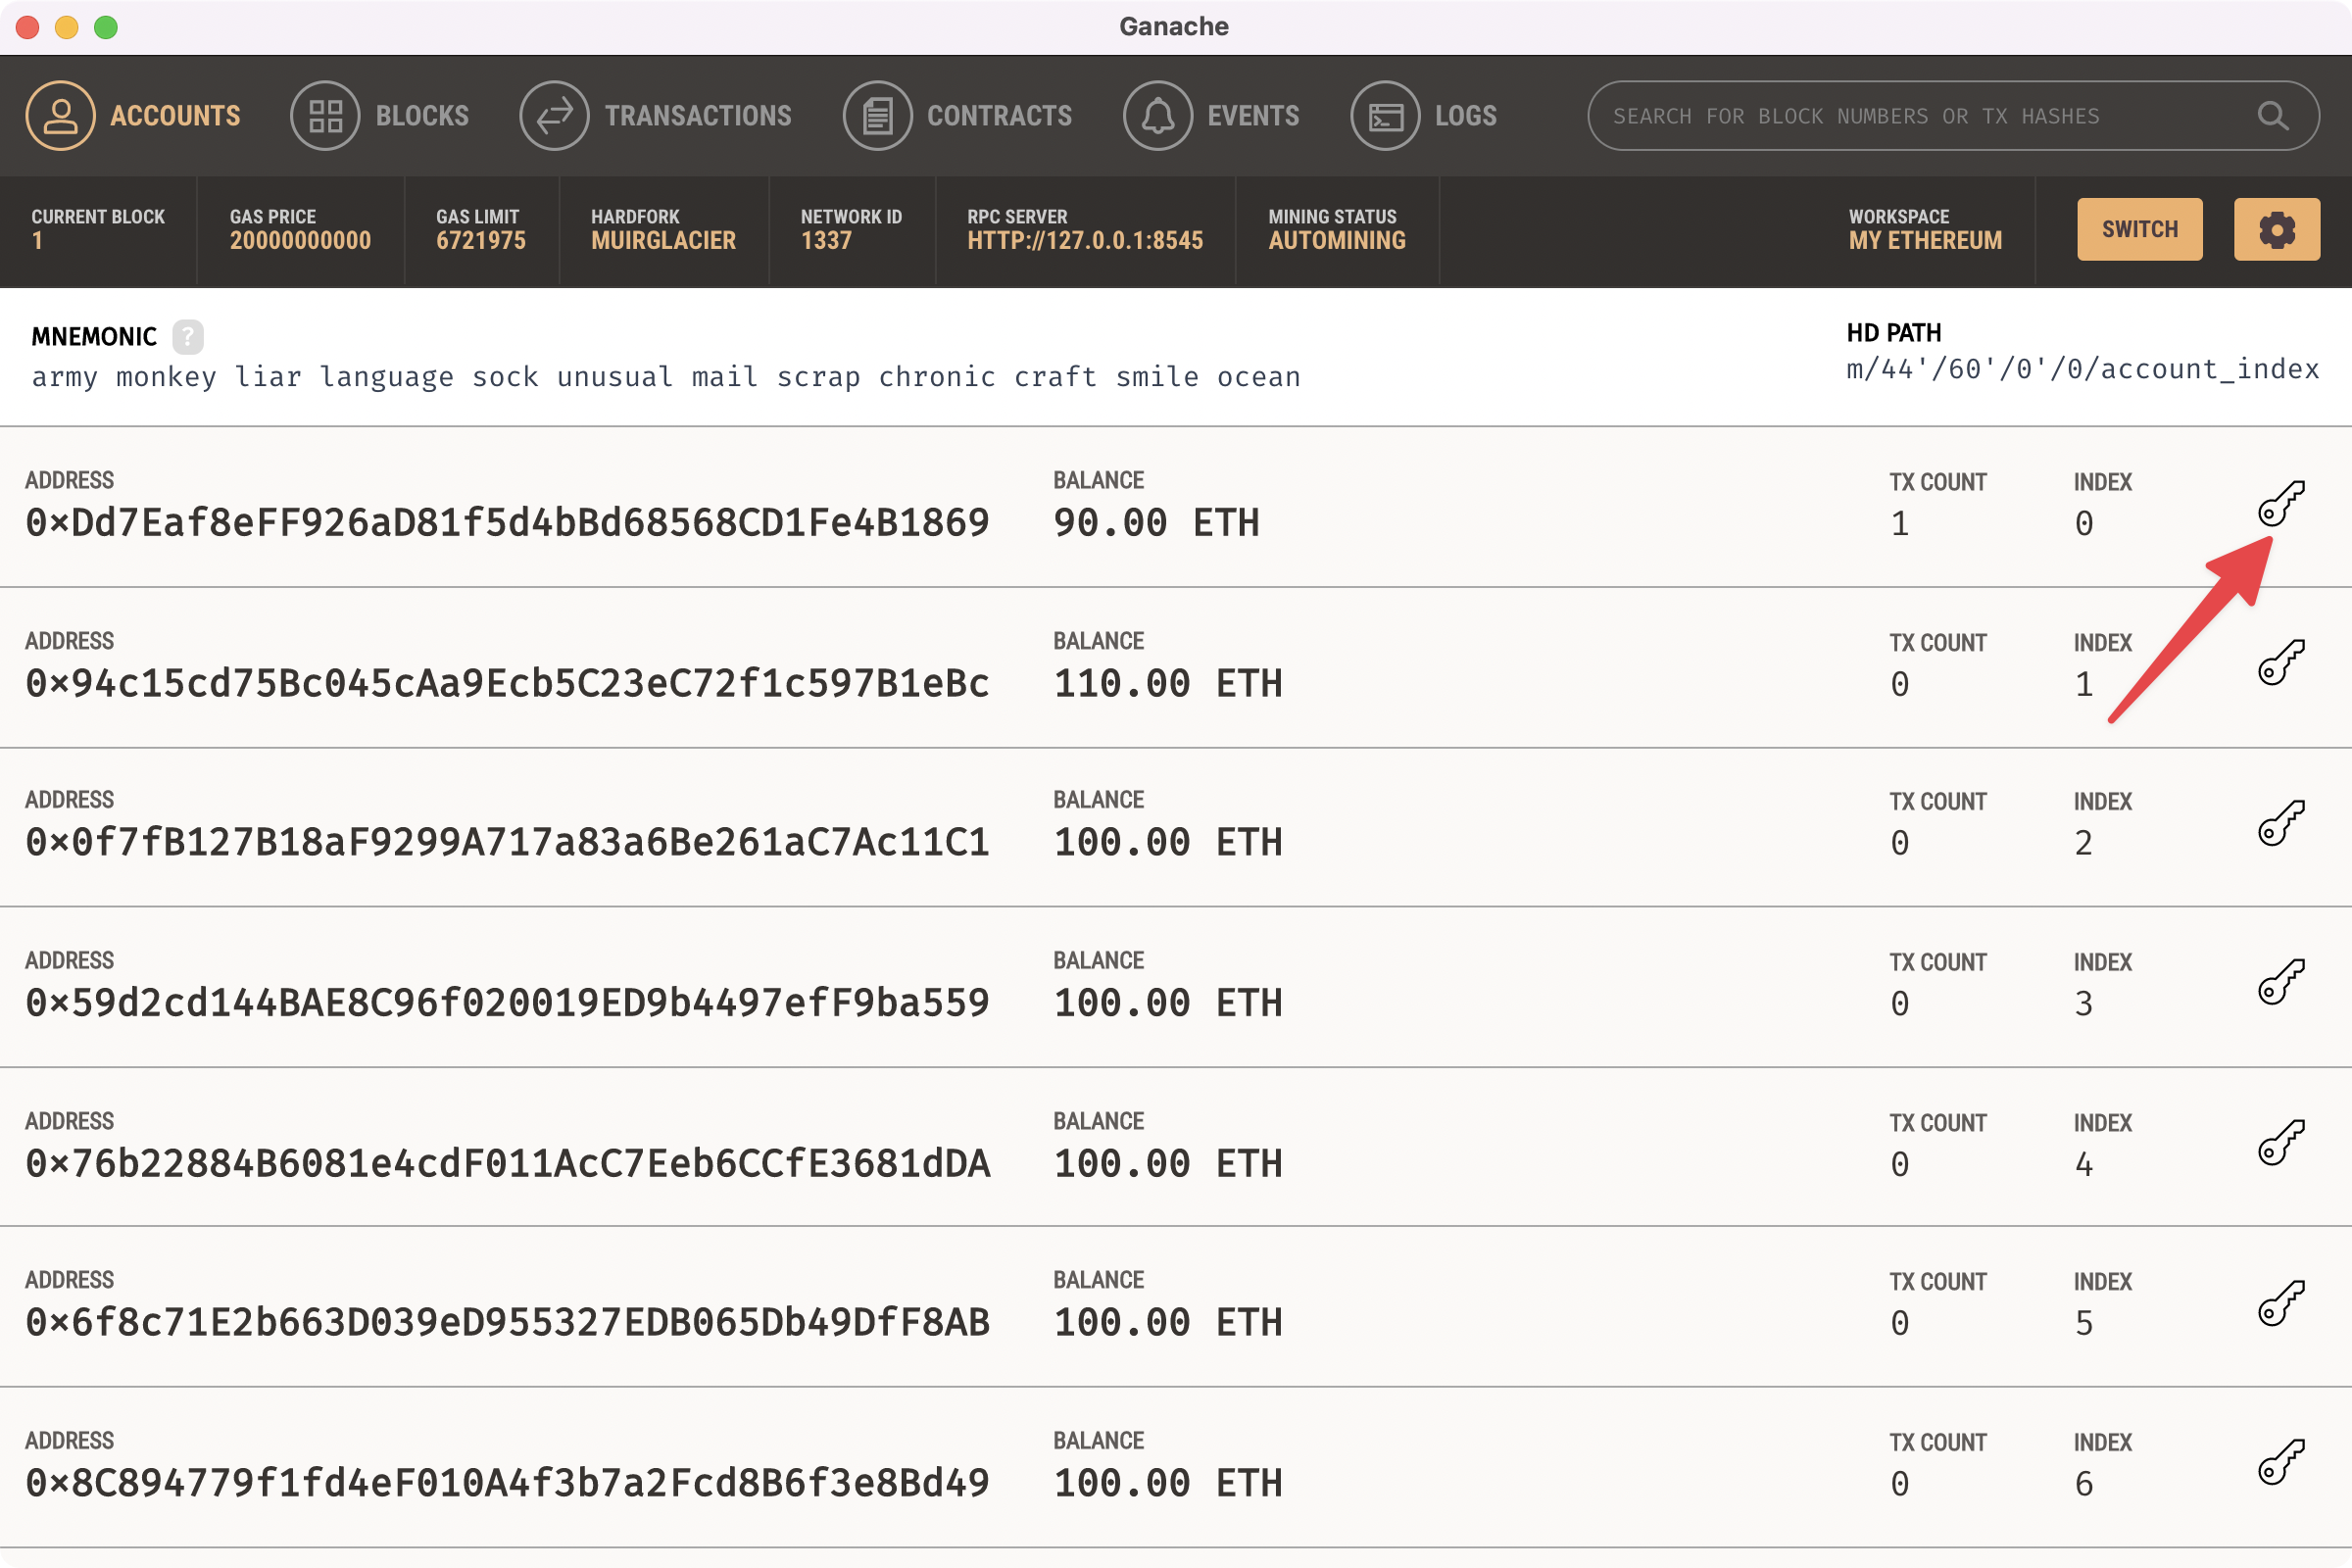
Open ganache and copy the private key
Import private key to MetaMask wallet
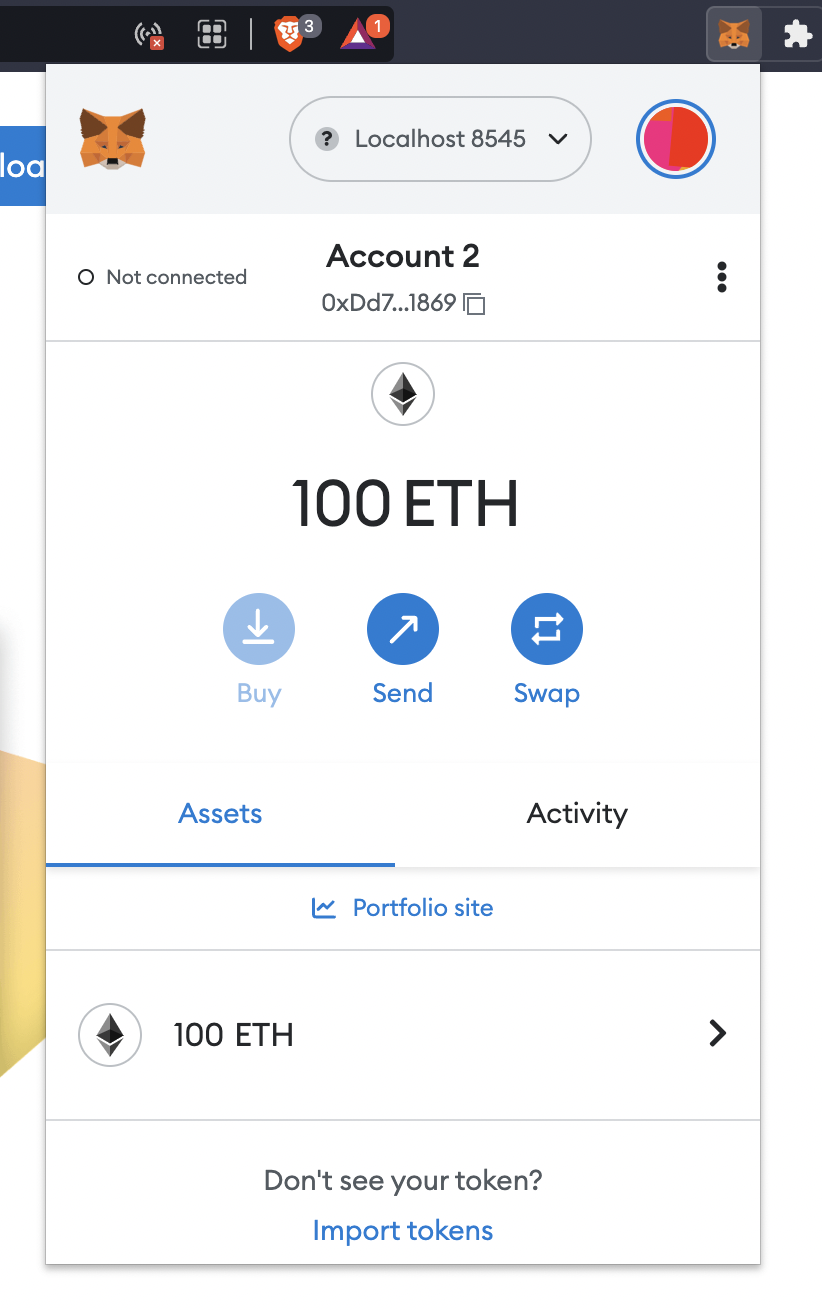
Now we switch the network to Localhost 8545 and Account 2
We can see
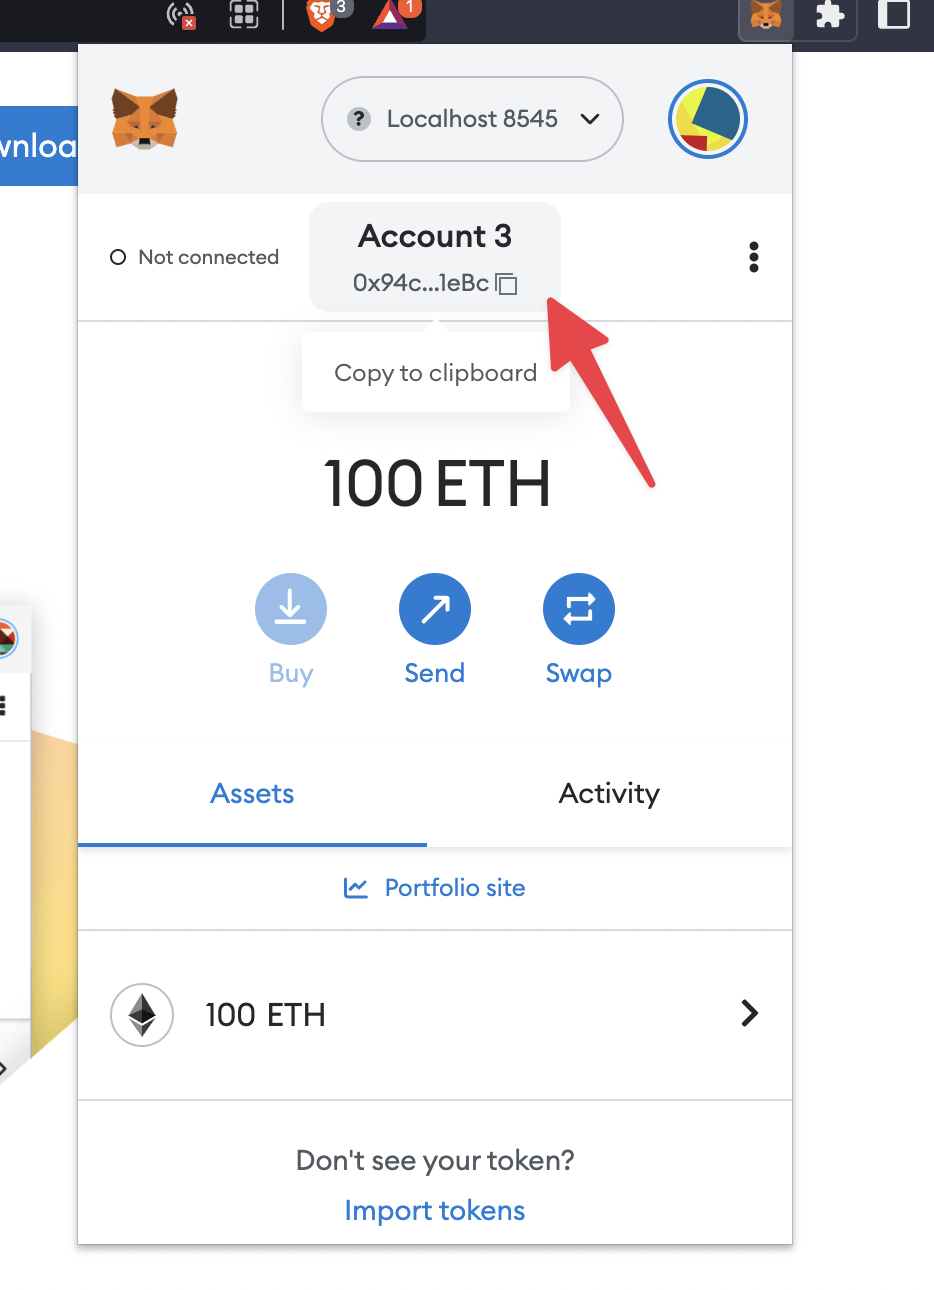
We do it again to add one more account
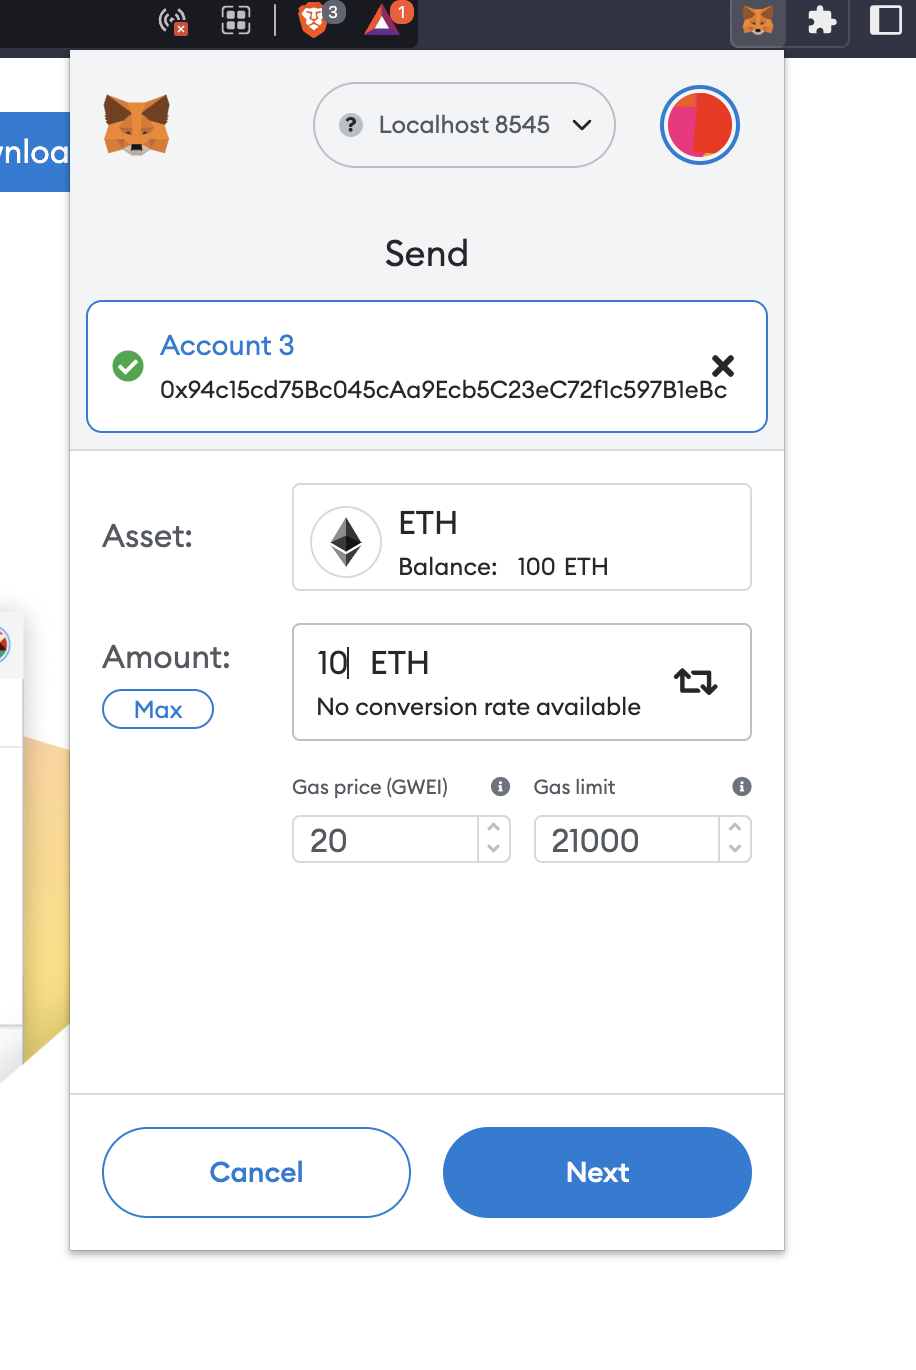
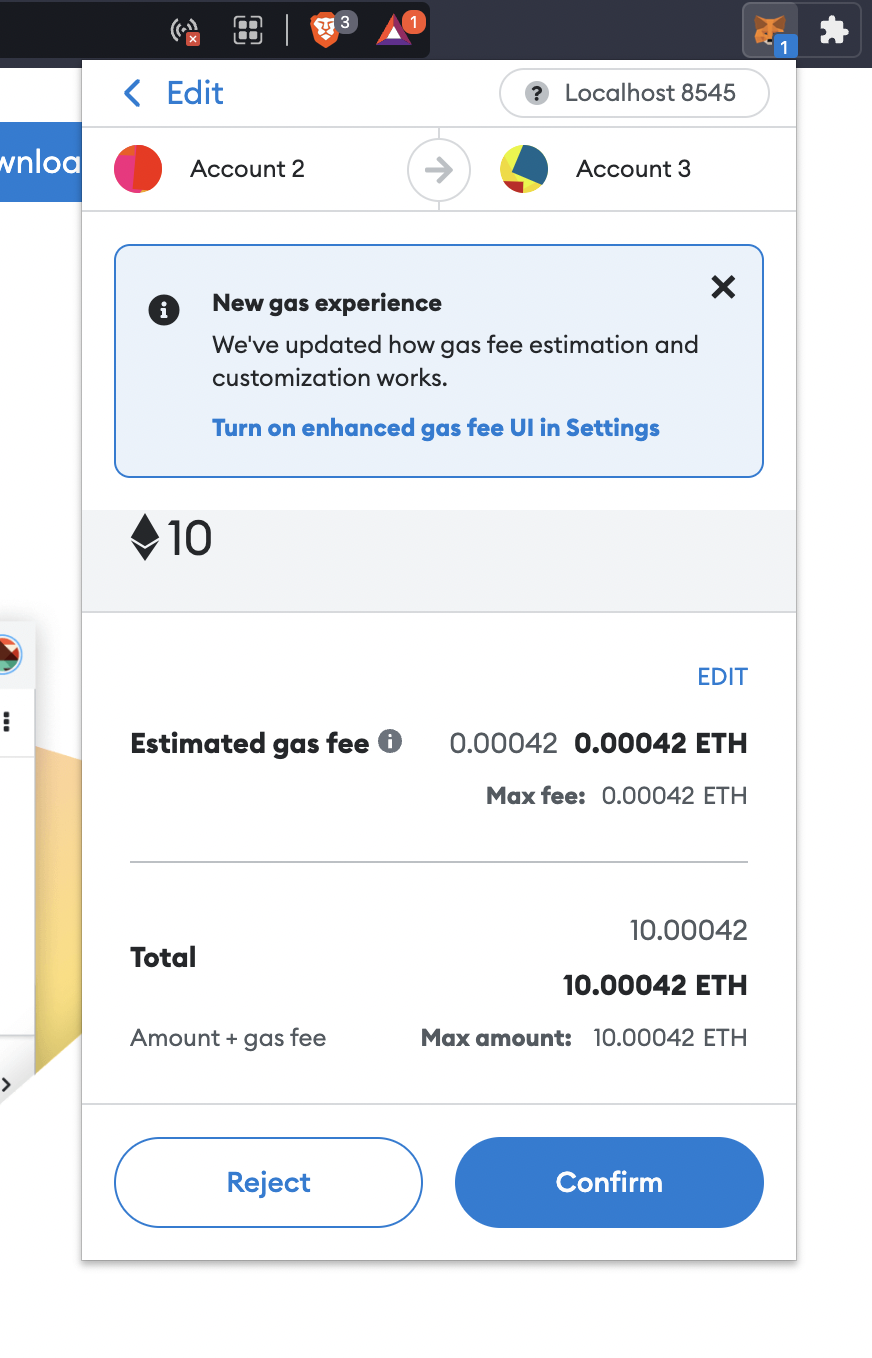
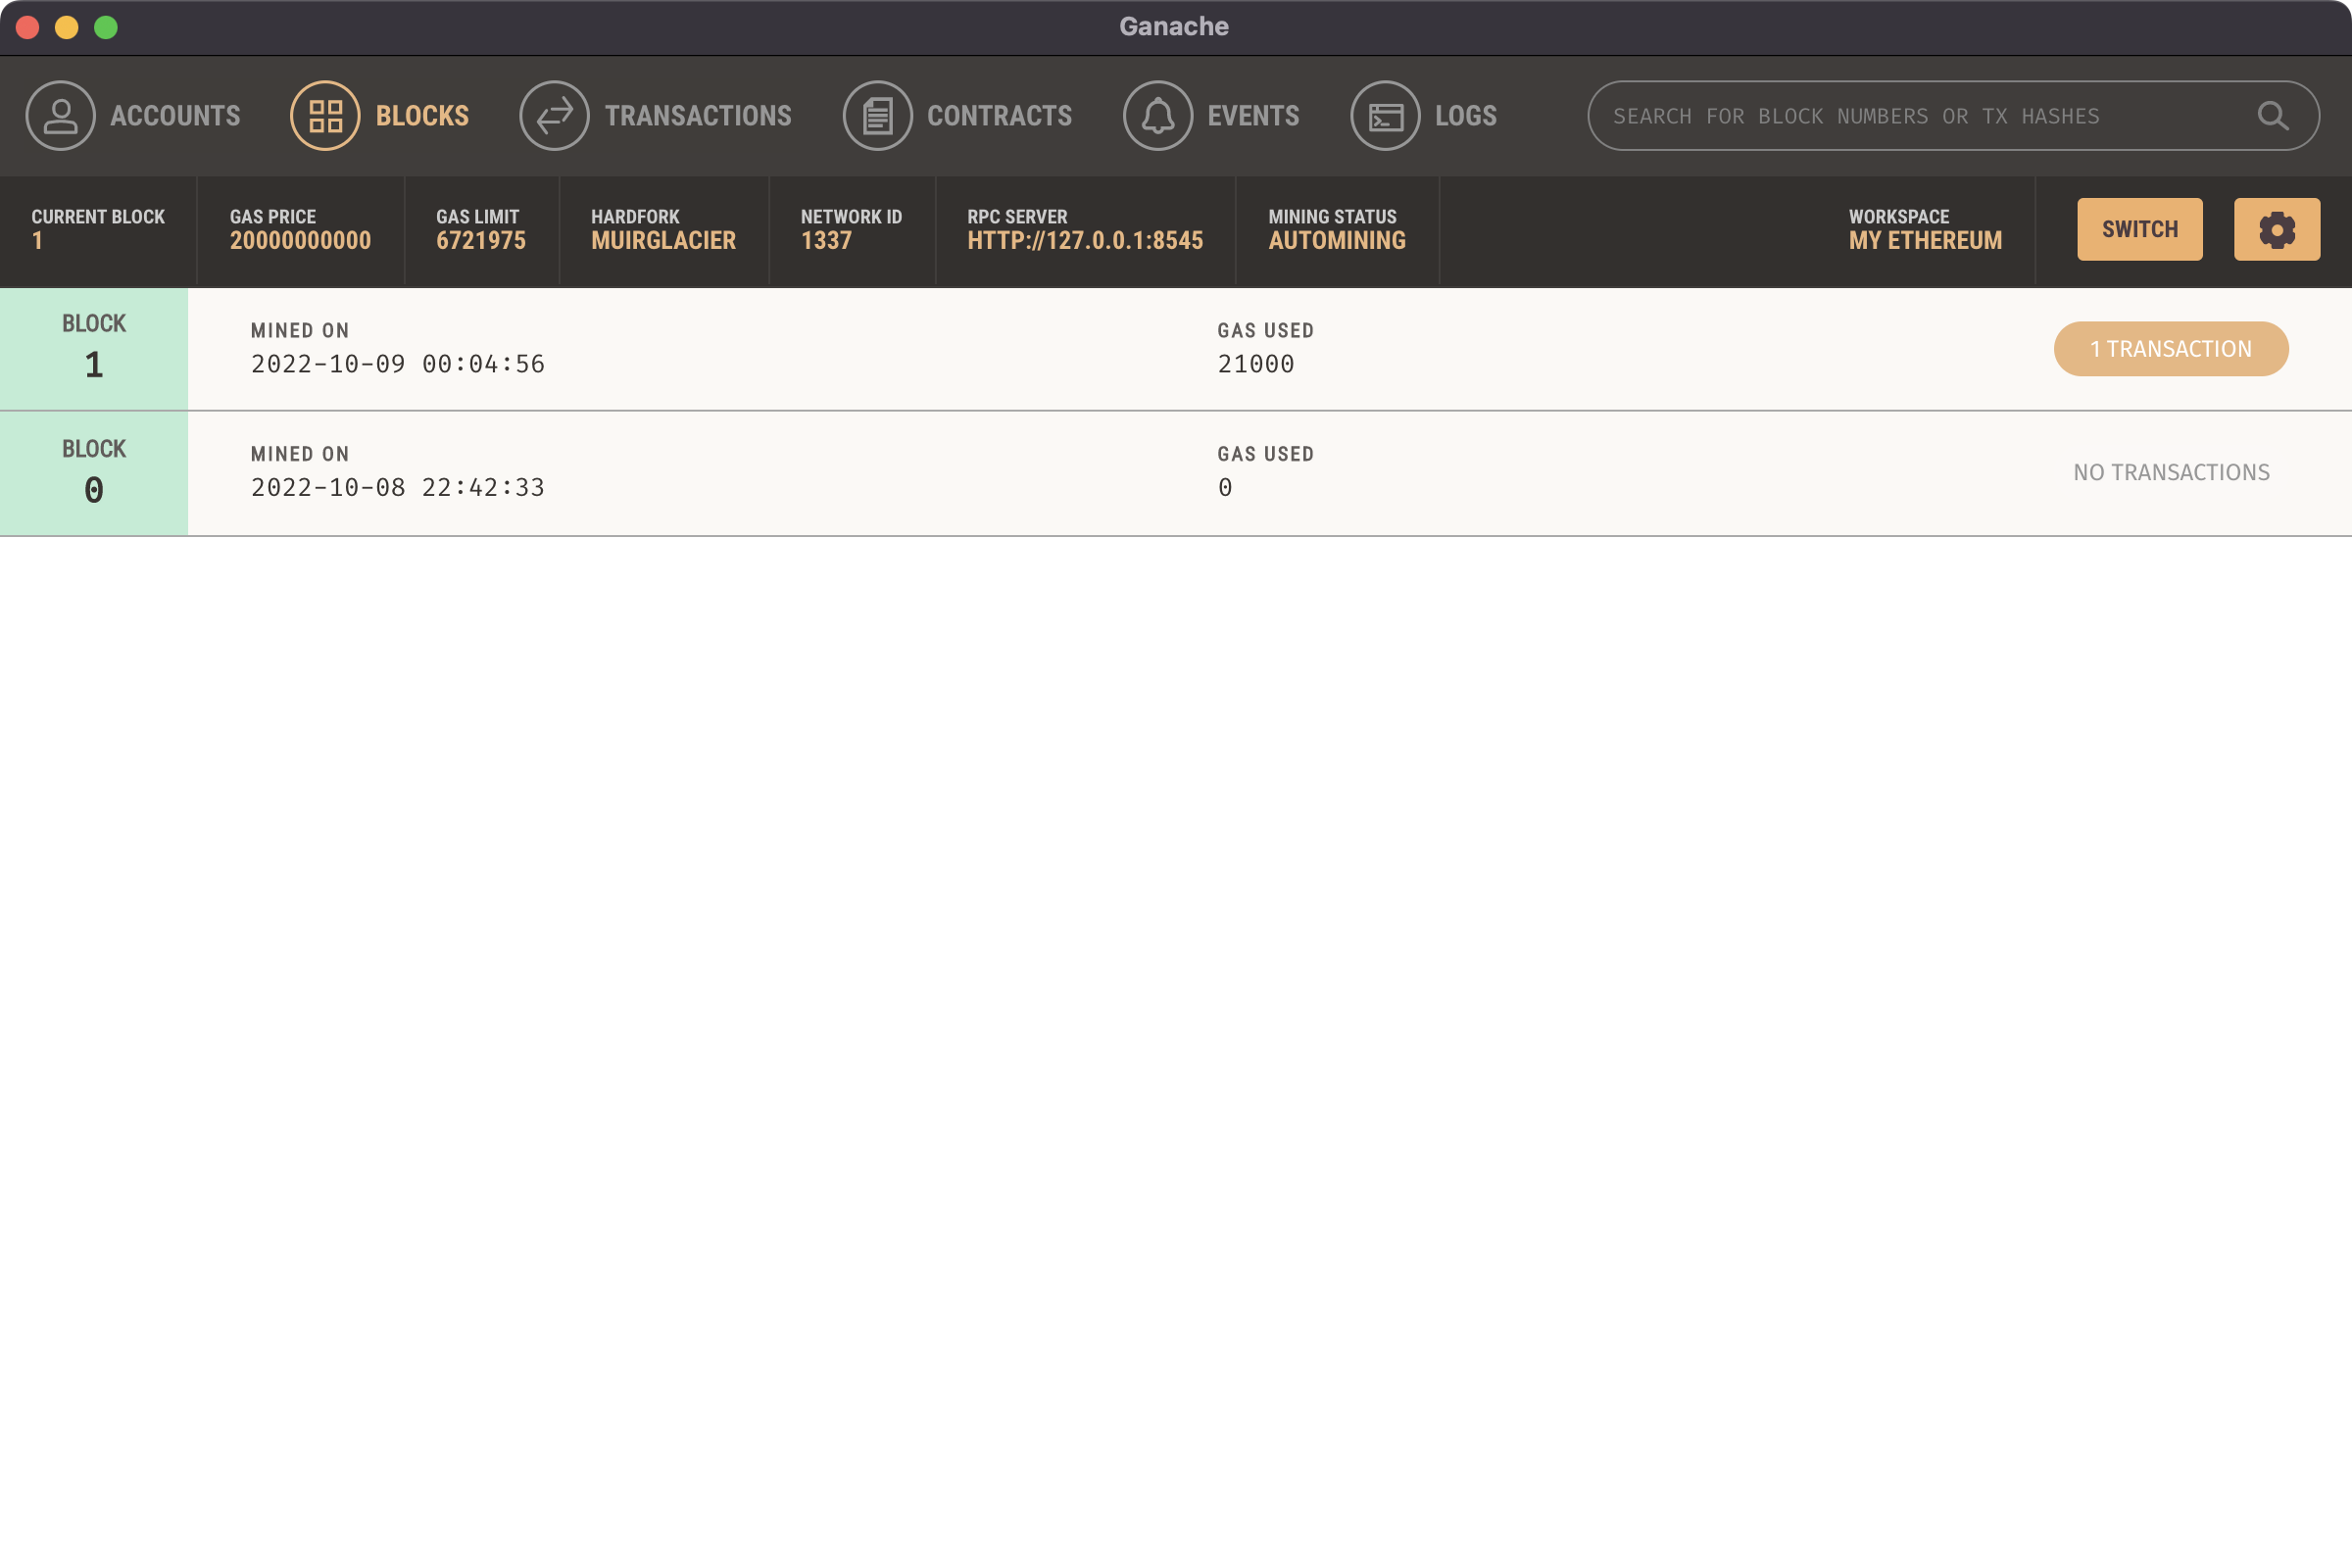
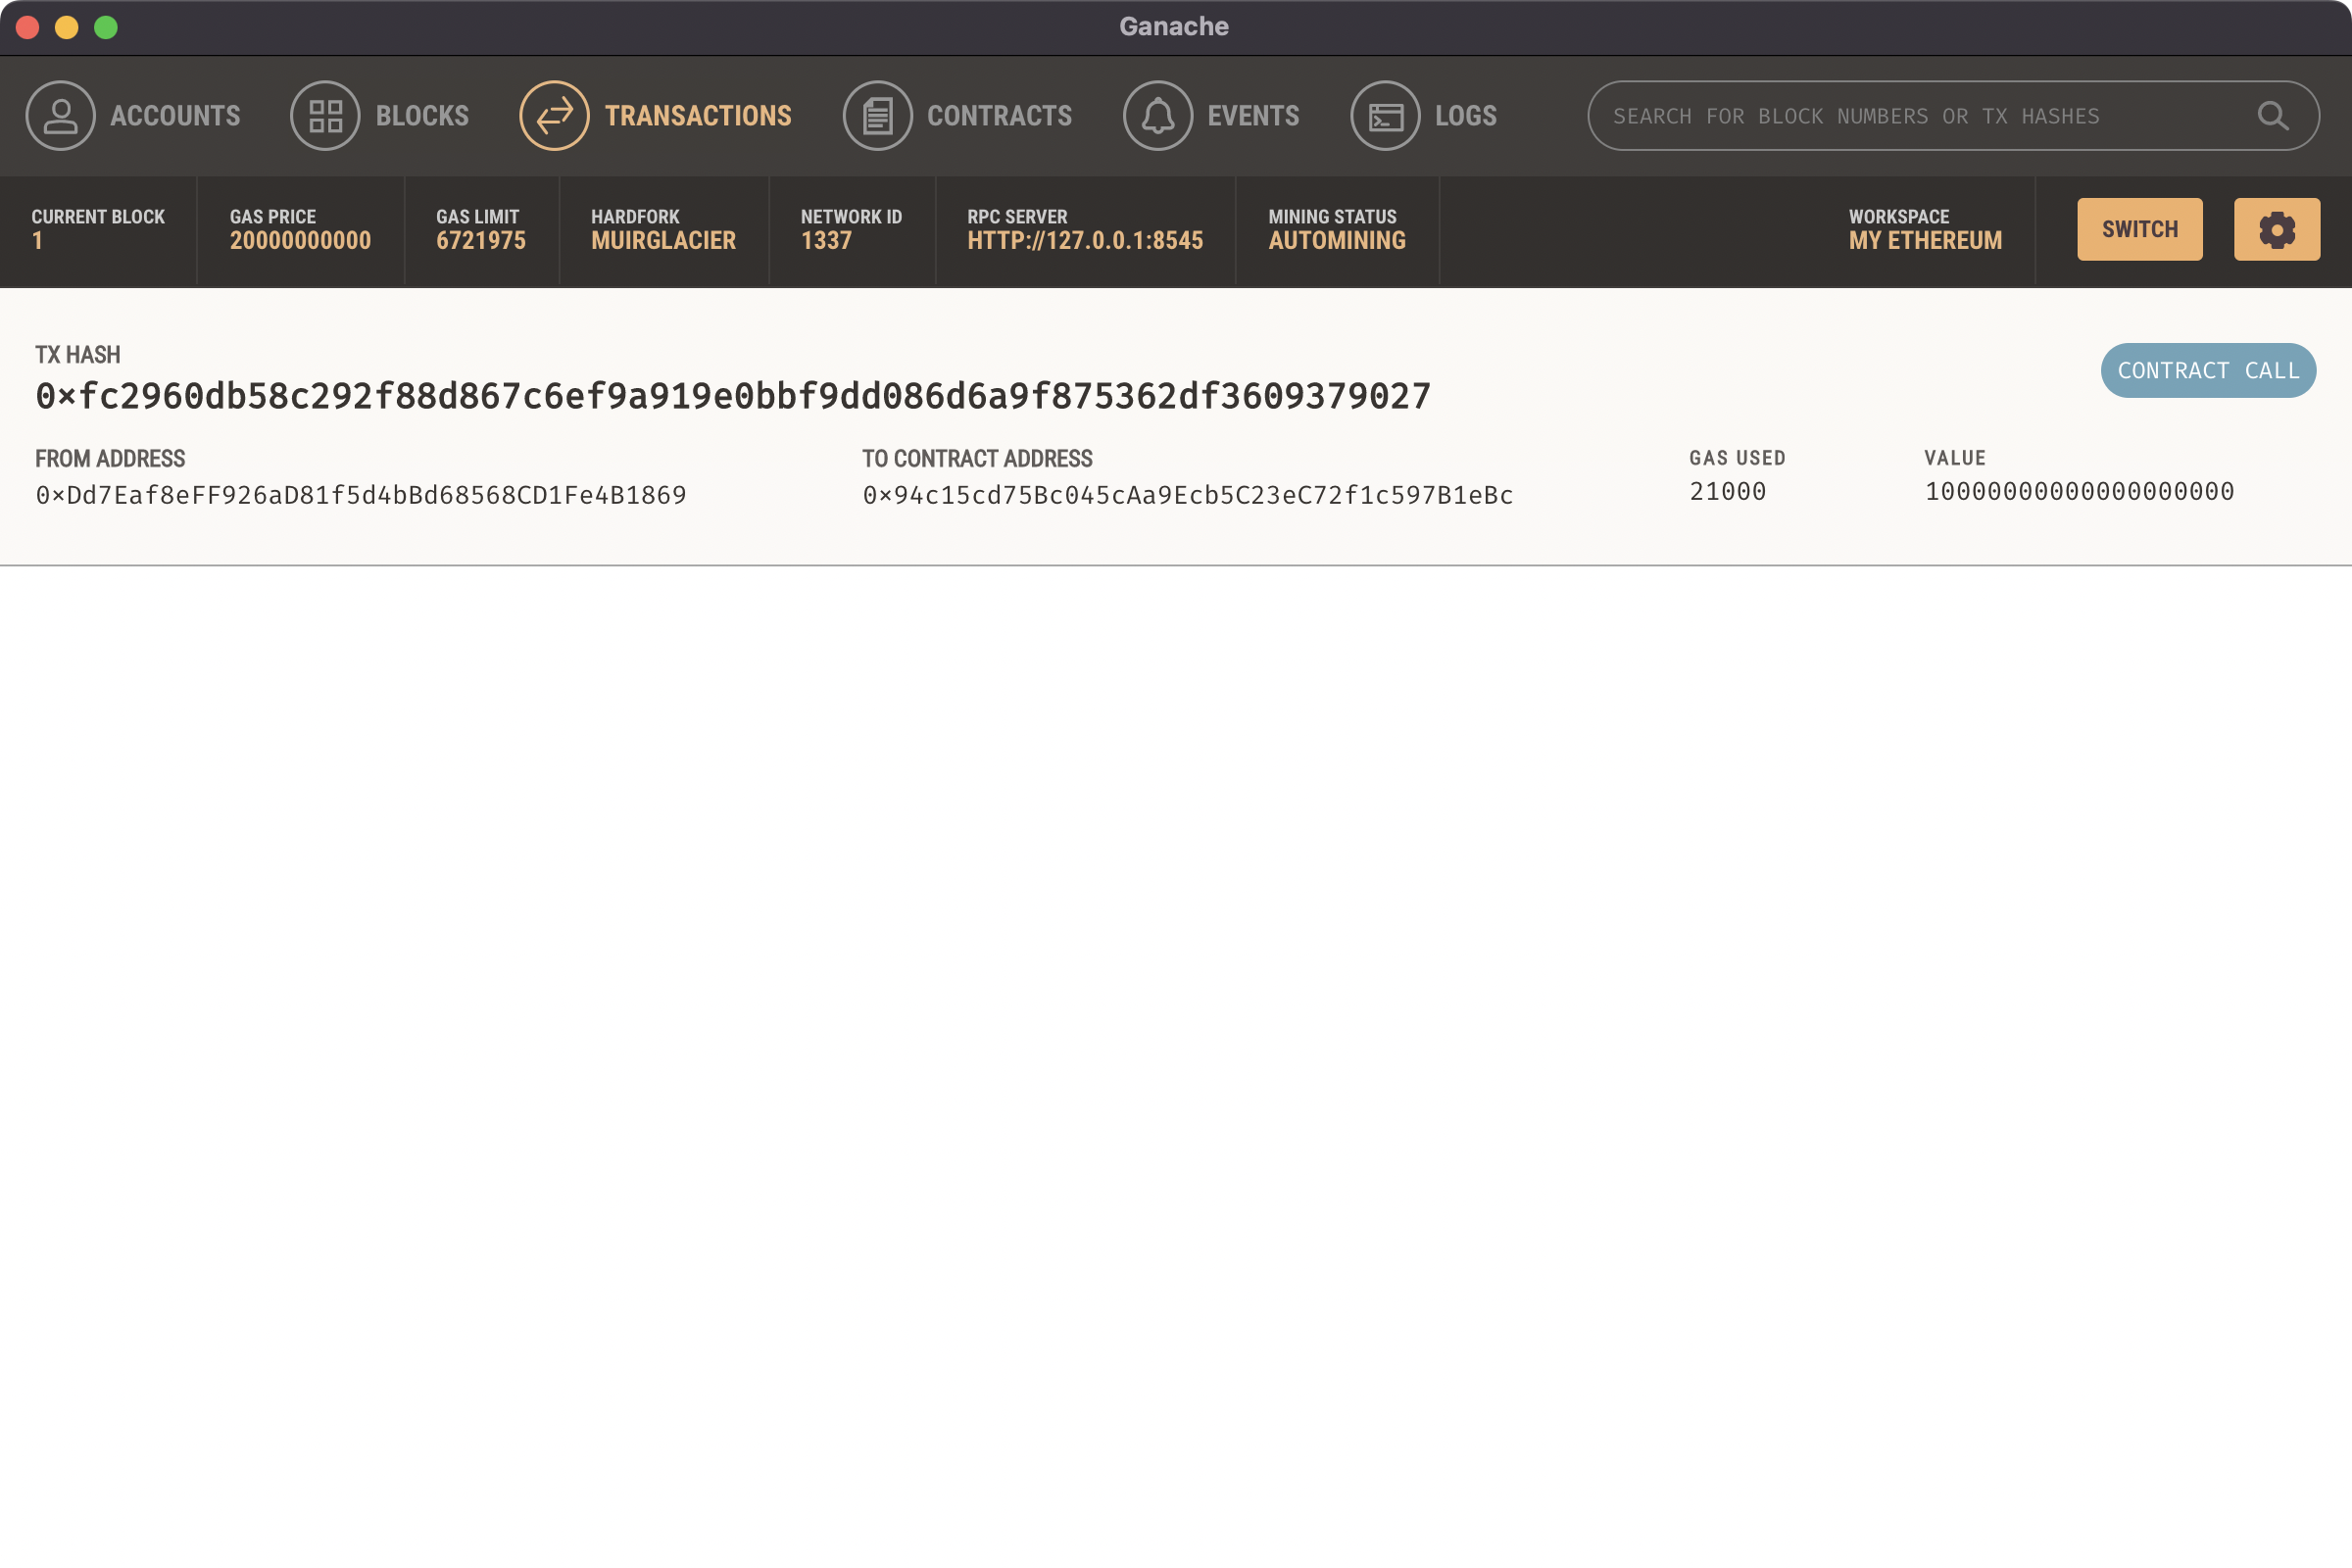
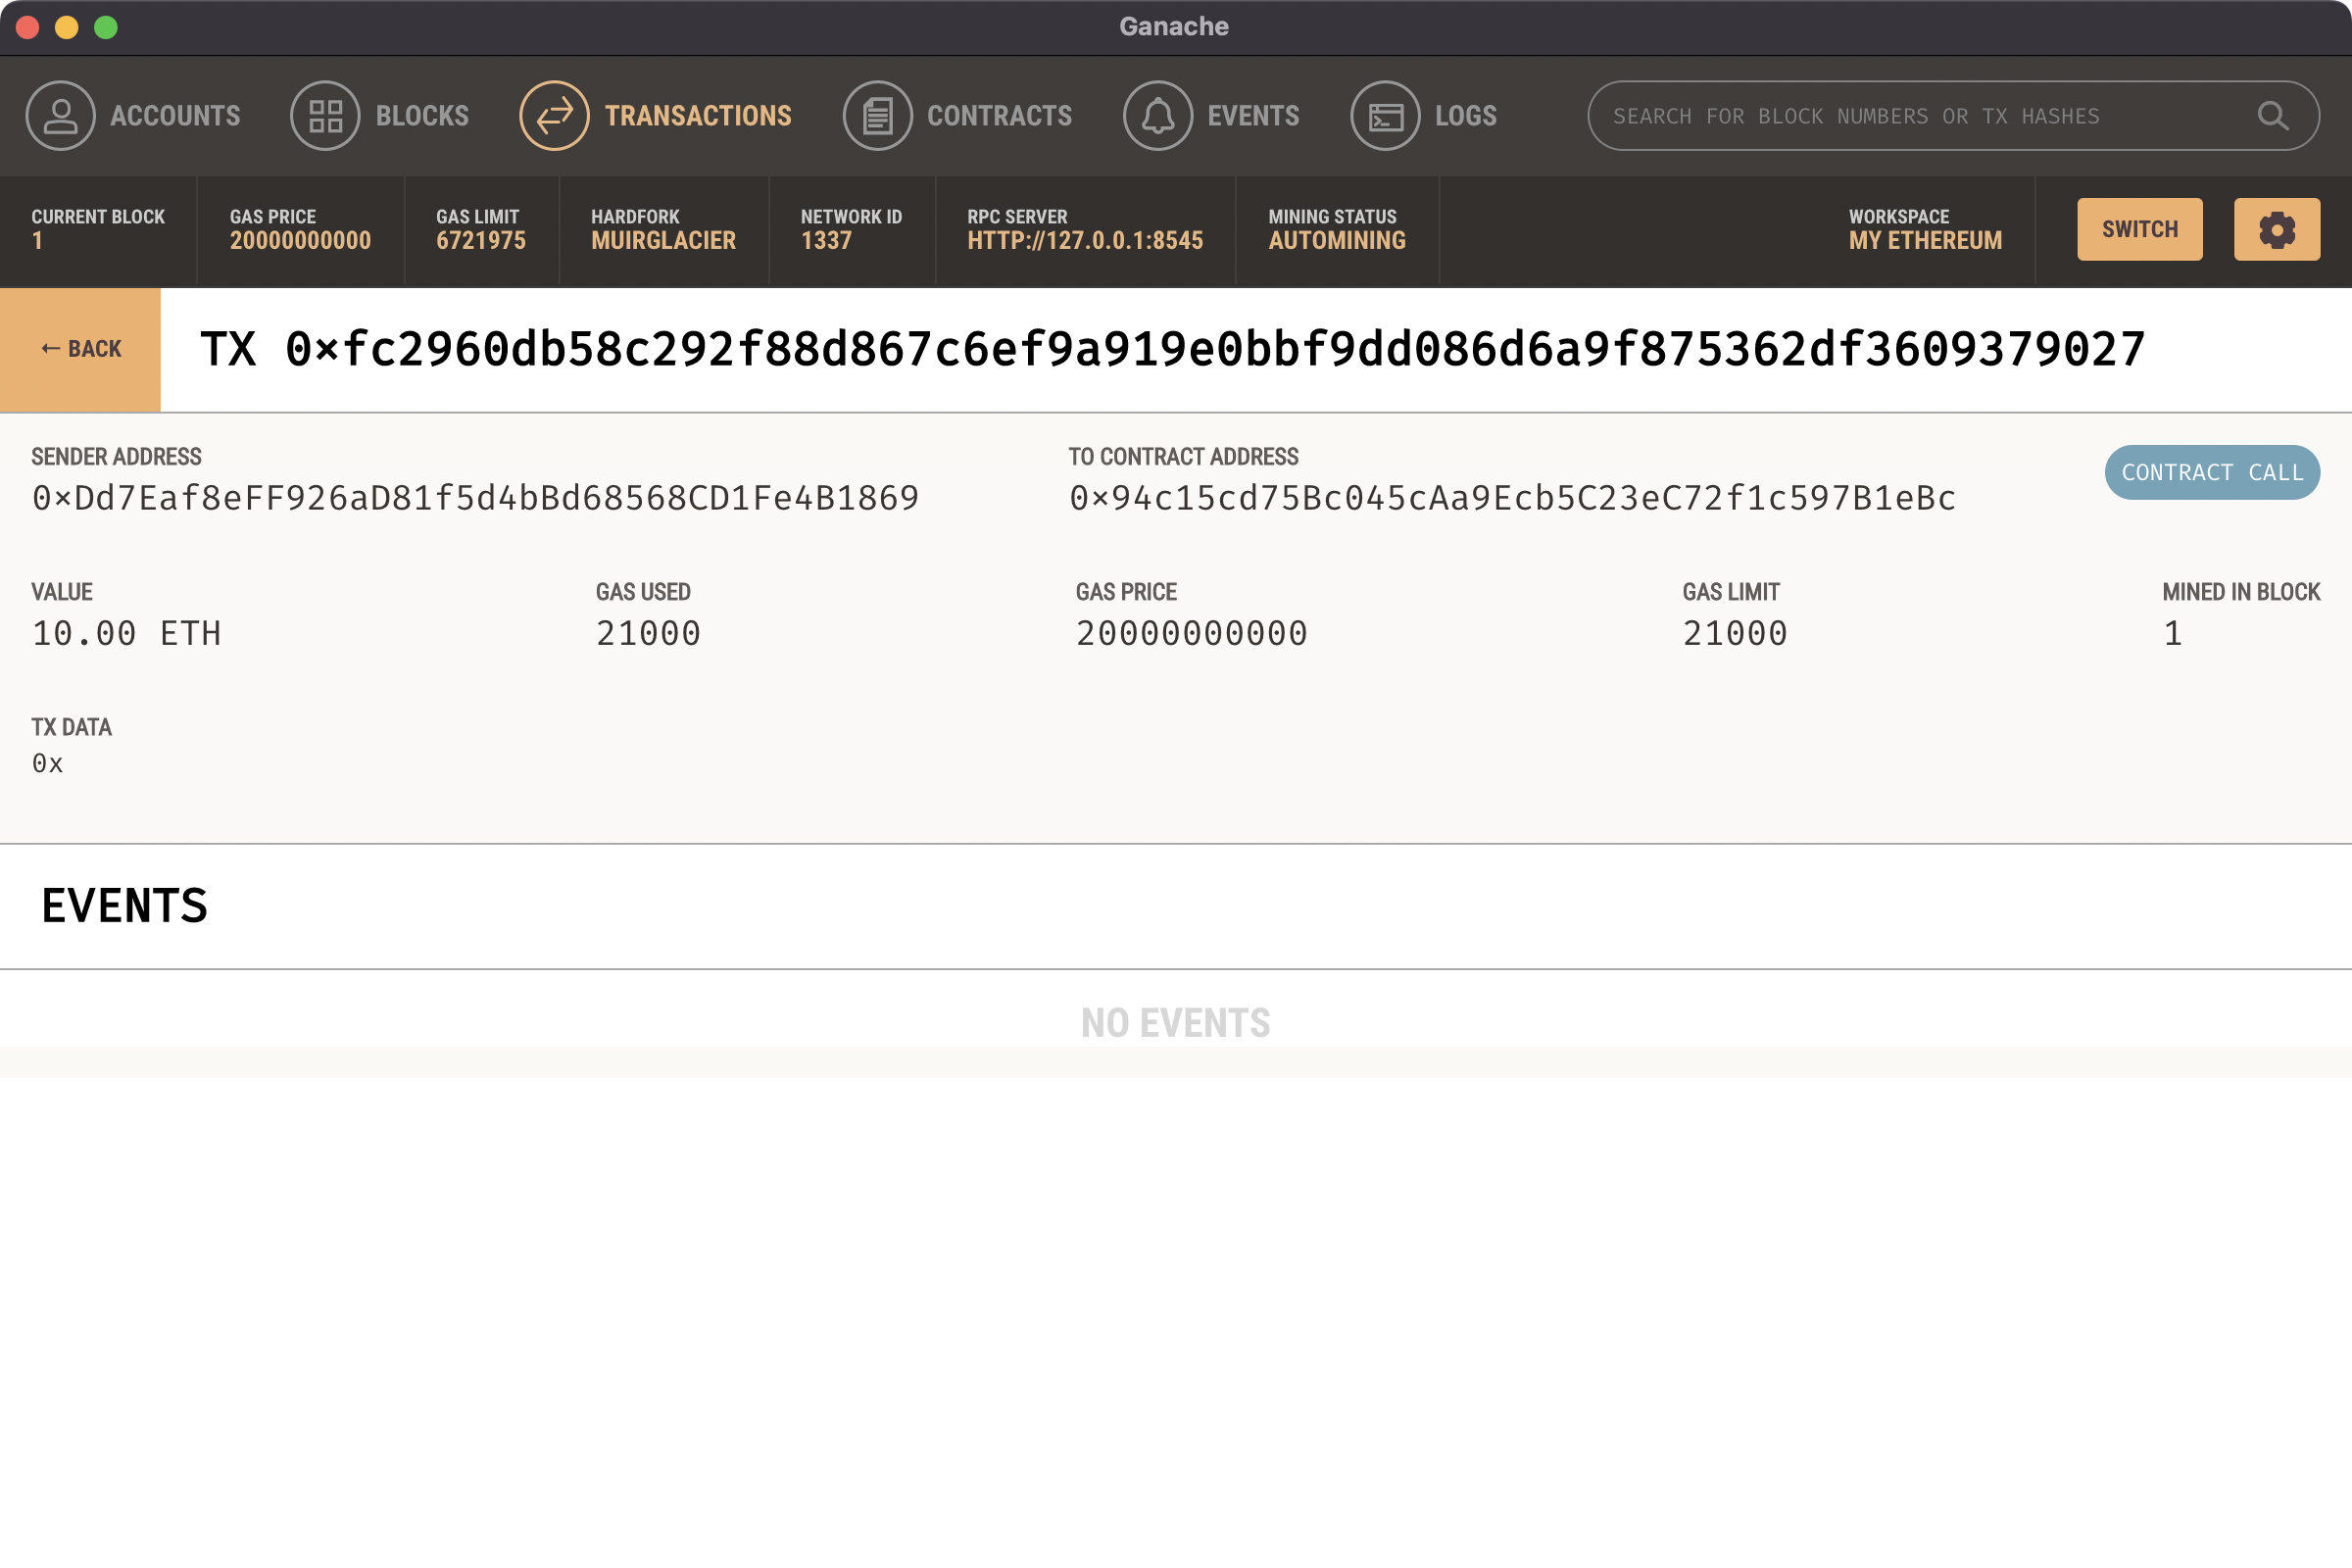
Try one transition on localhost chain Finally we already set up the localhost chain environment.
Let’s try one transition
Copy one wallet’s address
Switch other wallet’s account and send eth to the copy address
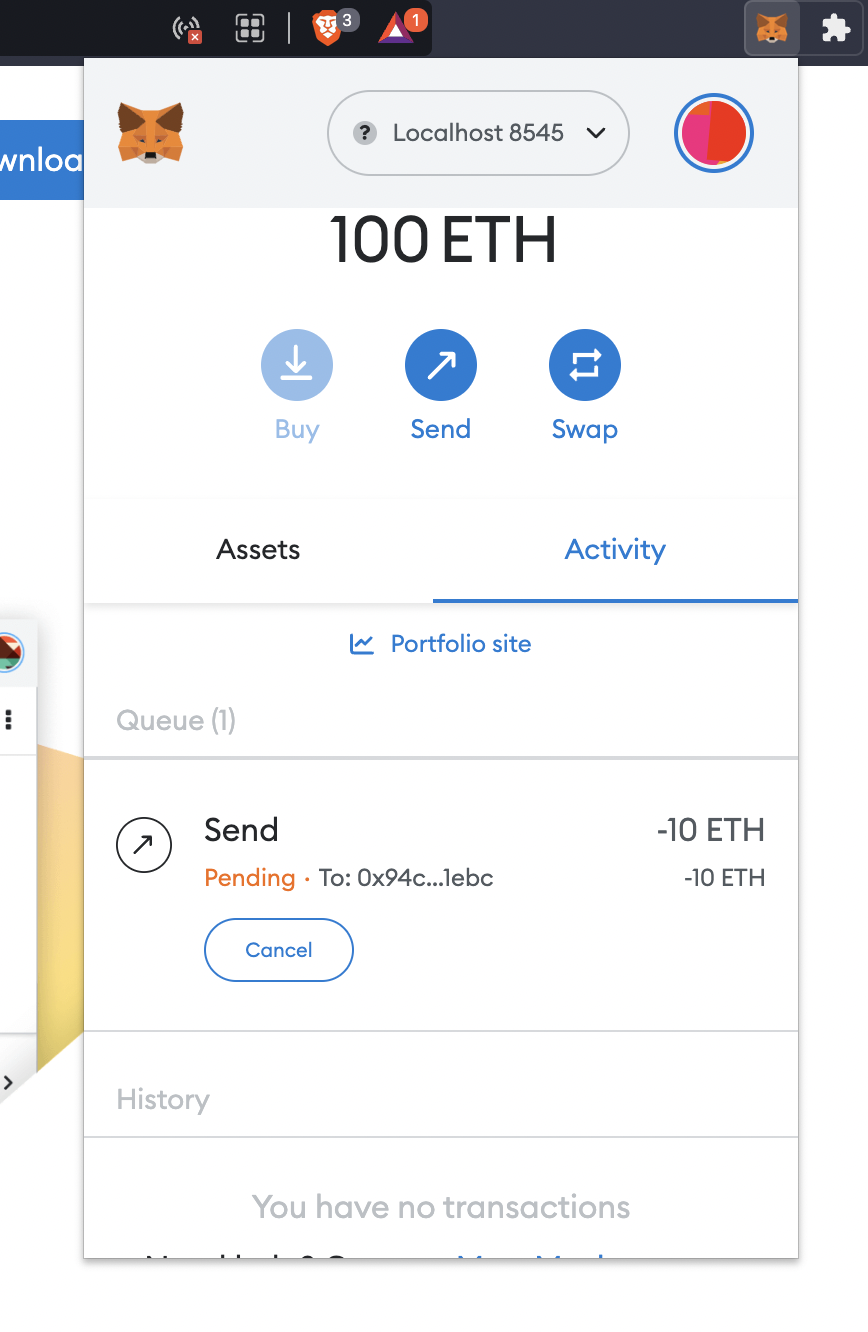
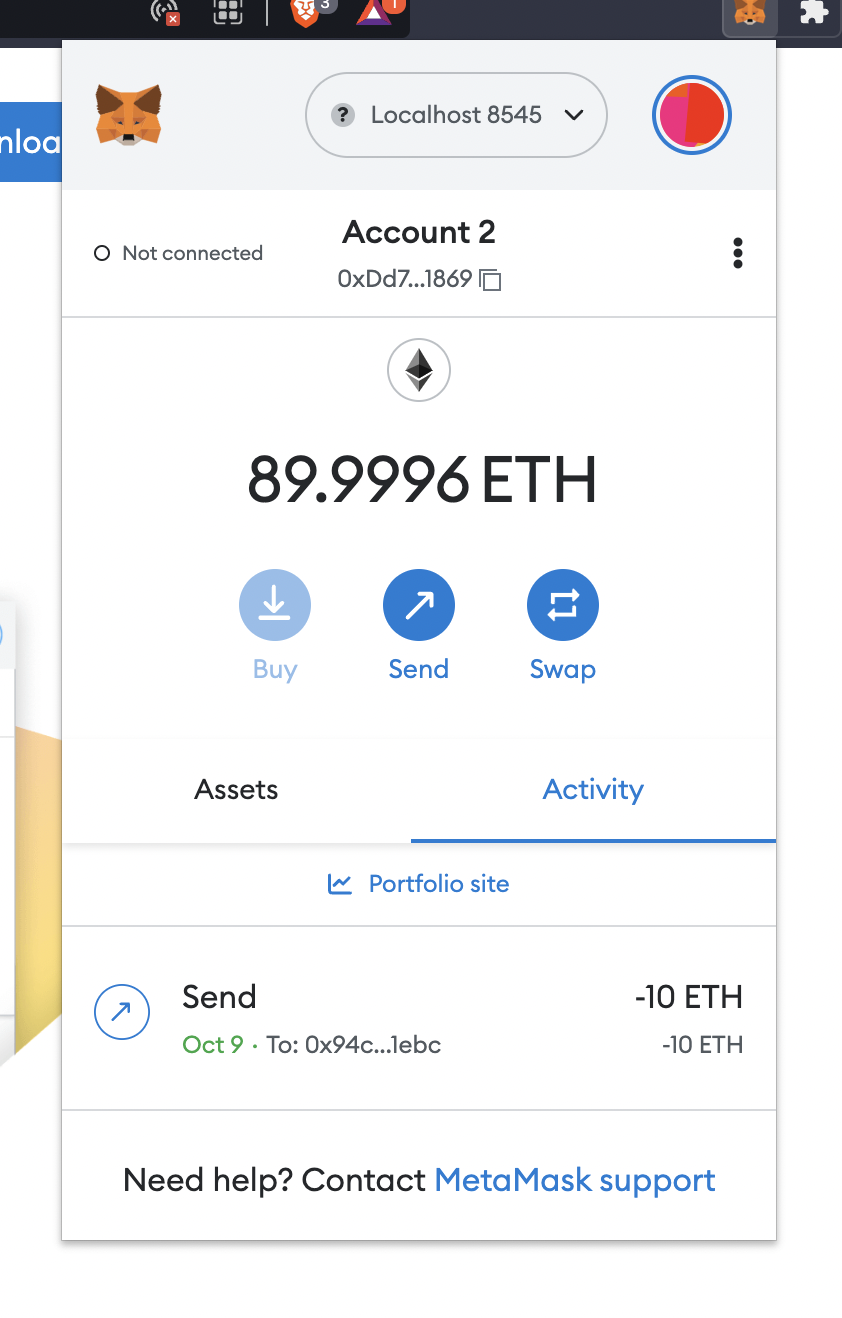
Wait a few seconds
Check ganache
Awesome, we have our own ethereum!
Deploying the smart contract to a localhost chain We remember the Foundry includes forge, cast, and anvil.forge to deploy our smart contracts. Then we will try to call our smart contract on cast
Deploying The first important thing is that we need to keep running the local chain on ganache.
We will run like below command to deploy a smart contract
forge create --rpc-url <your_rpc_url> --private-key <your_private_key> src/MyContract.sol:MyContract
This your_rpc_url can be found here.
This your_private_key is your deploy wallet private key. It can be found here.
We fill our value to the command, my command likes:
1 2 3 4 5 cd chain_endforge create --rpc-url http://127.0.0.1:8545 --private-key 1430bfebd9c4cf85cd2c9ccb43b7b1f6e3aa3449cd98451ad23ac31f518c3f7c src/Counter.sol:Counter --legacy forge create --rpc-url http://127.0.0.1:8545 --private-key 1430bfebd9c4cf85cd2c9ccb43b7b1f6e3aa3449cd98451ad23ac31f518c3f7c src/Counter.sol:Counter --json --legacy | jq
Because ganchce runs an old version chain so we need to add --legacy.
We will get like this:
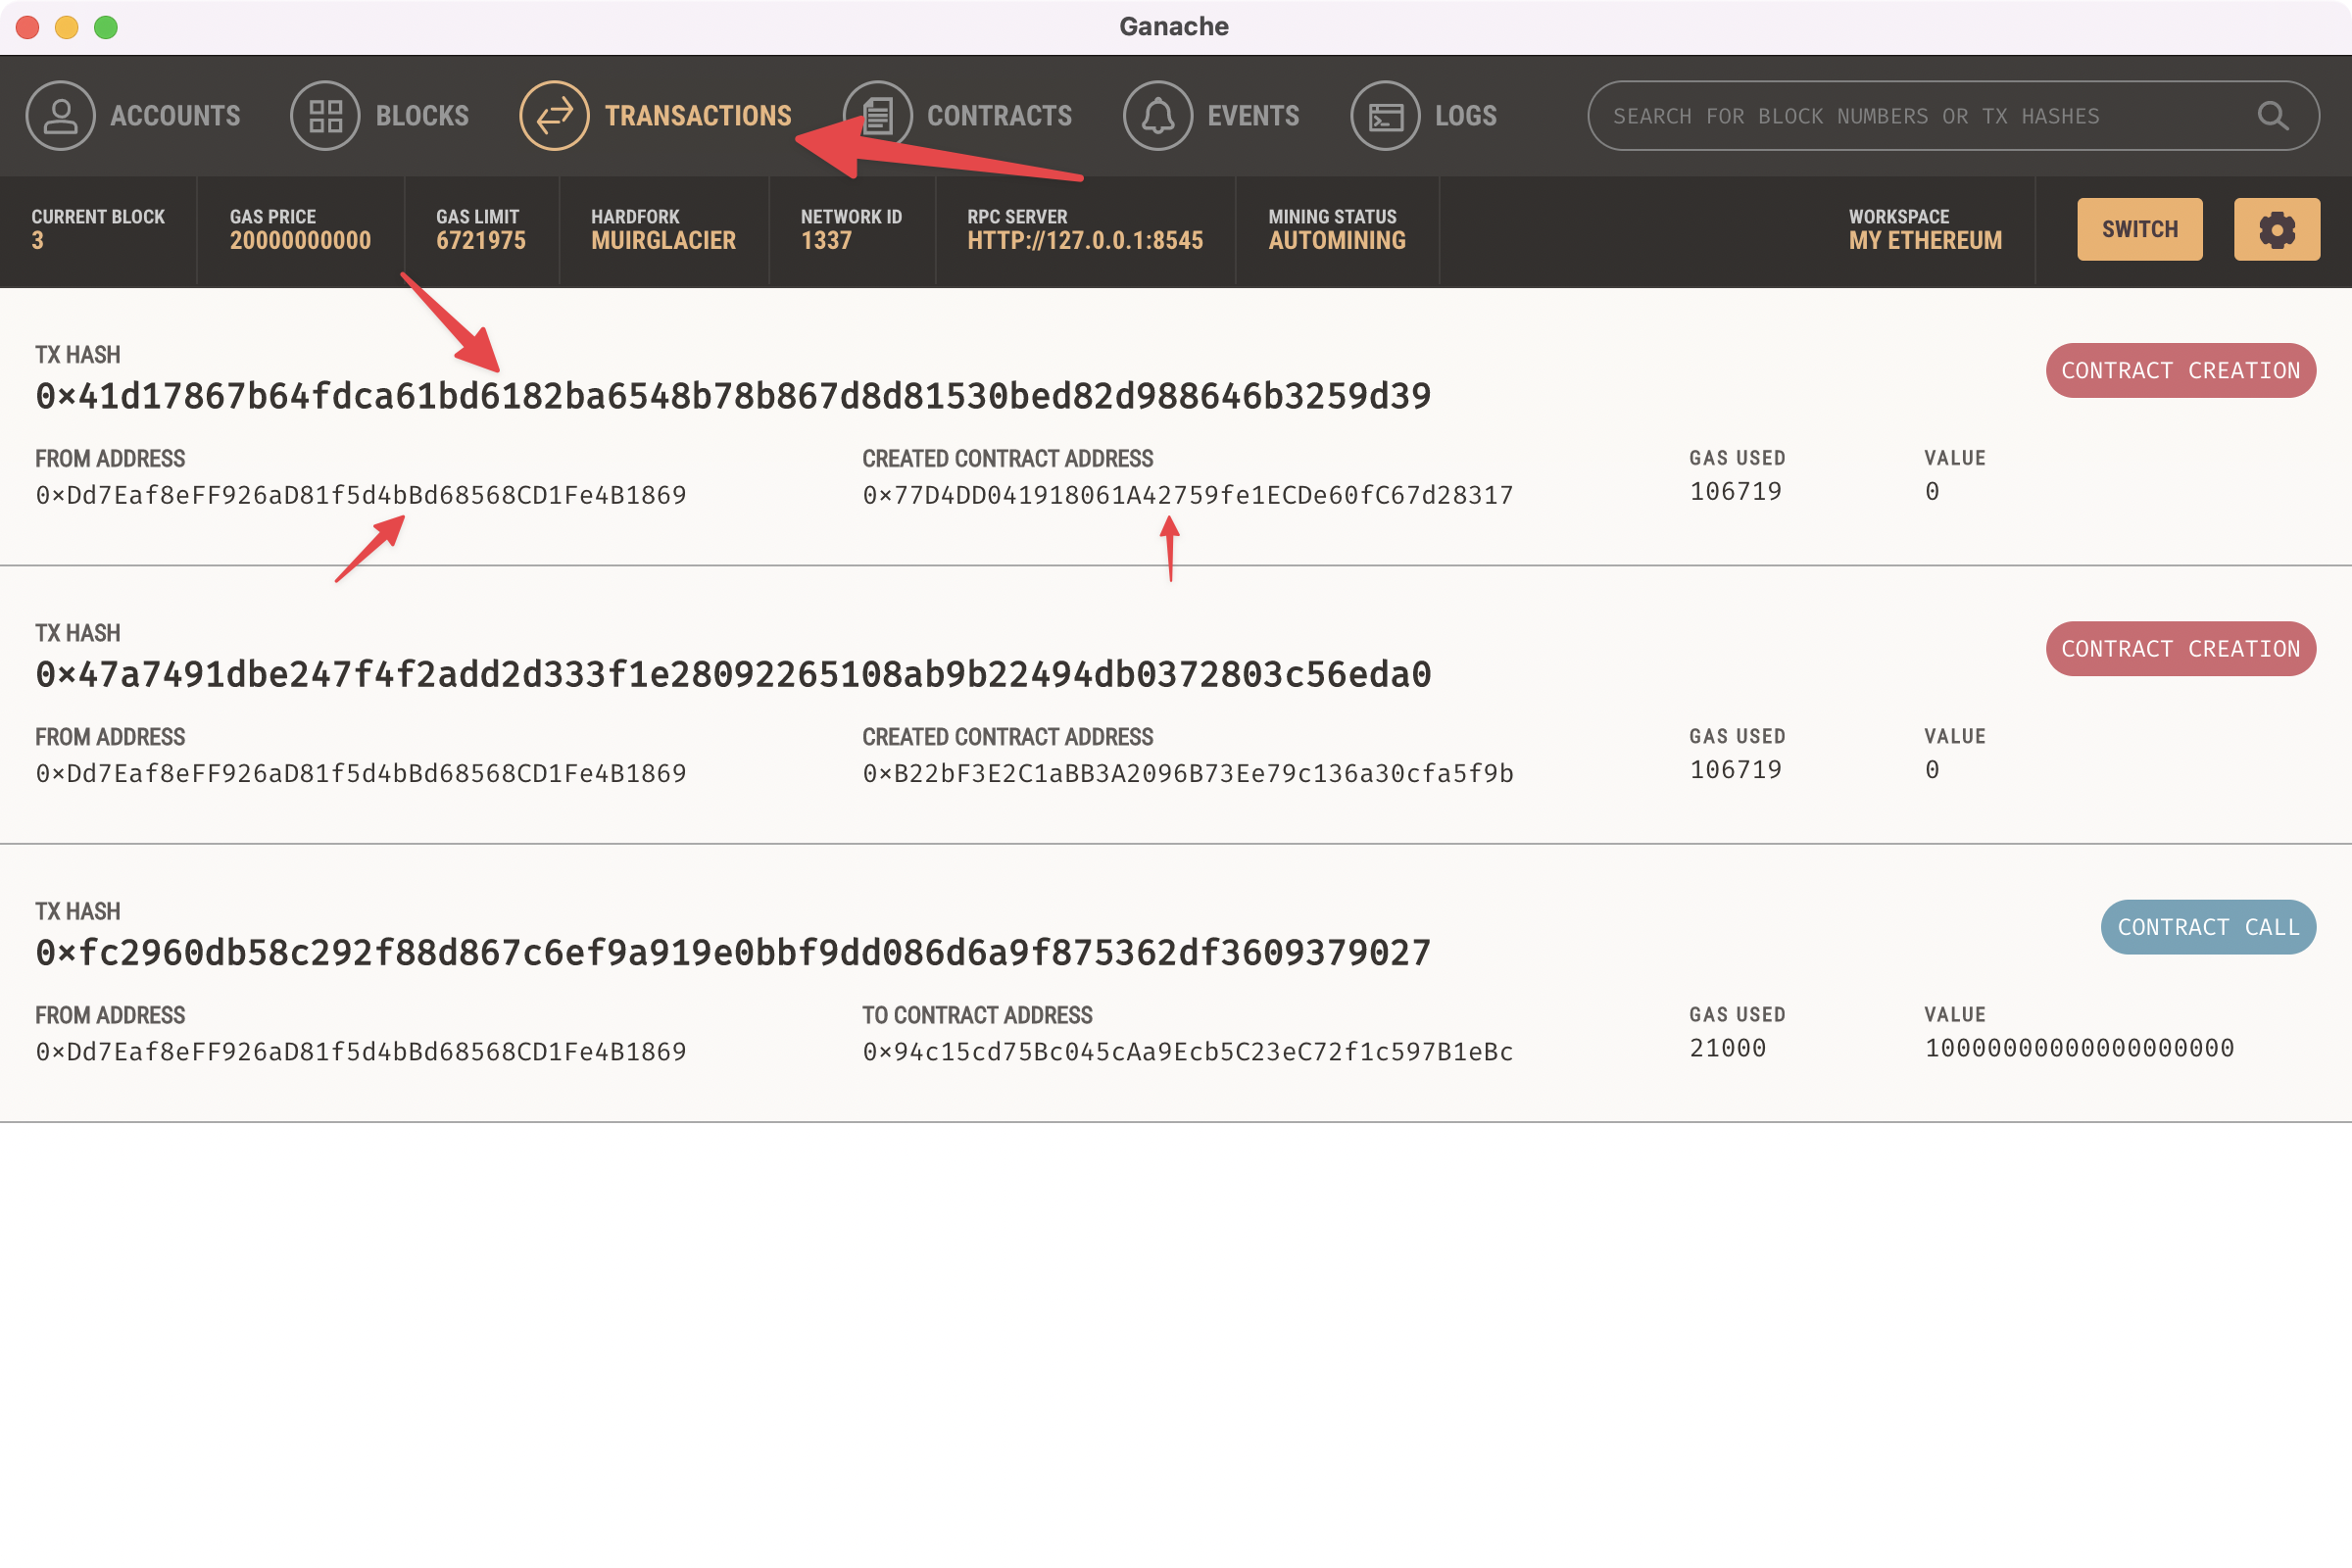
1 2 3 4 5 6 forge create --rpc-url http://127.0.0.1:8545 --private-key 1430bfebd9c4cf85cd2c9ccb43b7b1f6e3aa3449cd98451ad23ac31f518c3f7c src/Counter.sol:Counter --json --legacy | jq { "deployedTo" : "0x77D4DD041918061A42759fe1ECDe60fC67d28317" , "deployer" : "0xDd7Eaf8eFF926aD81f5d4bBd68568CD1Fe4B1869" , "transactionHash" : "0x41d17867b64fdca61bd6182ba6548b78b867d8d81530bed82d988646b3259d39" }
The deployedTo value 0x77D4DD041918061A42759fe1ECDe60fC67d28317 is the smart contract address.
Now, our smart contract already has been deployed successfully.
So easy! Right?
One more thing, because we use ganacha, we can check the smart contract deploy information on GUI too.
Uses cast to call the smart contract on the localhost chain In fact, everyone use the ethereum’s JSON_RPC API to call smart contract.eth_call and eth_sendTransaction.
The difference between a call and a transaction is the following:
transactions are created by your client, signed, and broadcasted to the network. They will eventually alter the state of the blockchain, for example, by manipulating balances or values in smart contracts.
calls are transactions executed locally on the user’s local machine which alone evaluates the result. These are read-only and fast. They can’t change the blockchain in any way because they are never sent to the network. Some examples “read-only/dry run/practice”.
Call cast call - Perform a call on an account without publishing a transaction. More Detail
It is Ethereum JSON-RPC’s eth_call
Transaction cast send - Sign and publish a transaction. More Detail
It is Ethereum JSON-RPC’s eth_sendTransaction
Use cast call We will run like below command to get a smart contract’s a public variablecast call your_smart_contract_address "public_variable_name()" --rpc-url http://127.0.0.1:8545
First, we need to find the smart contract address 0x77D4DD041918061A42759fe1ECDe60fC67d28317.
Second, our smart contract code is (chain_end/src/Counter.sol)
1 2 3 4 5 6 7 8 9 10 11 12 13 14 // SPDX-License-Identifier: UNLICENSED pragma solidity ^0.8.13; contract Counter { uint256 public number; function setNumber(uint256 newNumber) public { number = newNumber; } function increment() public { number++; } }
So public_variable_name is number.
We could get this command
1 2 3 cast call 0x77D4DD041918061A42759fe1ECDe60fC67d28317 "number()" --rpc-url http://127.0.0.1:8545 Output: 0x0000000000000000000000000000000000000000000000000000000000000000
Use cast send We will run like below command to call a smart contract’s a function
cast send your_smart_contract_address "function_name(function_args_type)(function_return_type)" --rpc-url http://127.0.0.1:8545 --private-key your_private_key --legacy --json | jq
Based on before content, we know the your_smart_contract_address and can find the your_private_key.
The increment function
1 2 3 function increment() public { number++; }
uses function_name(function_args_type)(function_return_type) method will convert to increment()
The setNumber function
1 2 3 function setNumber(uint256 newNumber) public { number = newNumber; }
uses function_name(function_args_type)(function_return_type) will convert to setNumber(uint256)
1 2 3 4 5 6 7 8 9 10 11 12 13 14 15 16 cast send 0x77D4DD041918061A42759fe1ECDe60fC67d28317 "increment()" --rpc-url http://127.0.0.1:8545 --private-key 1430bfebd9c4cf85cd2c9ccb43b7b1f6e3aa3449cd98451ad23ac31f518c3f7c --legacy --json | jq Output: { "blockHash" : "0x627958c966a6cae190d0dadd513cfdd5f53eaa048932394bd343cbb0fe3add00" , "blockNumber" : "0x15" , "contractAddress" : null, "cumulativeGasUsed" : "0xa478" , "from" : "0xdd7eaf8eff926ad81f5d4bbd68568cd1fe4b1869" , "gasUsed" : "0xa478" , "logs" : [], "logsBloom" : "0x00000000000000000000000000000000000000000000000000000000000000000000000000000000000000000000000000000000000000000000000000000000000000000000000000000000000000000000000000000000000000000000000000000000000000000000000000000000000000000000000000000000000000000000000000000000000000000000000000000000000000000000000000000000000000000000000000000000000000000000000000000000000000000000000000000000000000000000000000000000000000000000000000000000000000000000000000000000000000000000000000000000000000000000000000000000" , "status" : "0x1" , "to" : "0x77D4DD041918061A42759fe1ECDe60fC67d28317" , "transactionHash" : "0x9ee54c94adf35f3c9d4c18525266ff20e2210cd410cd3fa7d8ac682a4456b021" , "transactionIndex" : "0x0" }
Next, we will repeat multiple times to call our smart contract function.
1 2 3 cast call 0x77D4DD041918061A42759fe1ECDe60fC67d28317 "number()" --rpc-url http://127.0.0.1:8545 Output: 0x0000000000000000000000000000000000000000000000000000000000000001
1 2 3 4 5 6 7 8 9 10 11 12 13 14 15 16 cast send 0x77D4DD041918061A42759fe1ECDe60fC67d28317 "increment()" --rpc-url http://127.0.0.1:8545 --private-key 1430bfebd9c4cf85cd2c9ccb43b7b1f6e3aa3449cd98451ad23ac31f518c3f7c --legacy --json | jq Output: { "blockHash" : "0x6c3e9052c3e898083184c2409915a403dc73f17ee5ebed7d58b5a021ae38b8c2" , "blockNumber" : "0x16" , "contractAddress" : null, "cumulativeGasUsed" : "0x69e0" , "from" : "0xdd7eaf8eff926ad81f5d4bbd68568cd1fe4b1869" , "gasUsed" : "0x69e0" , "logs" : [], "logsBloom" : "0x00000000000000000000000000000000000000000000000000000000000000000000000000000000000000000000000000000000000000000000000000000000000000000000000000000000000000000000000000000000000000000000000000000000000000000000000000000000000000000000000000000000000000000000000000000000000000000000000000000000000000000000000000000000000000000000000000000000000000000000000000000000000000000000000000000000000000000000000000000000000000000000000000000000000000000000000000000000000000000000000000000000000000000000000000000000" , "status" : "0x1" , "to" : "0x77D4DD041918061A42759fe1ECDe60fC67d28317" , "transactionHash" : "0xcb506d3895e30c2cbcfb2f49063e1d598994499d980fb4eb7821d5edcabca3fa" , "transactionIndex" : "0x0" }
1 2 3 cast call 0x77D4DD041918061A42759fe1ECDe60fC67d28317 "number()" --rpc-url http://127.0.0.1:8545 Output: 0x0000000000000000000000000000000000000000000000000000000000000002
1 2 3 4 5 6 7 8 9 10 11 12 13 14 15 16 cast send 0x77D4DD041918061A42759fe1ECDe60fC67d28317 "setNumber(uint256)" 100 --rpc-url http://127.0.0.1:8545 --private-key 1430bfebd9c4cf85cd2c9ccb43b7b1f6e3aa3449cd98451ad23ac31f518c3f7c --legacy --json | jq Output: { "blockHash" : "0x5950ceaadc6177b0552396c208af2064d1b9272c796d8e4209252c8e048bbf83" , "blockNumber" : "0x17" , "contractAddress" : null, "cumulativeGasUsed" : "0x671a" , "from" : "0xdd7eaf8eff926ad81f5d4bbd68568cd1fe4b1869" , "gasUsed" : "0x671a" , "logs" : [], "logsBloom" : "0x00000000000000000000000000000000000000000000000000000000000000000000000000000000000000000000000000000000000000000000000000000000000000000000000000000000000000000000000000000000000000000000000000000000000000000000000000000000000000000000000000000000000000000000000000000000000000000000000000000000000000000000000000000000000000000000000000000000000000000000000000000000000000000000000000000000000000000000000000000000000000000000000000000000000000000000000000000000000000000000000000000000000000000000000000000000" , "status" : "0x1" , "to" : "0x77D4DD041918061A42759fe1ECDe60fC67d28317" , "transactionHash" : "0x5acc3e10d0e7a92cd5117d77810f0ffe31c0ee8e3b831577d6d0c7733d36452c" , "transactionIndex" : "0x0" }
1 2 3 cast call 0x77D4DD041918061A42759fe1ECDe60fC67d28317 "number()" --rpc-url http://127.0.0.1:8545 Output: 0x0000000000000000000000000000000000000000000000000000000000000064
1 2 3 cast call 0x77D4DD041918061A42759fe1ECDe60fC67d28317 "number()(uint256)" --rpc-url http://127.0.0.1:8545 Output: 100
So far so good.
Now we can deploy the smart contract on the local chain and call its function successfully.
Build front-end project We will focus how to build a minimal DApp. So I won’t explain any front end code details.
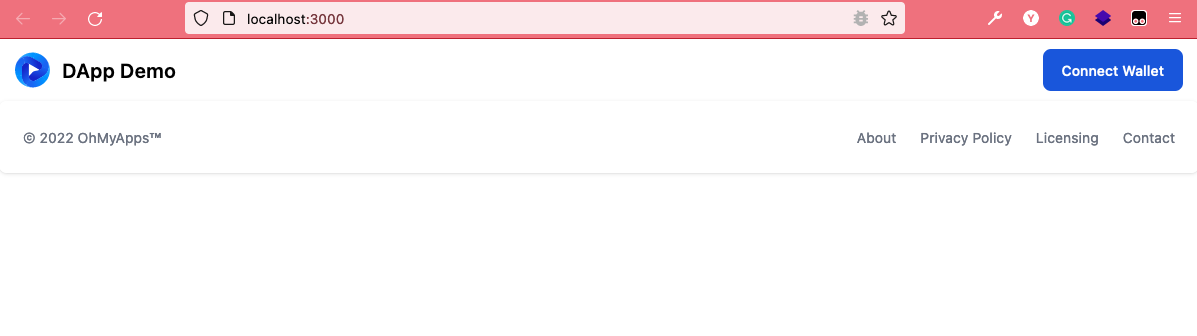
In the beginning, we quickly build our home page’s layout on the front-end project.
We use below code to replace front_end/pages/index.tsx file
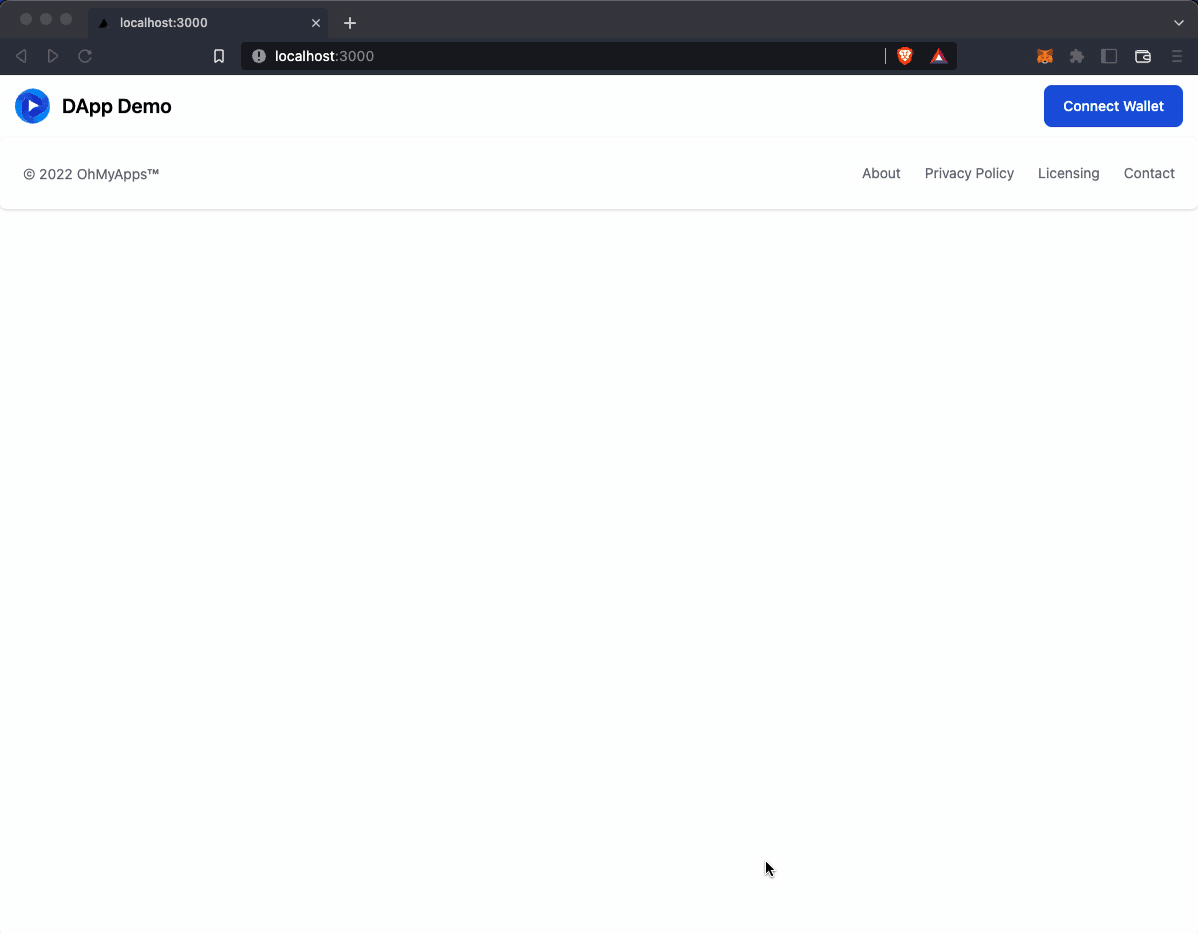
1 2 3 4 5 6 7 8 9 10 11 12 13 14 15 16 17 18 19 20 21 22 23 24 25 26 27 28 29 30 31 32 33 34 35 36 37 38 39 40 41 42 43 44 import type { NextPage } from "next" ;import { Navbar , Footer , Button } from "flowbite-react" ;const Home : NextPage = () => { const handleConnectWallet = ( return ( <div className ="" > <Navbar fluid ={true} rounded ={true} > <Navbar.Brand href ="/" > <img src ="https://flowbite.com/docs/images/logo.svg" className ="mr-3 h-6 sm:h-9" alt ="Flowbite Logo" /> <span className ="self-center whitespace-nowrap text-xl font-semibold dark:text-white" > DApp Demo </span > </Navbar.Brand > <Navbar.Toggle /> <Navbar.Collapse > <Button onClick ={handleConnectWallet} > Connect Wallet</Button > </Navbar.Collapse > </Navbar > <div className ="min-w-full min-h-full" > <div className ="container flex flex-col justify-center items-center space-y-5" > </div > </div > <Footer container ={true} > <Footer.Copyright href ="#" by ="OhMyApps™" year ={new Date ().getFullYear ()} /> <Footer.LinkGroup > <Footer.Link href ="#" > About</Footer.Link > <Footer.Link href ="#" > Privacy Policy</Footer.Link > <Footer.Link href ="#" > Licensing</Footer.Link > <Footer.Link href ="#" > Contact</Footer.Link > </Footer.LinkGroup > </Footer > </div > ); }; export default Home ;
How to use ethers.js Let’s try to build the first feature with ethers.js
Install ethers.js The ethers.js library is interacting with Ethereum. So we choose it.
Now, We install it.
1 2 3 // on ./DApp-Demo cd front_endyarn add ethers
We will use metamask to connect to our website. Looks like
We study the ethersjs document ,
We changed our front_end/pages/index.tsx file.
1 2 3 4 5 6 7 8 9 10 11 12 13 14 15 16 17 18 19 20 21 22 23 24 25 26 27 28 29 30 31 32 33 34 35 36 37 38 39 40 41 42 43 44 45 46 47 48 49 50 51 52 53 54 55 56 57 58 59 60 61 62 63 64 import { useState } from 'react' import type { NextPage } from 'next' import { Navbar , Footer , Button } from 'flowbite-react' import { ethers } from 'ethers' declare let window : any const Home : NextPage = () => { const [address, setAddress] = useState<string>() const [balance, setBalance] = useState<string>() const handleConnectWallet = async ( const provider = new ethers.providers .Web3Provider (window .ethereum ) await provider.send ('eth_requestAccounts' , []) const signer = provider.getSigner () setAddress (await signer.getAddress ()) setBalance (ethers.utils .formatEther (await signer.getBalance ())) } return ( <div className ="" > <Navbar fluid ={true} rounded ={true} > <Navbar.Brand href ="/" > <img src ="https://flowbite.com/docs/images/logo.svg" className ="mr-3 h-6 sm:h-9" alt ="Flowbite Logo" /> <span className ="self-center whitespace-nowrap text-xl font-semibold dark:text-white" > DApp Demo </span > </Navbar.Brand > <Navbar.Toggle /> <Navbar.Collapse > {address ? ( <> <div > {address}</div > <div > {balance}</div > </> ) : ( <Button onClick ={handleConnectWallet} > Connect Wallet</Button > )} </Navbar.Collapse > </Navbar > <div className ="min-w-full min-h-full" > <div className ="container flex flex-col justify-center items-center space-y-5" > </div > </div > <Footer container ={true} > <Footer.Copyright href ="#" by ="OhMyApps™" year ={new Date ().getFullYear ()} /> <Footer.LinkGroup > <Footer.Link href ="#" > About</Footer.Link > <Footer.Link href ="#" > Privacy Policy</Footer.Link > <Footer.Link href ="#" > Licensing</Footer.Link > <Footer.Link href ="#" > Contact</Footer.Link > </Footer.LinkGroup > </Footer > </div> ) } export default Home
We built the first feature with ethersjs.
Now we want to call our smart contract.
Integrating the Front-End Generate Typescript code from ABI Because we use typescript, so we can’t like javascript to directly call ABI.
Recommend TypeChain library. It helps us to create typescript code from Ethereum smart contract.
Install TypeChain
1 2 3 // on ./DApp-Demo cd front_endyarn add typechain @typechain/ethers-v5 -D
Use TypeChain
1 2 3 4 // on ./DApp-Demo/front_end // Keep you already built the smart contract before. npx typechain --target ethers-v5 --out-dir generated/contract-types '../chain_end/out/Counter.sol/Counter.json' Output: Successfully generated 5 typings!
Now, we finished from the JSON ABI files to the typescript module.
Update the homepage We changed our front_end/pages/index.tsx file.COUNTER_ADDRESS value. It muse be your smart contract deployed address.
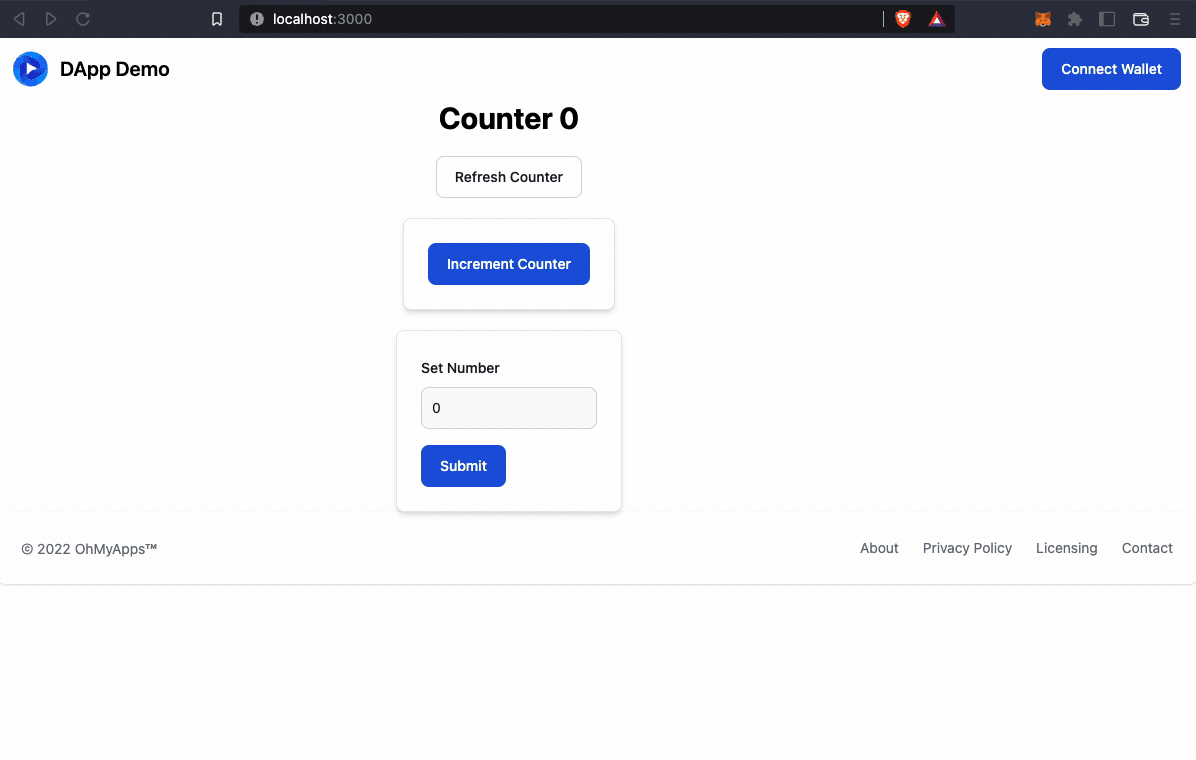
1 2 3 4 5 6 7 8 9 10 11 12 13 14 15 16 17 18 19 20 21 22 23 24 25 26 27 28 29 30 31 32 33 34 35 36 37 38 39 40 41 42 43 44 45 46 47 48 49 50 51 52 53 54 55 56 57 58 59 60 61 62 63 64 65 66 67 68 69 70 71 72 73 74 75 76 77 78 79 80 81 82 83 84 85 86 87 88 89 90 91 92 93 94 95 96 97 98 99 100 101 102 103 104 105 106 107 108 109 110 111 112 113 114 115 116 117 118 119 120 121 122 123 124 125 126 127 128 129 130 131 132 133 134 135 136 137 138 139 140 import type { NextPage } from 'next' import React from 'react' import { useState, useEffect } from 'react' import { ethers } from 'ethers' import { Counter __factory } from '../generated/contract-types' import { Navbar , Footer , Card , Label , TextInput , Button } from 'flowbite-react' declare let window : any const Home : NextPage = () => { const [address, setAddress] = useState<string>() const [balance, setBalance] = useState<string>() const [count, setCount] = useState<number>(0 ) const [number, setNumber] = useState<number>(0 ) const [time, setTime] = useState (Date .now ()) const COUNTER_ADDRESS = '0x4D32EEaee44e11cBD3fDE99F38f0885D0F735dE3' useEffect (() => { const interval = setInterval (() => setTime (Date .now ()), 5000 ) return () => { clearInterval (interval) } }, []) useEffect (() => { const provider = new ethers.providers .StaticJsonRpcProvider () const counter = Counter __factory.connect (COUNTER_ADDRESS , provider) if (counter) { counter.number ().then ((count ) => { setCount (count.toNumber ()) }) } }, [time]) const handleConnectWallet = async ( const provider = new ethers.providers .Web3Provider (window .ethereum ) await provider.send ('eth_requestAccounts' , []) const signer = provider.getSigner () setAddress (await signer.getAddress ()) setBalance (ethers.utils .formatEther (await signer.getBalance ())) } const handleRefresh = async ( const provider = new ethers.providers .StaticJsonRpcProvider () const counter = Counter __factory.connect (COUNTER_ADDRESS , provider) const n = await counter.number () setCount (n.toNumber ()) } const handleIncrement = async ( console .log ('increment' ) const provider = new ethers.providers .Web3Provider (window .ethereum ) const signer = await provider.getSigner () const counter = Counter __factory.connect (COUNTER_ADDRESS , signer) await counter.increment () } const handleSetNumber = async ( console .log ('set number' ) const provider = new ethers.providers .Web3Provider (window .ethereum ) const signer = await provider.getSigner () const contract = Counter __factory.connect (COUNTER_ADDRESS , signer) await contract.setNumber (number) } return ( <div className ="" > <Navbar fluid ={true} rounded ={true} > <Navbar.Brand href ="/" > <img src ="https://flowbite.com/docs/images/logo.svg" className ="mr-3 h-6 sm:h-9" alt ="Flowbite Logo" /> <span className ="self-center whitespace-nowrap text-xl font-semibold dark:text-white" > DApp Demo </span > </Navbar.Brand > <Navbar.Toggle /> <Navbar.Collapse > {address ? ( <> <div > {address}</div > <div > {balance}</div > </> ) : ( <Button onClick ={handleConnectWallet} > Connect Wallet</Button > )} </Navbar.Collapse > </Navbar > <div className ="min-w-full min-h-full" > <div className ="container flex flex-col justify-center items-center space-y-5" > <div className ="text-3xl font-bold" > Counter {count}</div > <Button color ="light" onClick ={handleRefresh} > Refresh Counter </Button > <Card > <Button onClick ={handleIncrement} > Increment Counter</Button > </Card > <Card > <div > <div className ="mb-2 block" > <Label htmlFor ="number" value ="Set Number" /> </div > <TextInput id ="number" type ="number" placeholder ="Enter number" value ={number} required ={true} onChange ={(e) => setNumber(parseInt(e.target.value))} /> </div > <Button type ="submit" onClick ={handleSetNumber} > Submit </Button > </Card > </div > </div > <Footer container ={true} > <Footer.Copyright href ="#" by ="OhMyApps™" year ={new Date ().getFullYear ()} /> <Footer.LinkGroup > <Footer.Link href ="#" > About</Footer.Link > <Footer.Link href ="#" > Privacy Policy</Footer.Link > <Footer.Link href ="#" > Licensing</Footer.Link > <Footer.Link href ="#" > Contact</Footer.Link > </Footer.LinkGroup > </Footer > </div> ) } export default Home
Nice work!
Deploying it to the World So, we have it working great locally, how do we get it out to the world?
Deploying smart contract to Goerli test network Get some test GoEth I really recommend this faucet https://goerli-faucet.pk910.de/ . It doesn’t register any account. It is easy.
Get the goerli RPC url sign up the https://infura.io and you can find it.
It looks like this:https://goerli.infura.io/v3/YOUR_API_KEY
Get the etherscan api key to verify https://etherscan.io/myapikey here find your api key.
The smart contract deploys to Goerli test network 1 2 3 // on ./DApp-Demo cd chain_endforge create --rpc-url https://goerli.infura.io/v3/YOUR_API_KEY --private-key YOUR_PRIVATE_KEY src/Counter.sol:Counter --etherscan-api-key YOUR_ETHERSCAN_API_KEY --verify
Output:
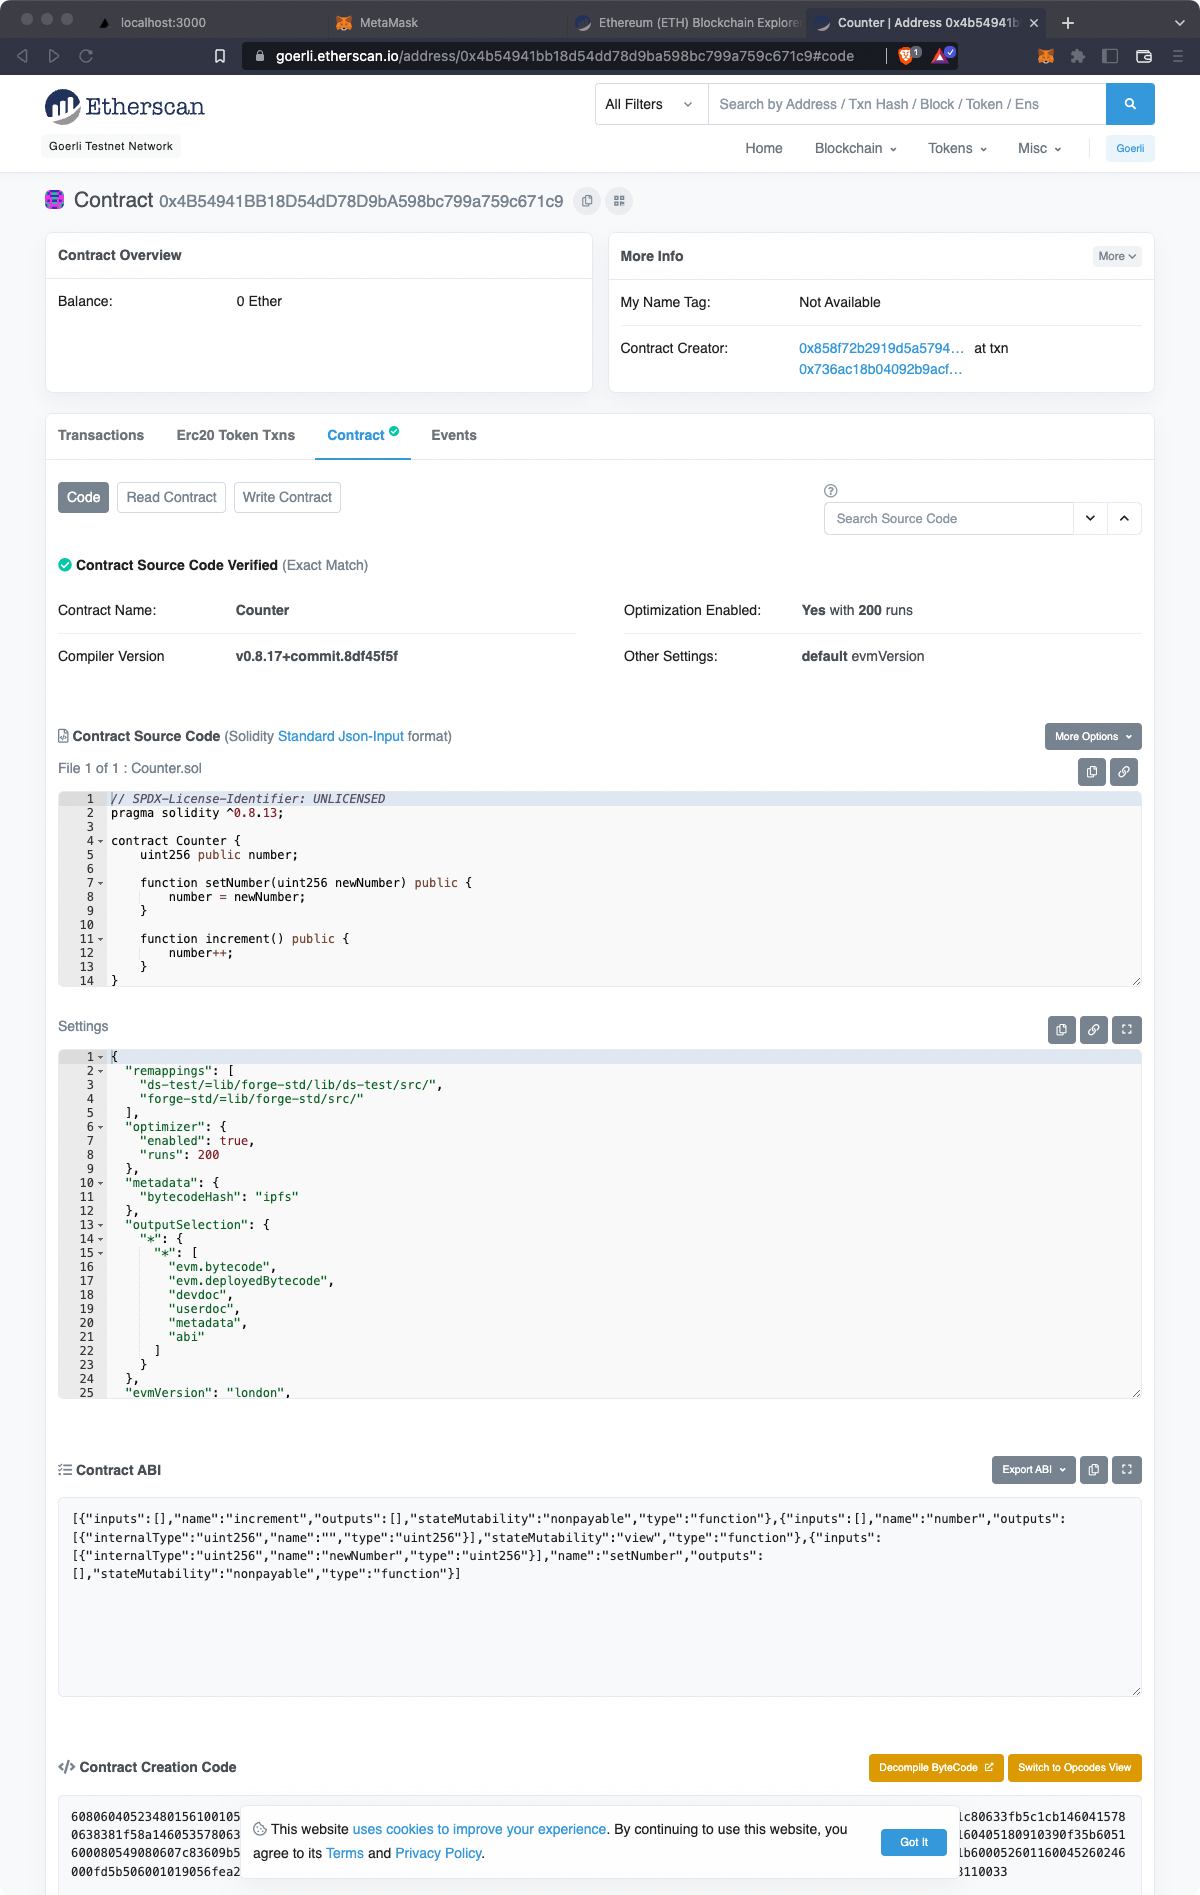
1 2 3 4 5 6 7 8 9 10 11 12 13 14 15 16 17 18 19 20 21 22 23 24 [⠆] Compiling... No files changed, compilation skipped Deployer: 0x858F72b2919d5A5794bE7b93ce4e603f8FFB8792 Deployed to: 0x4B54941BB18D54dD78D9bA598bc799a759c671c9 Transaction hash : 0x736ac18b04092b9acf3d4140ae49d7e93e450a49f14fe96081ed5e4fe26f38cc Starting contract verification... Waiting for etherscan to detect contract deployment... Submitting verification for [src/Counter.sol:Counter] "0x4B54941BB18D54dD78D9bA598bc799a759c671c9" . Submitting verification for [src/Counter.sol:Counter] "0x4B54941BB18D54dD78D9bA598bc799a759c671c9" . Submitting verification for [src/Counter.sol:Counter] "0x4B54941BB18D54dD78D9bA598bc799a759c671c9" . Submitting verification for [src/Counter.sol:Counter] "0x4B54941BB18D54dD78D9bA598bc799a759c671c9" . Submitting verification for [src/Counter.sol:Counter] "0x4B54941BB18D54dD78D9bA598bc799a759c671c9" . Submitted contract for verification: Response: `OK` GUID: `ukrqjb5n3rmrxbns2jf91a2nbbmiqkjv8vticjhti3t4dzw6jf` URL: https://goerli.etherscan.io/address/0x4b54941bb18d54dd78d9ba598bc799a759c671c9 Waiting for verification result... Contract successfully verified
Please remember this is deployed to value. It is your smart contract address.
Checks it on Etherscan
Our code was verified. Nice!
Deploying website to IPFS Update our front-end code We need to do two things:
replace StaticJsonRpcProvider with InfuraProvider
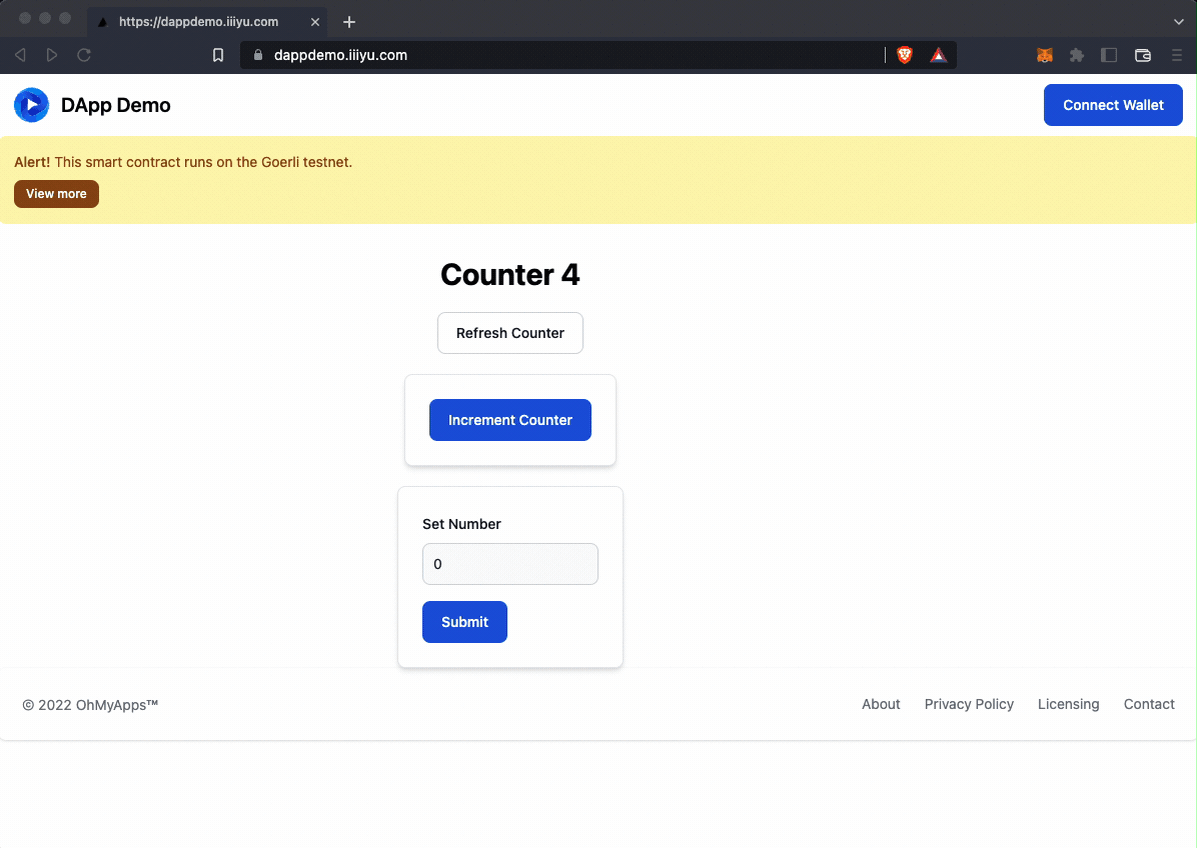
Uses the correct smart contract address. replace const COUNTER_ADDRESS value.
We changed our front_end/pages/index.tsx file.
1 2 3 4 5 6 7 8 9 10 11 12 13 14 15 16 17 18 19 20 21 22 23 24 25 26 27 28 29 30 31 32 33 34 35 36 37 38 39 40 41 42 43 44 45 46 47 48 49 50 51 52 53 54 55 56 57 58 59 60 61 62 63 64 65 66 67 68 69 70 71 72 73 74 75 76 77 78 79 80 81 82 83 84 85 86 87 88 89 90 91 92 93 94 95 96 97 98 99 100 101 102 103 104 105 106 107 108 109 110 111 112 113 114 115 116 117 118 119 120 121 122 123 124 125 126 127 128 129 130 131 132 133 134 135 136 137 138 139 140 141 142 143 144 145 146 147 148 149 150 151 152 153 154 155 156 157 158 159 160 161 162 163 164 165 166 167 168 169 import type { NextPage } from 'next' import React from 'react' import { useState, useEffect } from 'react' import { ethers } from 'ethers' import { Counter __factory } from '../generated/contract-types' import { Navbar , Footer , Card , Label , TextInput , Button , Alert , } from 'flowbite-react' declare let window : any const Home : NextPage = () => { const [address, setAddress] = useState<string>() const [balance, setBalance] = useState<string>() const [count, setCount] = useState<number>(0 ) const [number, setNumber] = useState<number>(0 ) const [time, setTime] = useState (Date .now ()) const COUNTER_ADDRESS = '0x4B54941BB18D54dD78D9bA598bc799a759c671c9' useEffect (() => { const interval = setInterval (() => setTime (Date .now ()), 5000 ) return () => { clearInterval (interval) } }, []) useEffect (() => { const provider = new ethers.providers .InfuraProvider ('goerli' ) const counter = Counter __factory.connect (COUNTER_ADDRESS , provider) if (counter) { counter.number ().then ((count ) => { setCount (count.toNumber ()) }) } }, [time]) const handleConnectWallet = async ( const provider = new ethers.providers .Web3Provider (window .ethereum ) await provider.send ('eth_requestAccounts' , []) const signer = provider.getSigner () setAddress (await signer.getAddress ()) setBalance (ethers.utils .formatEther (await signer.getBalance ())) } const handleRefresh = async ( const provider = new ethers.providers .InfuraProvider ('goerli' ) const counter = Counter __factory.connect (COUNTER_ADDRESS , provider) const n = await counter.number () setCount (n.toNumber ()) } const handleIncrement = async ( console .log ('increment' ) const provider = new ethers.providers .Web3Provider (window .ethereum ) const signer = await provider.getSigner () const counter = Counter __factory.connect (COUNTER_ADDRESS , signer) await counter.increment () } const handleSetNumber = async ( console .log ('set number' ) const provider = new ethers.providers .Web3Provider (window .ethereum ) const signer = await provider.getSigner () const contract = Counter __factory.connect (COUNTER_ADDRESS , signer) await contract.setNumber (number) } return ( <div className ="" > <Navbar fluid ={true} rounded ={true} > <Navbar.Brand href ="/" > <img src ="https://flowbite.com/docs/images/logo.svg" className ="mr-3 h-6 sm:h-9" alt ="Flowbite Logo" /> <span className ="self-center whitespace-nowrap text-xl font-semibold dark:text-white" > DApp Demo </span > </Navbar.Brand > <Navbar.Toggle /> <Navbar.Collapse > {address ? ( <> <div > {address}</div > <div > {balance}</div > </> ) : ( <Button onClick ={handleConnectWallet} > Connect Wallet</Button > )} </Navbar.Collapse > </Navbar > <Alert color ="warning" additionalContent ={ <> <a href ={ `https: //goerli.etherscan.io /address /${COUNTER_ADDRESS }`} className ="mr-2 inline-flex items-center rounded-lg bg-yellow-700 px-3 py-1.5 text-center text-xs font-medium text-white hover:bg-yellow-800 focus:ring-4 focus:ring-yellow-300 dark:bg-yellow-800 dark:hover:bg-yellow-900" > View more </a > </> } > <div className ="flex w-full justify-between flex-row space-x-5" > <div > <span className ="font-medium" > Alert!</span > This smart contract runs on the Goerli testnet. </div > </div > </Alert > <div className ="min-w-screen min-h-full mx-auto mt-8" > <div className ="container flex flex-col justify-center items-center space-y-5" > <div className ="text-3xl font-bold" > Counter {count}</div > <Button color ="light" onClick ={handleRefresh} > Refresh Counter </Button > <Card > <Button onClick ={handleIncrement} > Increment Counter</Button > </Card > <Card > <div > <div className ="mb-2 block" > <Label htmlFor ="number" value ="Set Number" /> </div > <TextInput id ="number" type ="number" placeholder ="Enter number" value ={number} required ={true} onChange ={(e) => setNumber(parseInt(e.target.value))} /> </div > <Button type ="submit" onClick ={handleSetNumber} > Submit </Button > </Card > </div > </div > <Footer container ={true} > <Footer.Copyright href ="#" by ="OhMyApps™" year ={new Date ().getFullYear ()} /> <Footer.LinkGroup > <Footer.Link href ="#" > About</Footer.Link > <Footer.Link href ="#" > Privacy Policy</Footer.Link > <Footer.Link href ="#" > Licensing</Footer.Link > <Footer.Link href ="#" > Contact</Footer.Link > </Footer.LinkGroup > </Footer > </div> ) } export default Home
Update front end project config
Open package.json and add the following scripts
1 2 3 4 5 6 7 8 ... "scripts" : { "dev" : "next" , "build" : "next build" , "start" : "next start" , "export" : "next export" } ...
Open next.config.js and add two lines of code.
1 2 3 4 5 6 module.exports = { reactStrictMode: true , exportTrailingSlash: true , assetPrefix: './', }
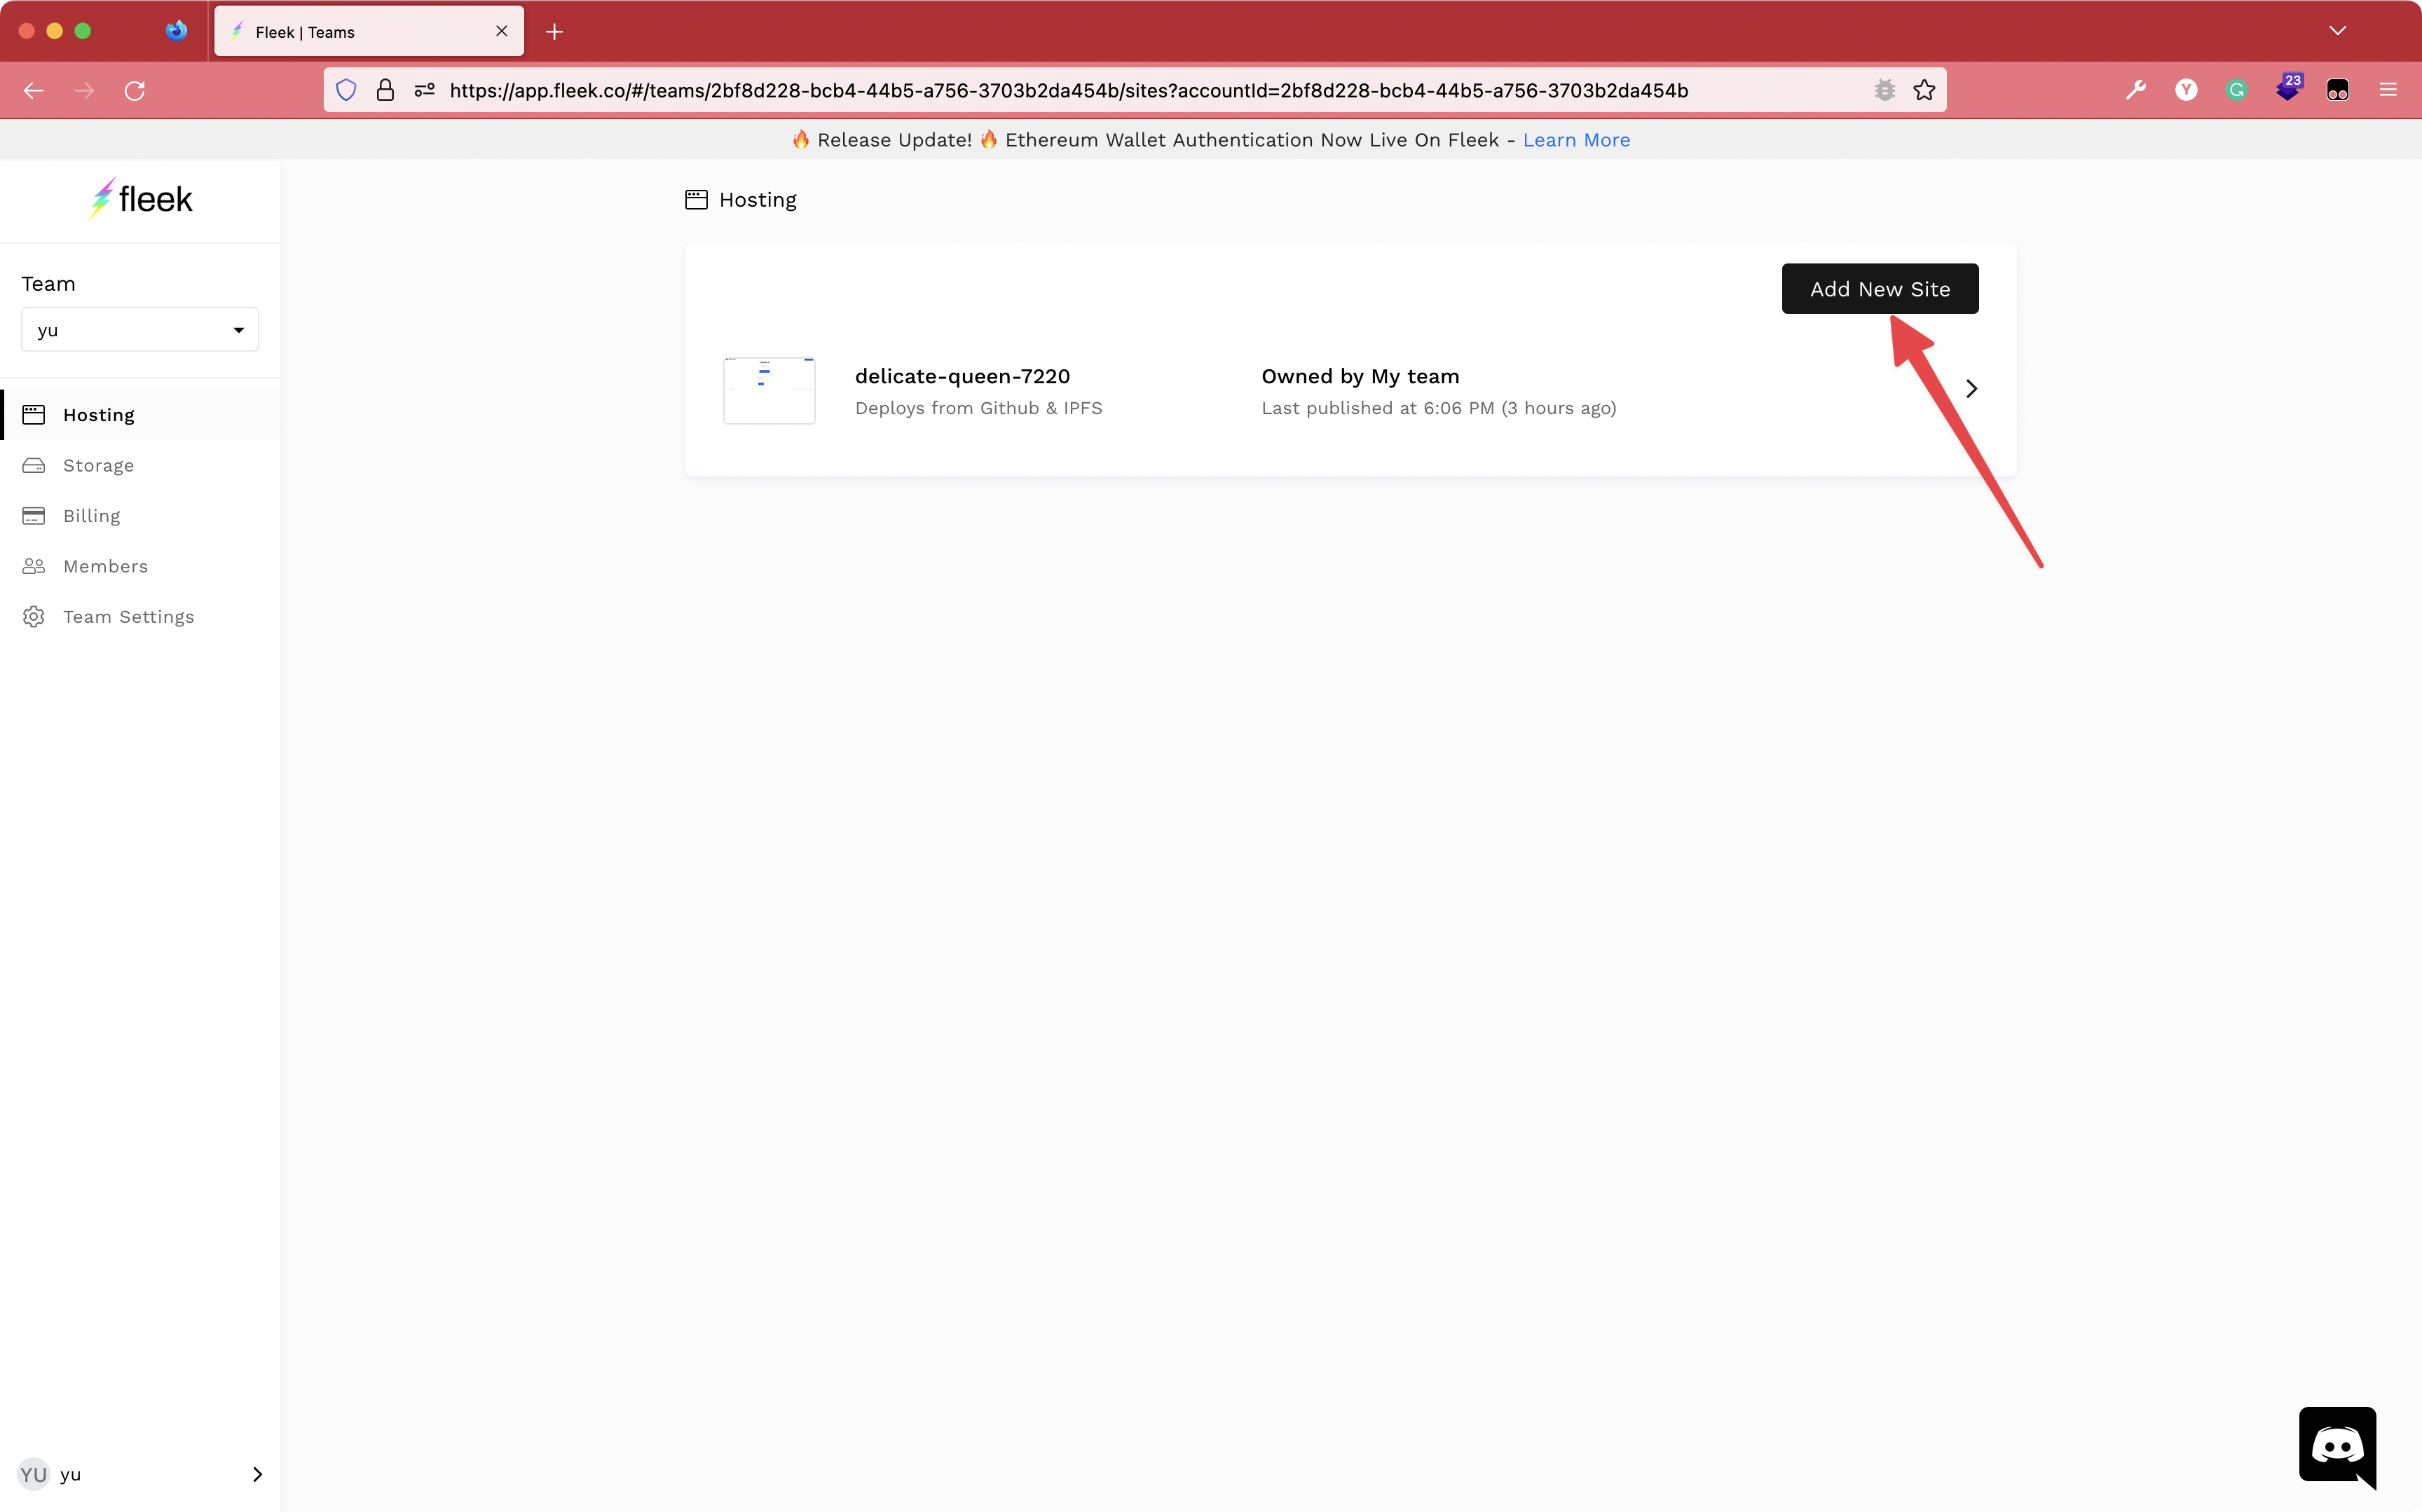
Deploys front end project to IPFS We will use the fleek to help us to deploy our front end project.
The fleek likes vercel . They are the same and easy to use. Just the fleek pushes the file to IPFS.
So First we sign up the fleek or sign in if you already have an account.
Then,
Create a new site
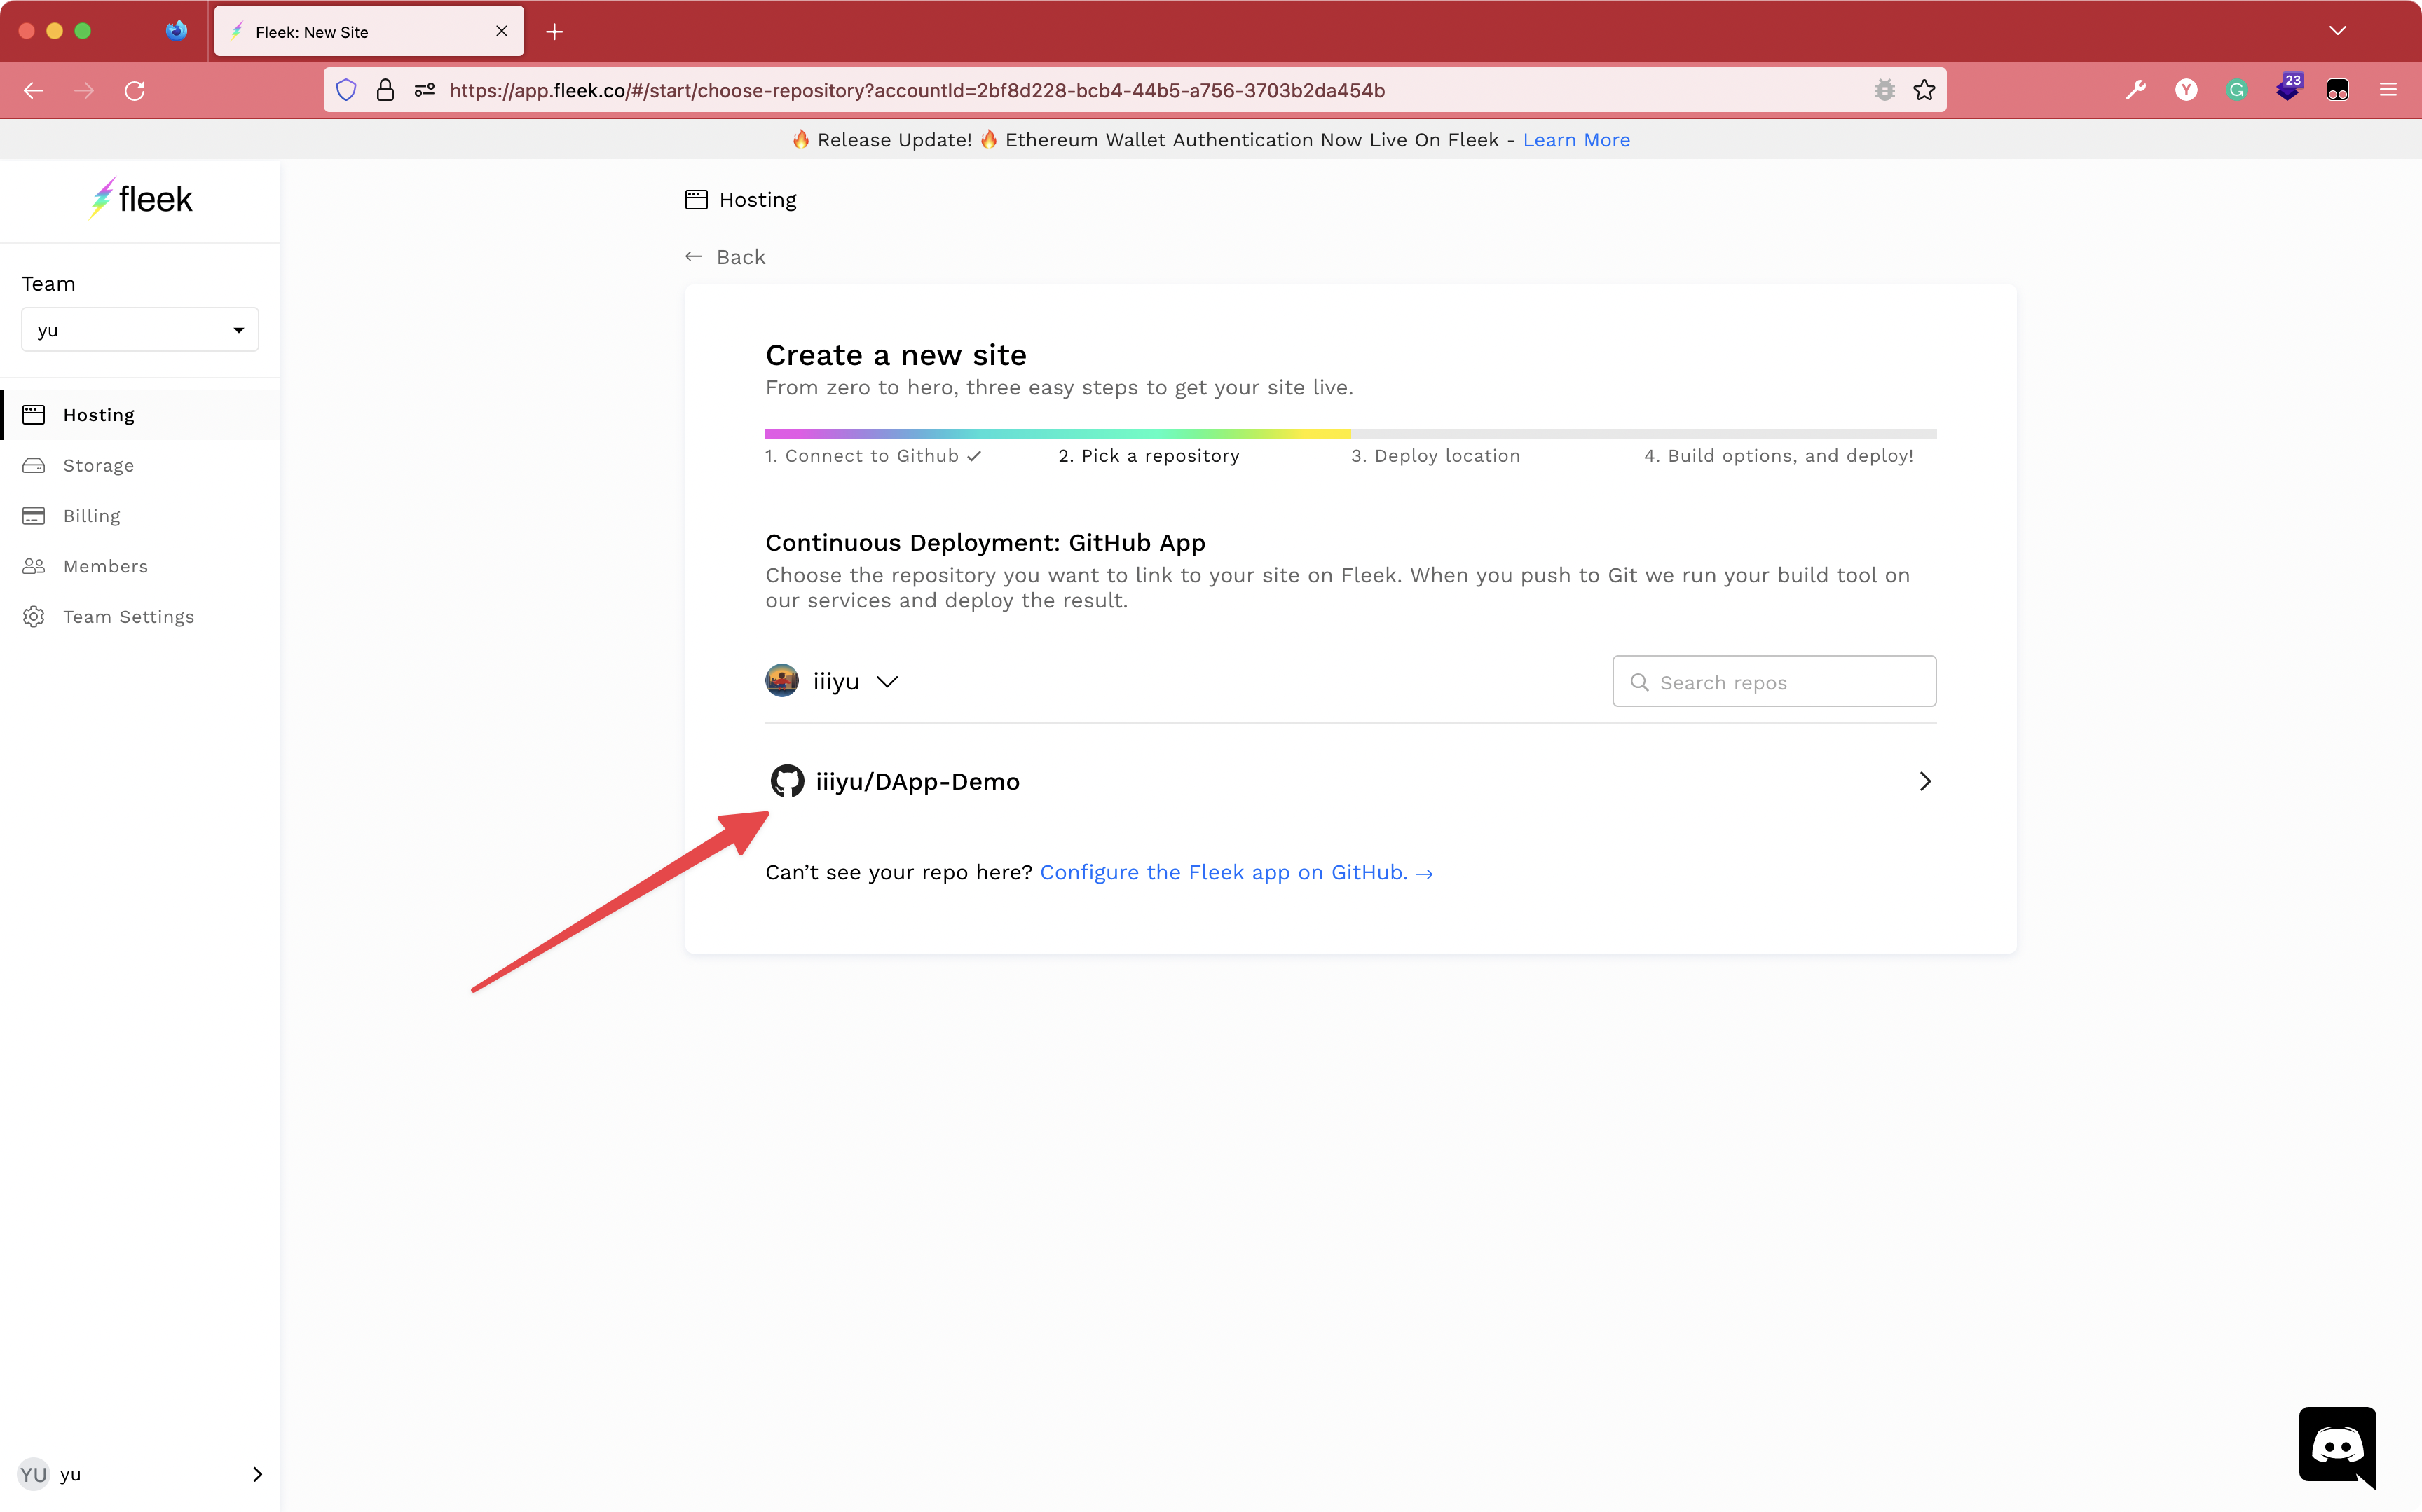
Connect to Github
Pick a repository
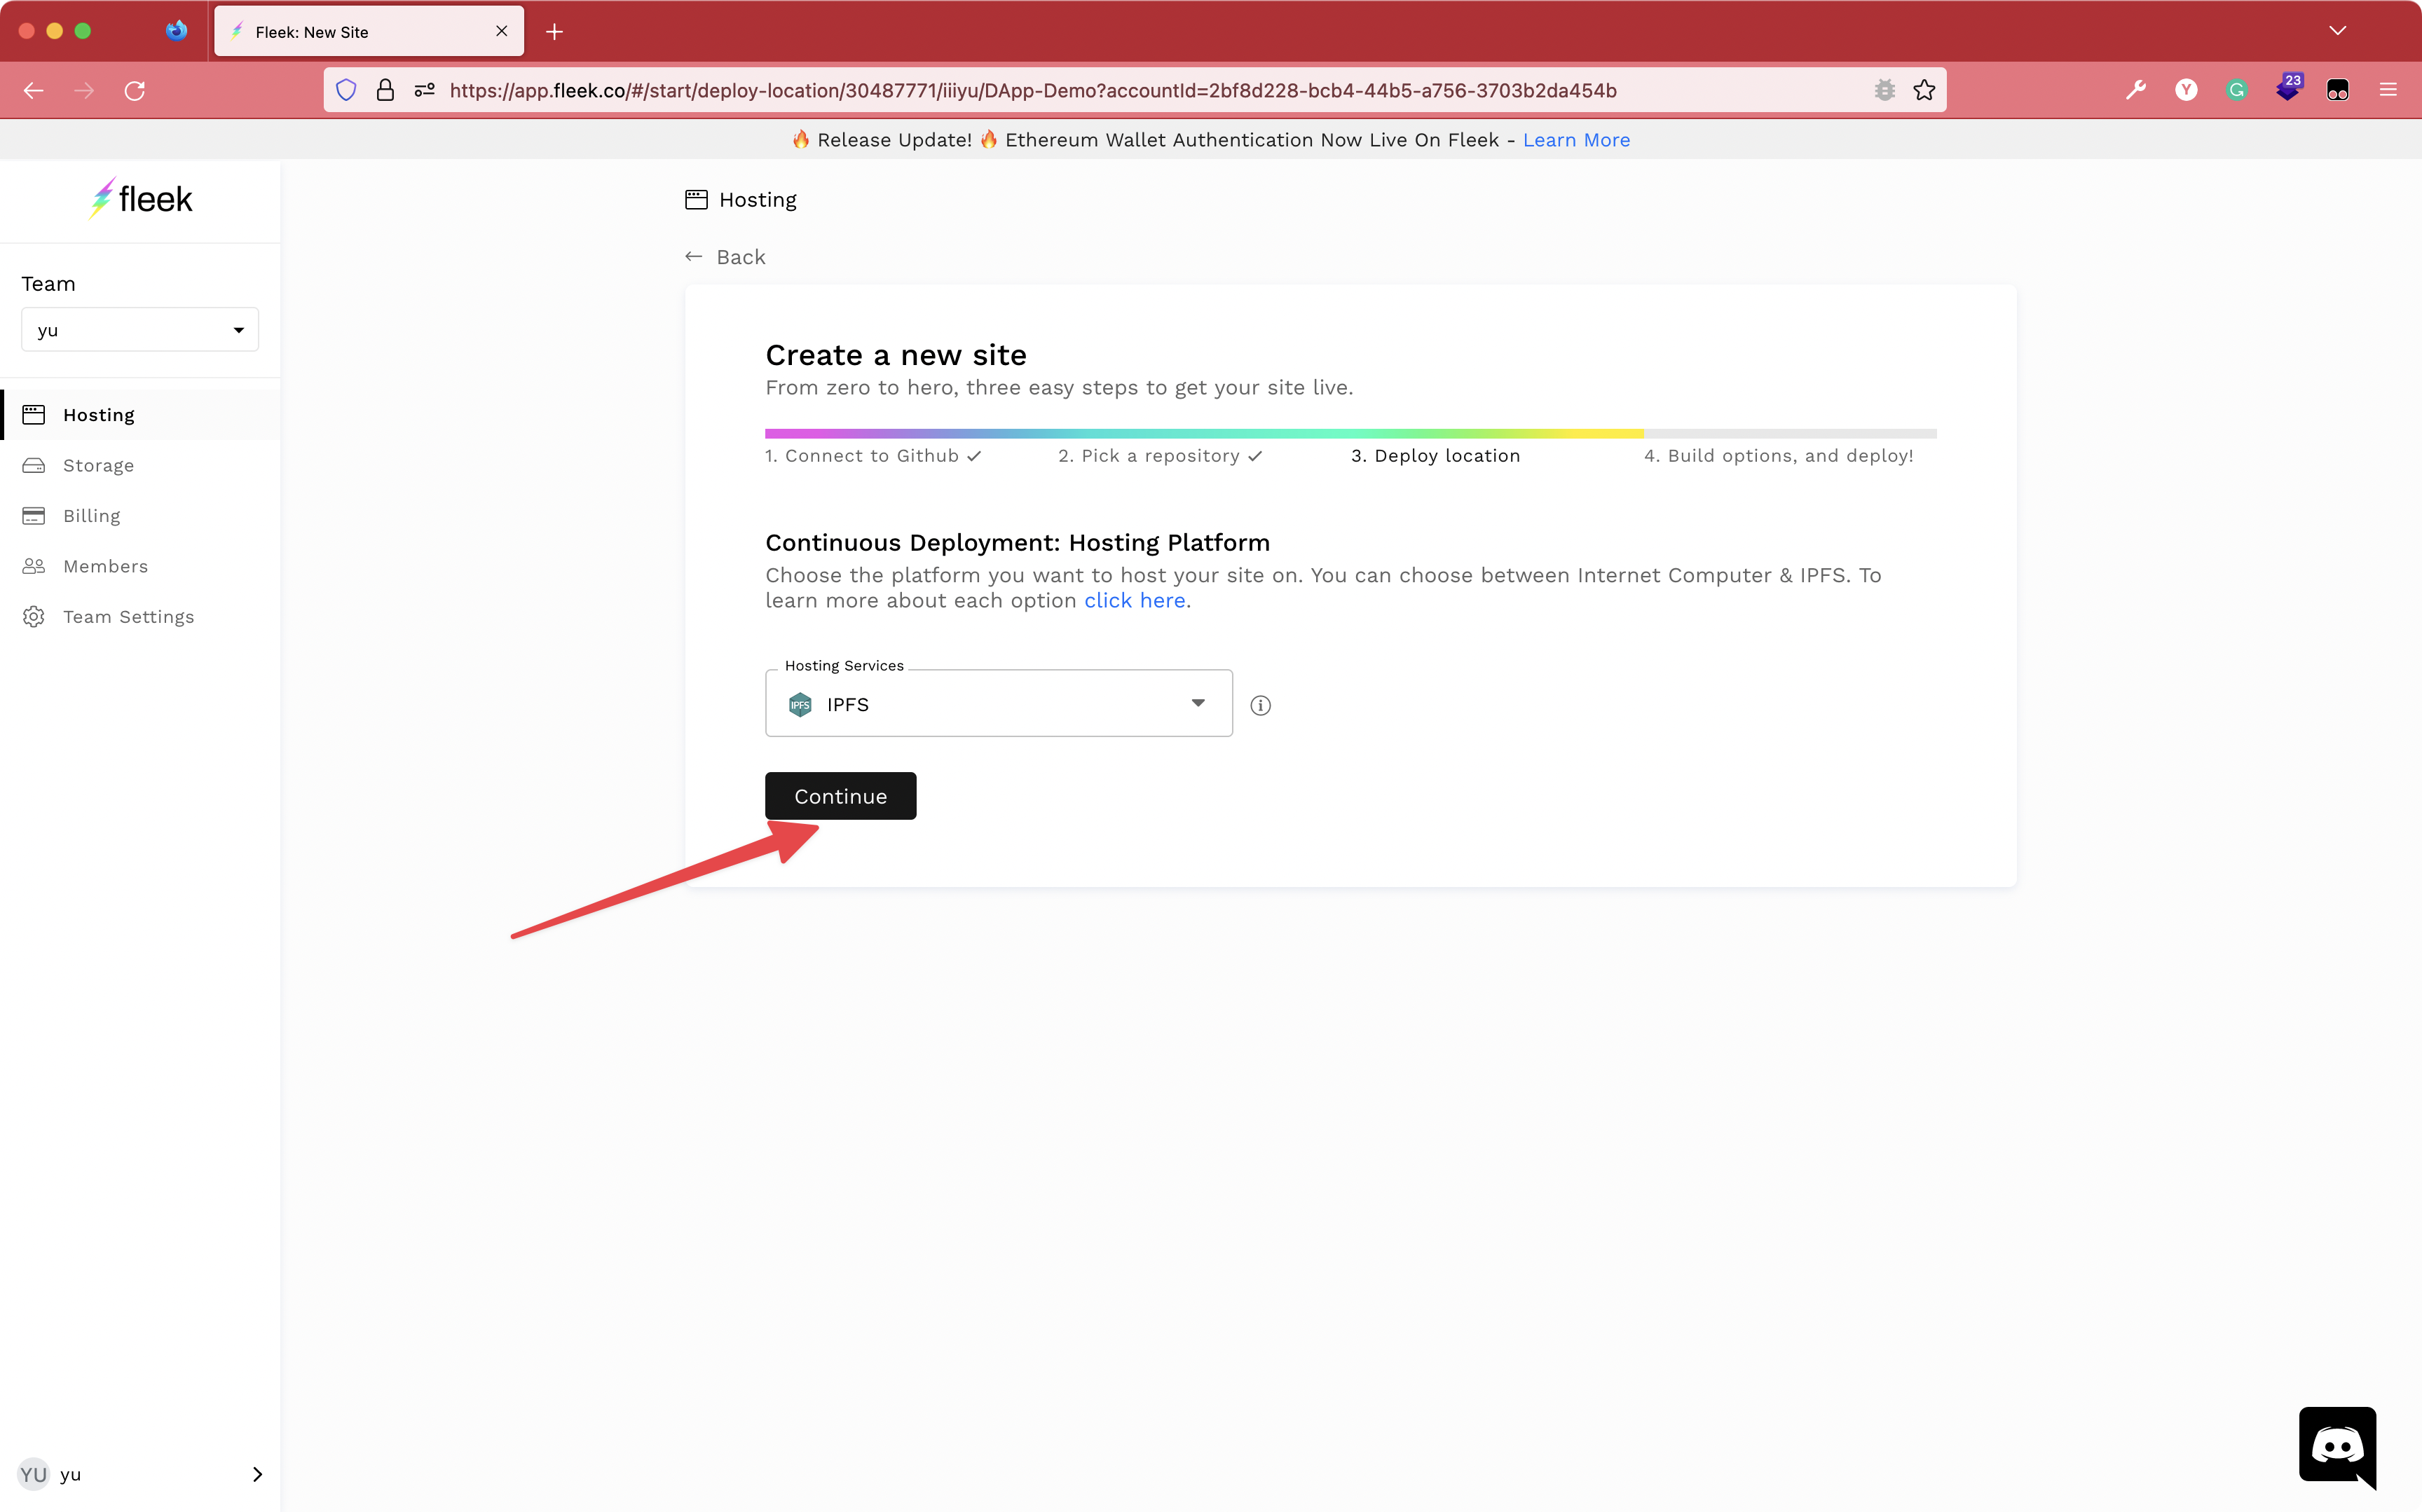
Deploy location
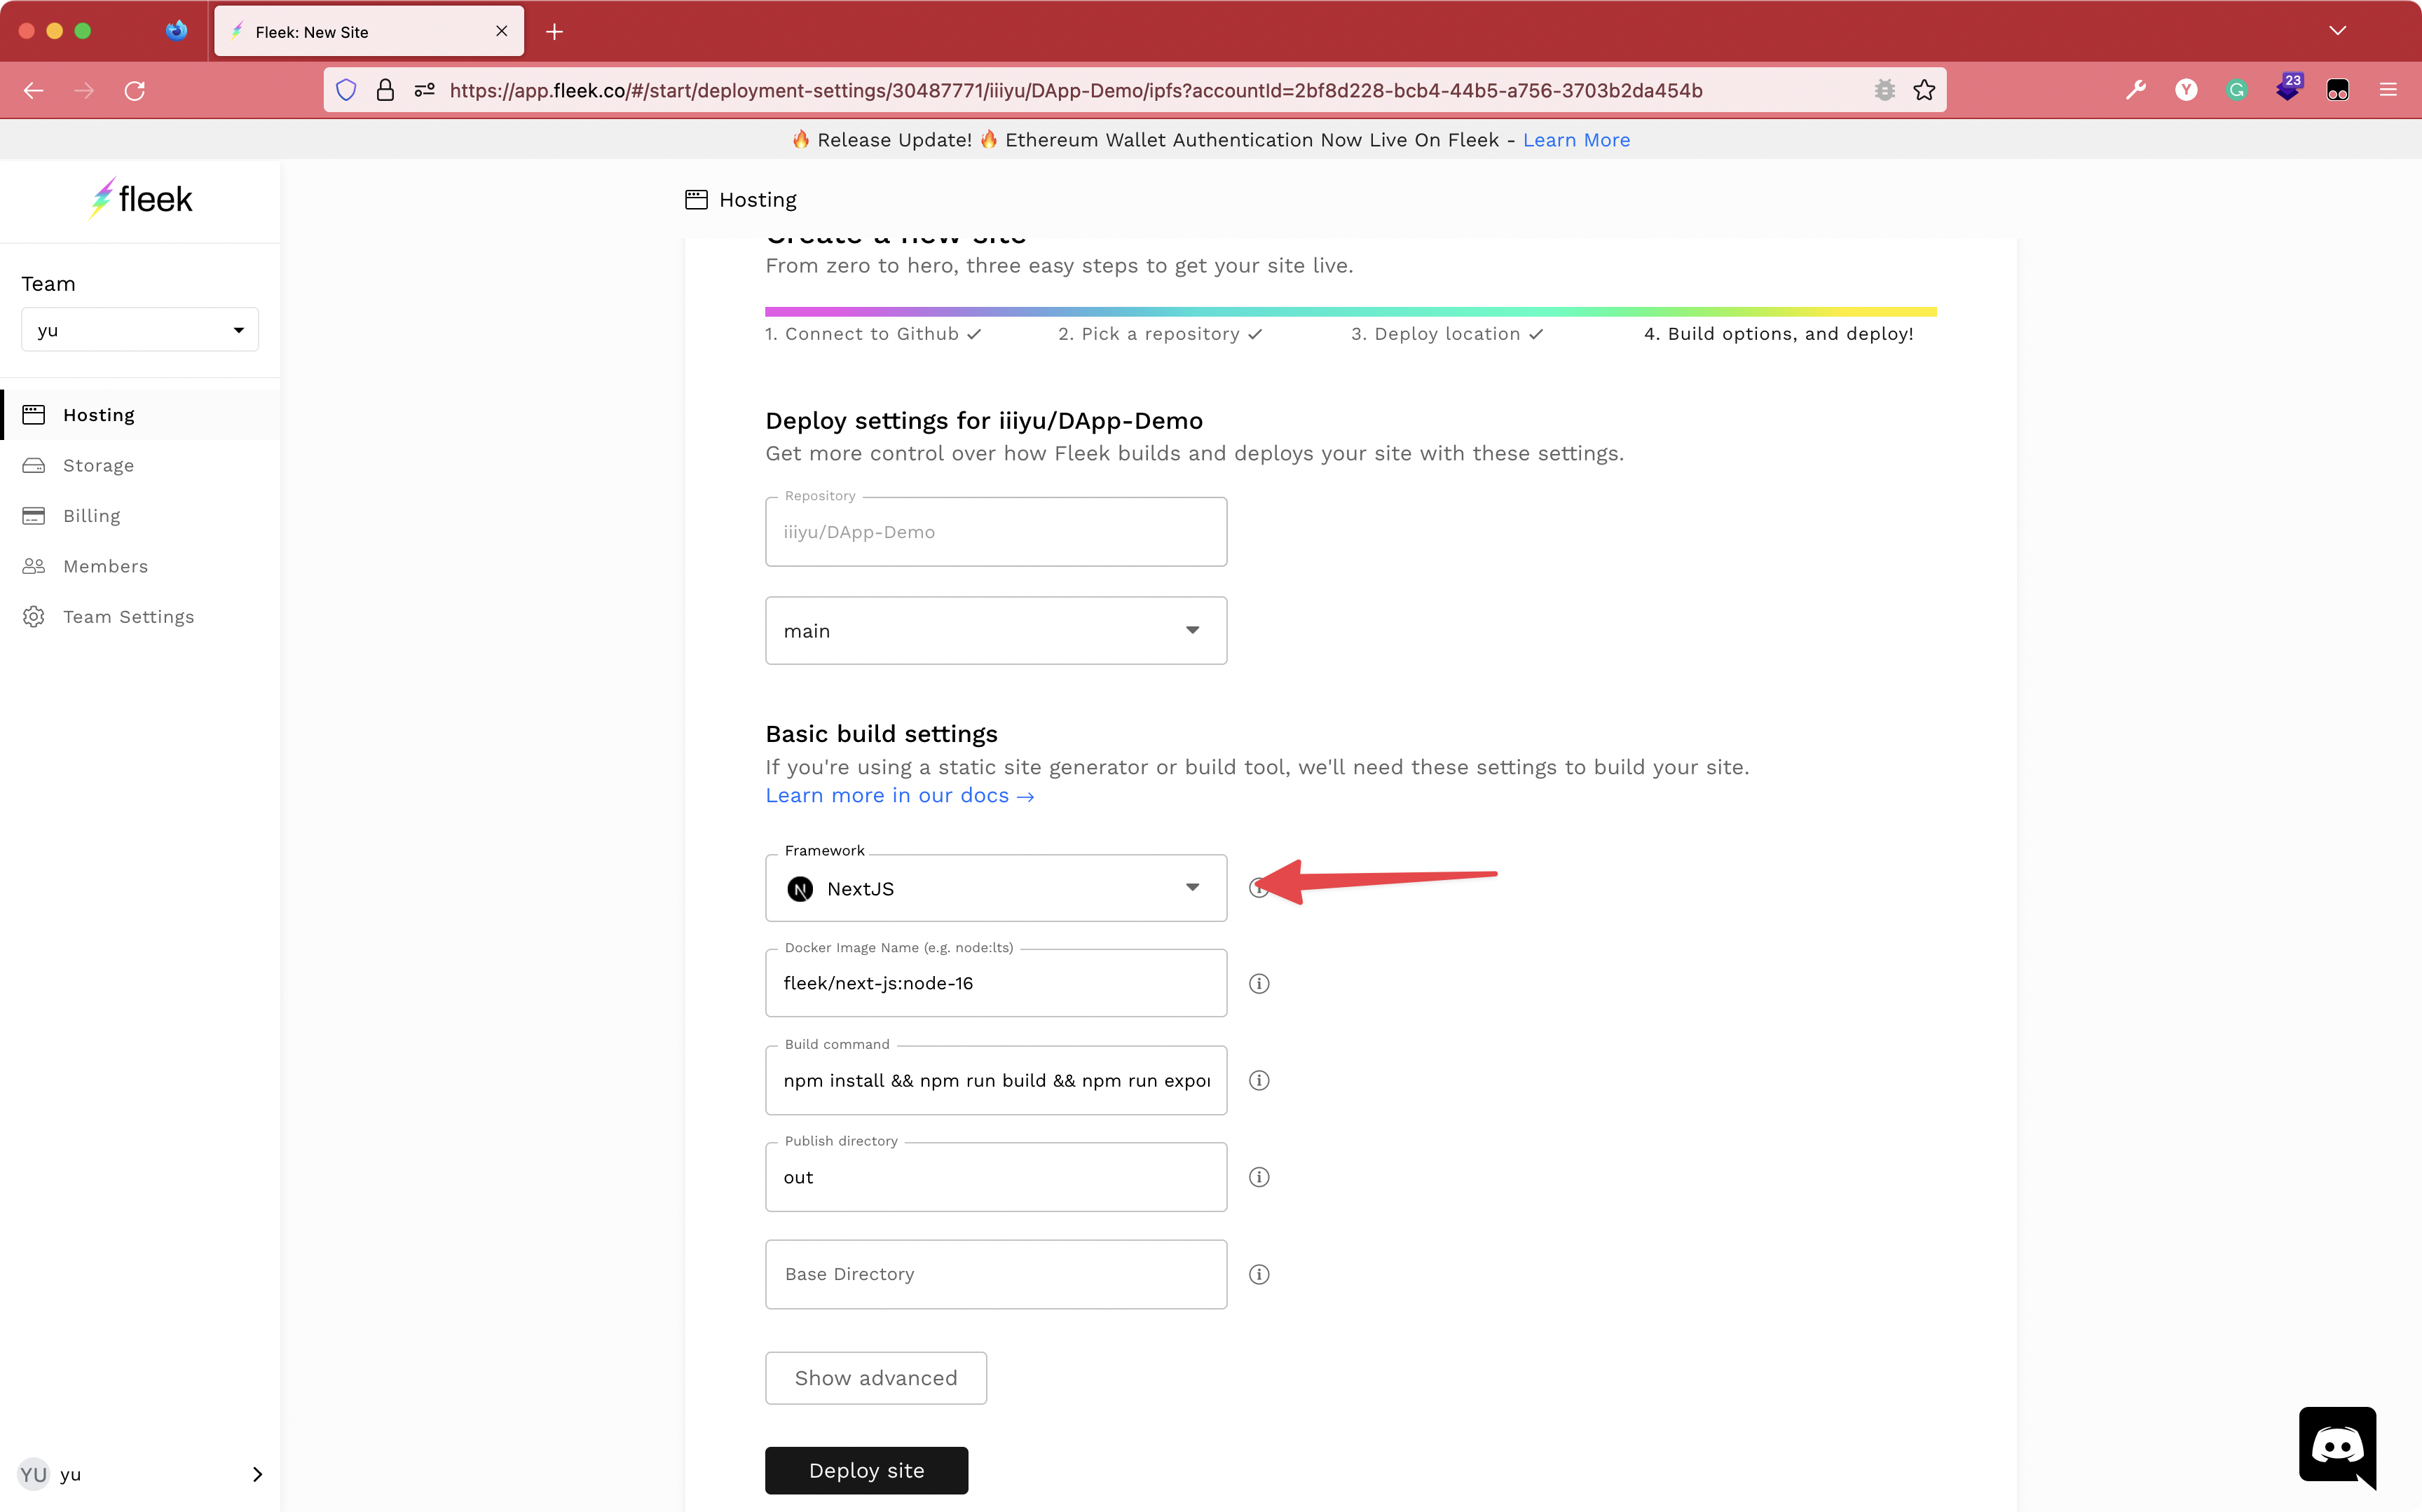
Build options, and deploy!
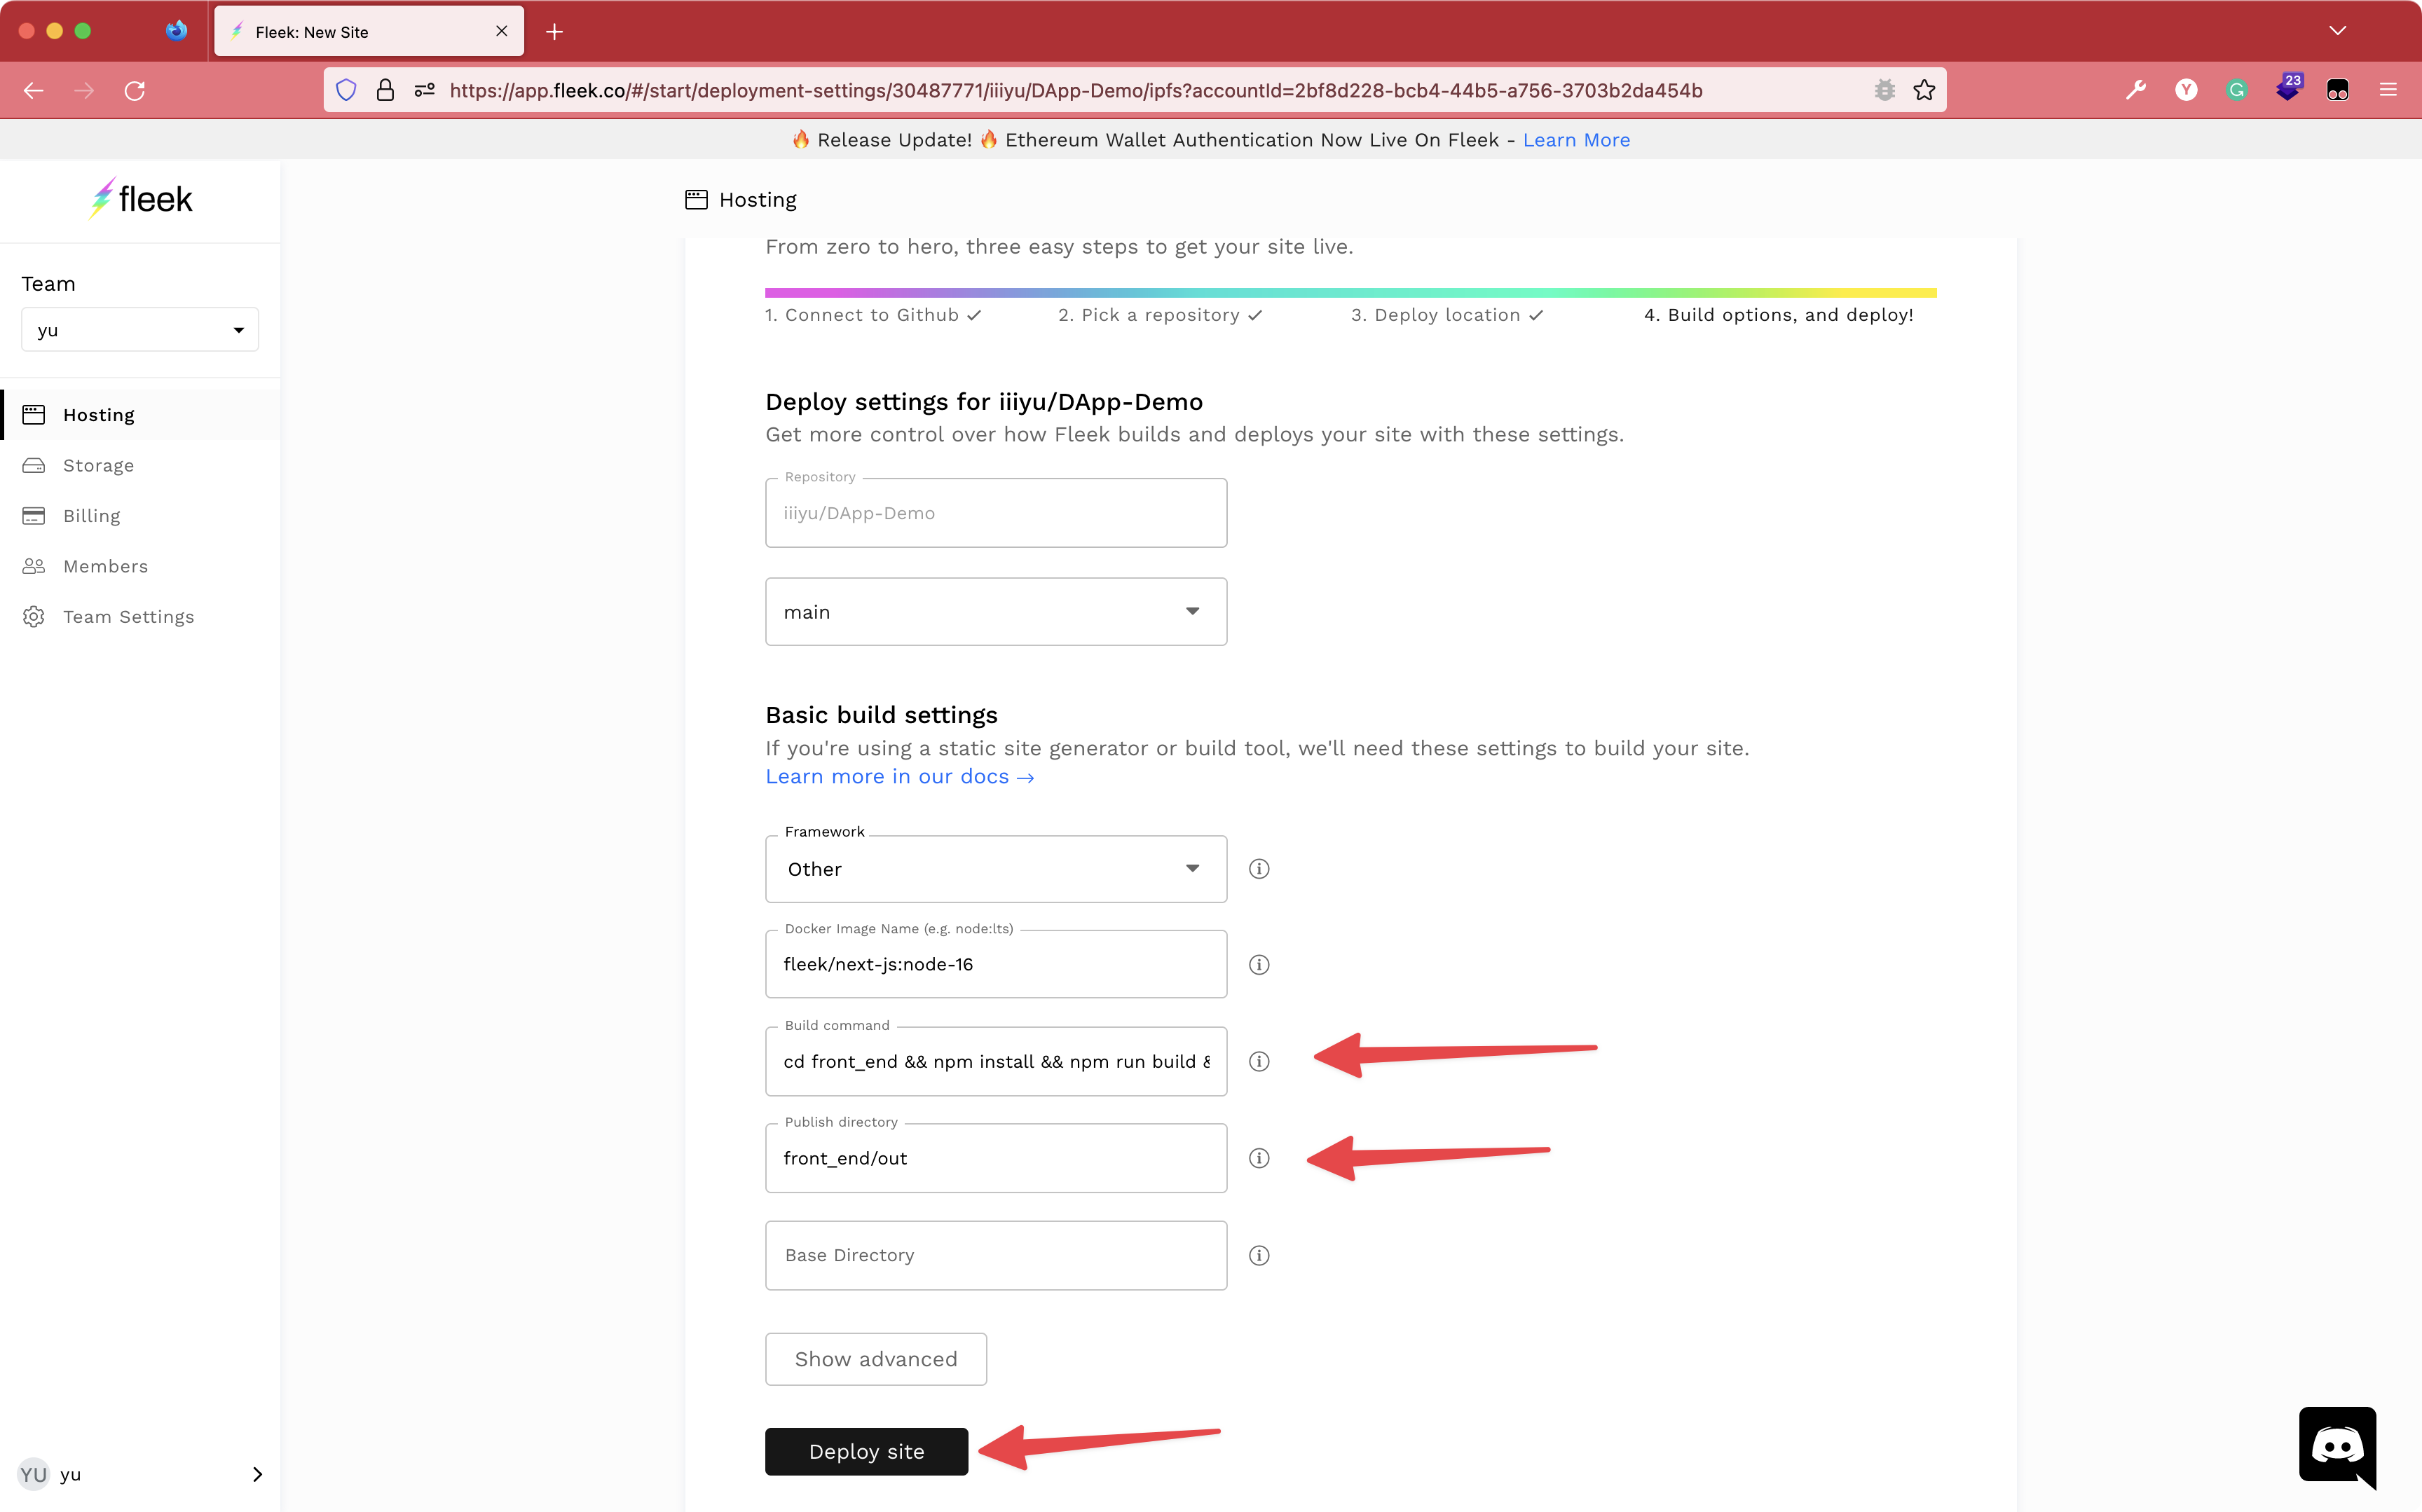
Framework selects Next.JS
Build commandnpm install && npm run build && npm run export
cd front_end && npm install && npm run build && npm run export
Publish directoryoutfront_end/out
All right. Wait a few minutes.
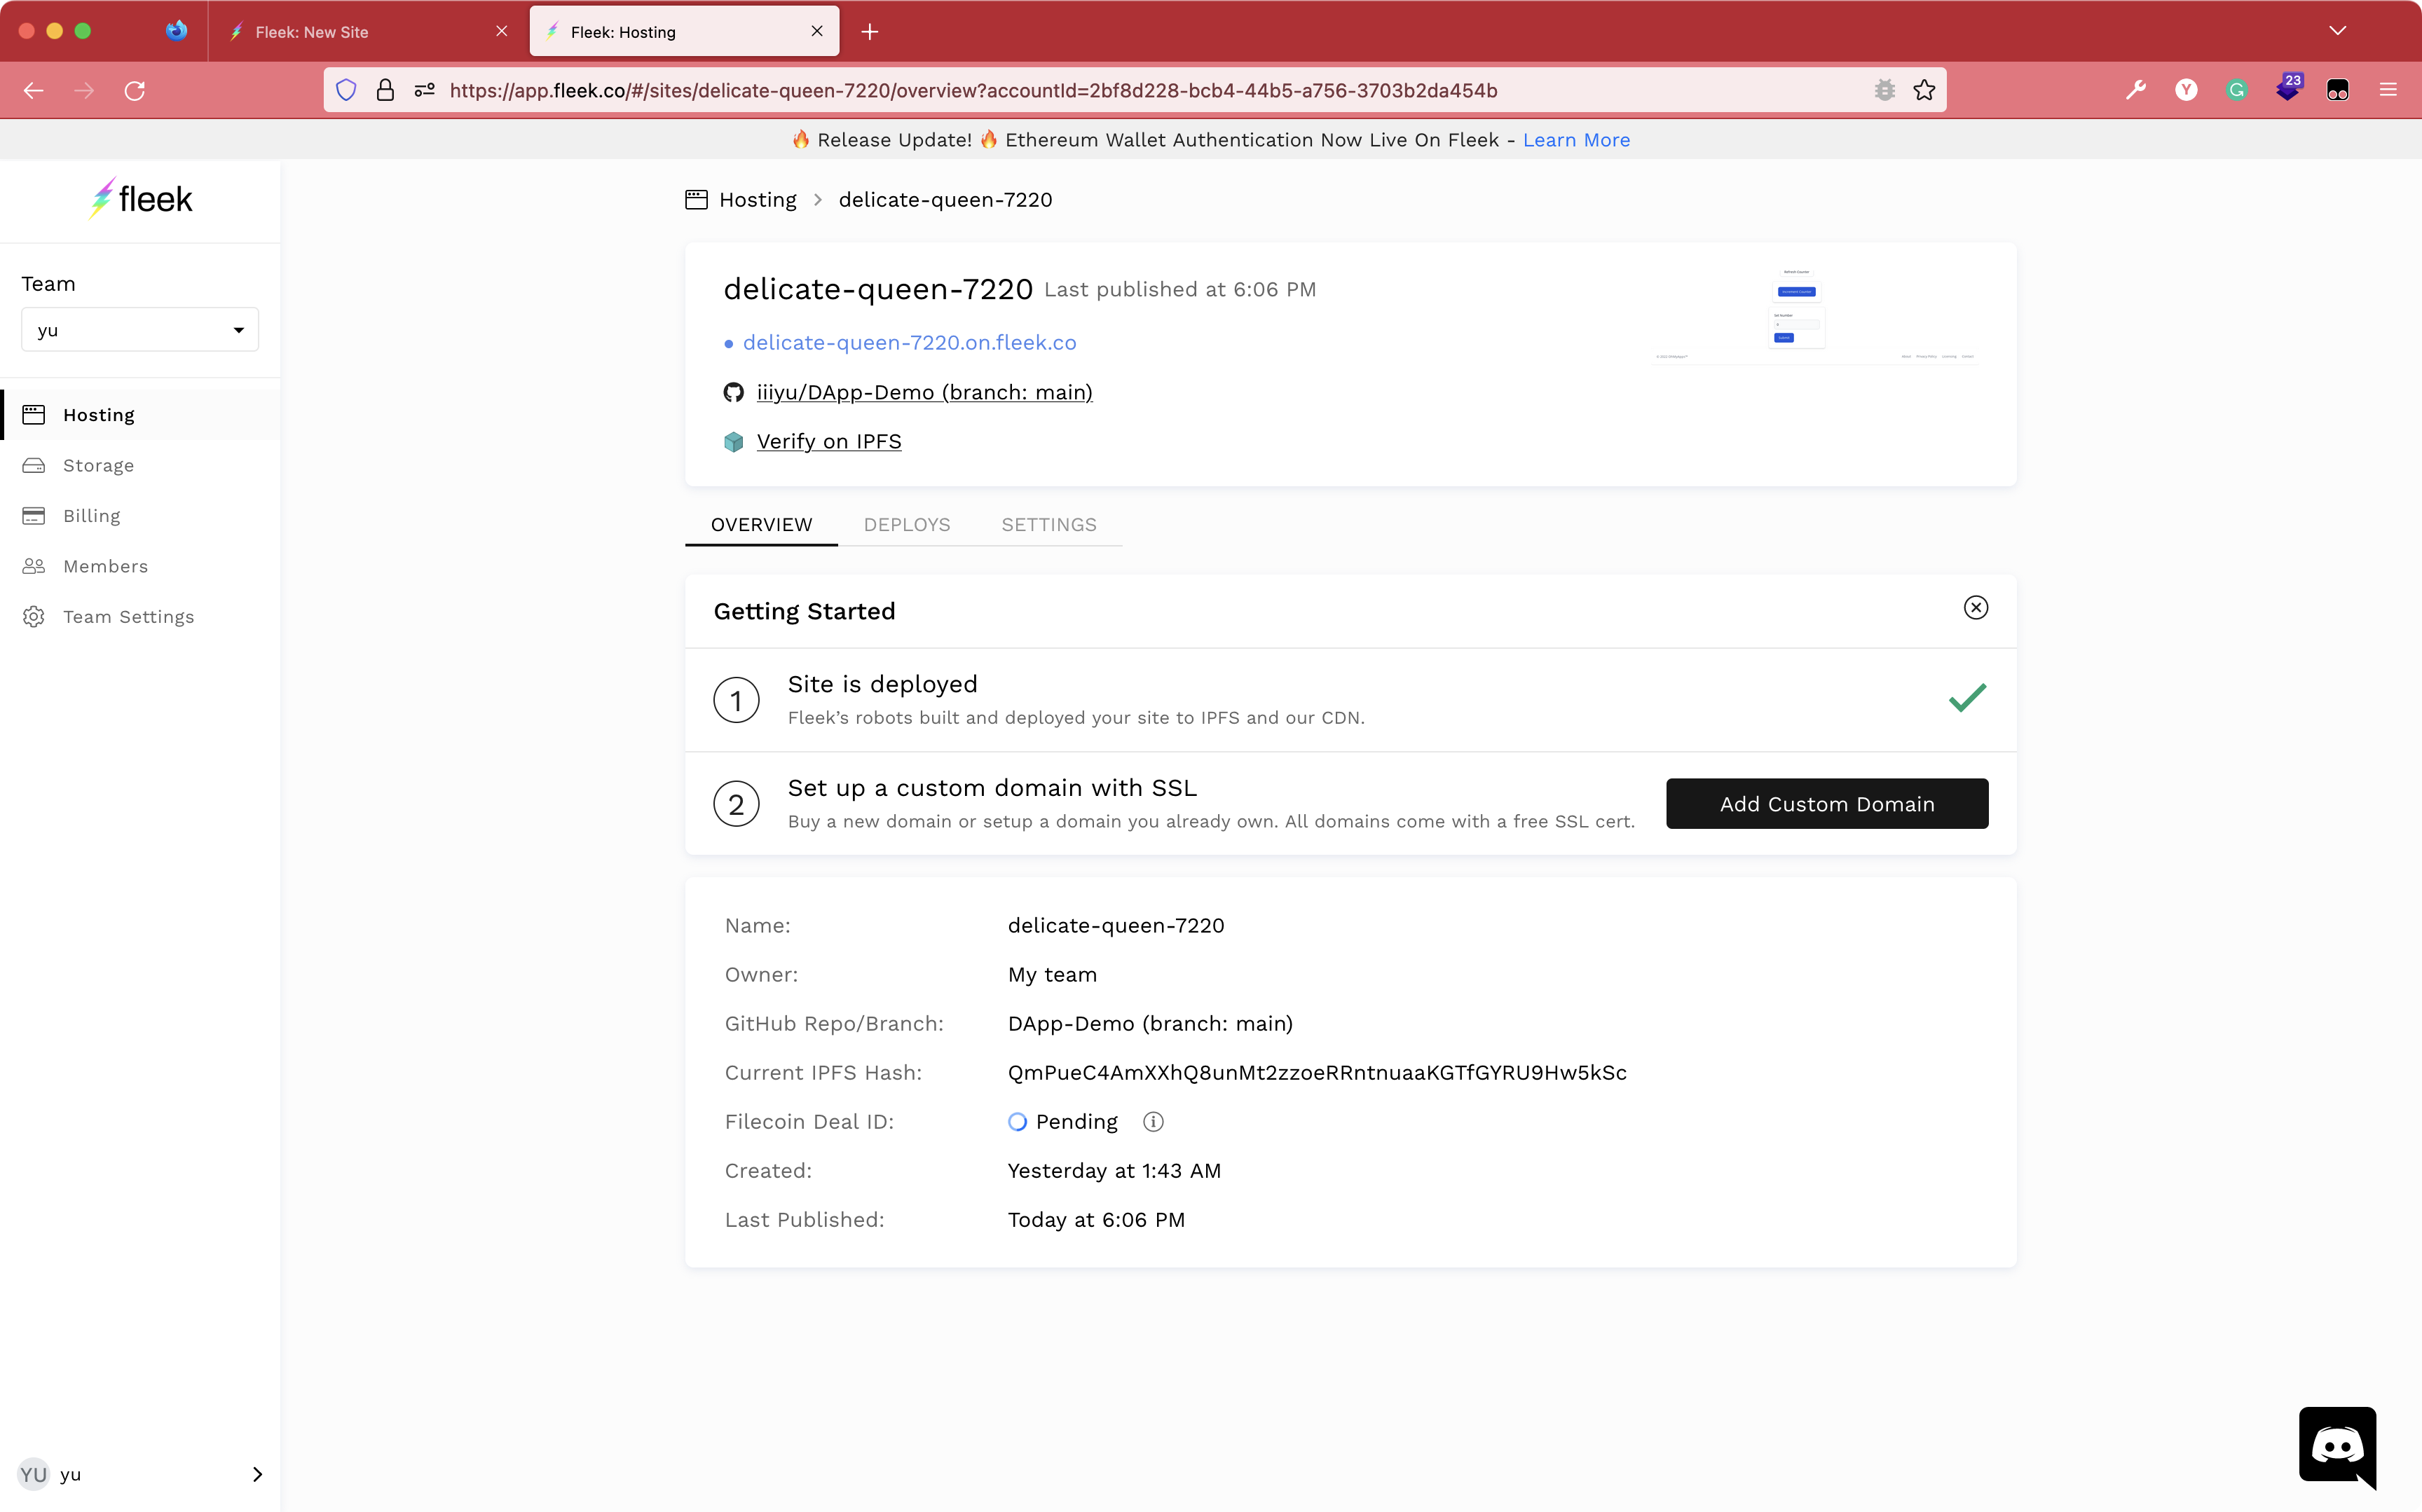
You will see like:
We can click Verify on IPFS to verify our website on IPFS.
This is url likes https://ipfs.fleek.co/ipfs/QmcNoHXxrpaxyxKhLhpUoFDzzycvx7o2fUh9mXiG83Xph4/
The QmcNoHXxrpaxyxKhLhpUoFDzzycvx7o2fUh9mXiG83Xph4 is your unique token.
We can replace the URL to https://ipfs.io/ipfs/QmcNoHXxrpaxyxKhLhpUoFDzzycvx7o2fUh9mXiG83Xph4/ for 100% verification on IPFS.
Everything looks great.
Summary So exciting, We build a real 100% decentralized application from 0 to 1.
We used all modern tech stack:
NextJS
Typescript
TailwindCSS
Solidity
Foundry
IPFS
We deploy a smart contract on Goerli test network and deploy a website on IPFS.
You can find the code on github and visit the website on custom domain or IPFS domain
P.S. This article is very subjective. If you do not feel comfortable viewing it, please close it as soon as possible.RSS .
Referrals Photo by GuerrillaBuzz Crypto PR on Unsplash
Zero-to-Hero Full-Stack DApp Development in 10 Minutes
Deploying - Foundry Book
What is the difference between a transaction and a call?
Providers & Signers
Providers
Signers
How to deploy a Next.js app onto IPFS using Fleek
Example of Next.js app deployable to IPFS